Home
Motorcycle Home
Triumph Home
Export Home
Norton Info Home
Special Parts
Updated
01/29/26
Master Switch Bracket
Updated
01/29/26
MKIII Rebuild
Updated
01/29/26
Combat 5
Updated
02/01/26
High Mileage Combat
Updated
02/18/26
Roadster 850
Updated
01/29/26
Customer Combat
Partial Rebuild July 24
Delivered 03/22/25
850 Commando
Recommission
Delivered 09/20/24
Customer Combat
Build Oct 23
Shipped 7/13/24
1975 Norton Wiring
Delivered 06/07/24
Blue 69S
Delivered 05/17/24
High Mileage 850
Delivered 03/26/24
Mk3 Engine & Gearbox
Delivered 03/07/23
1973 Customer
BasketCase Build
Delivered 07/15/22
1974 Norton 850
Commando Rebuild
Sold 01/12/21
Updated 06/10/21
Customer Combat
Delivered 09/07/20
First Place Norton 05/18/2025
1972 Norton 750
Commando Rebuild
Completed 05/15/19
First Place Norton 05/16/19
Sold 01/01/20
1972 Norton Wiring
Completed 07/19/18
1974 Norton Wiring
Completed 07/27/20
Customer Combat
and 69S Builds
Closed 10/18/23
|
 | Thursday, February 19, 2026 |
A few days before Thanksgiving 2021, a guy dropped off his Norton basket case for me to build for him. It's an early 1973 750. I'm going to document this because it's different from the other bikes I've documented in that is it is a basket case, and it will be turned into a reliable rider – not my normal rebuild.
I'll do to this one mostly as a narrative and only include pictures where needed to explain something or to show a major milestone.
The owner would like this done in time for the riding season which I'll try to do, but since I have other commitments and since I don't know the hidden problems that may or may not be difficult.
November 23, 2021 I've sorted through and organized the parts into bins in order I would need them and checked things along the way. Here's what I found:
- The lifters were duct taped to a piece of cardboard and the cardboard marked for their location. It took me over an hour to get the tape goo and surface rust off them! I think they are OK. They show some wear and I'll check once in the cylinder block – a new set is about $665 so cross your fingers!
- Cradle and Swingarm. These both need masking when powder coating – they were not masked. The swingarm I can easily resolve. Not sure what to do about the cradle. There is supposed to be NO paint/powder coat where the swingarm attaches and the metal must be very smooth there so grinding it off is not an option. As it is now, it will be impossible to get the swingarm on! Also, the engine and gearbox mount points need to be clear of powder coat – paint is OK but powder coat is too thick and over time the vibration causes the powder coat to wear away and make the mounts bolts loose. Since they are also what holds the crankcase together – that's real bad.
- The tach cable was over tightened and has mushroomed the engine end nut to the cable – I'm hoping I can fix that.
- Crank. It wasn't stored great and there is some rust and dirt. The threads on the drive side are not great – I think I can resolve that. It appears that the crank was split since the tabs on the bottom bolts were not bent over but I can't trust it, so the crank will have to come all apart.
- Cam – it's toast! It was wrapped in a blue towel that apparently got wet.
- Primary chain. This is the first one I've seen with a master link. One of the plates is missing and unless I find that, I cannot put it back together. Not sure I can get it clean enough to use – it's full of dirt and grit.
- Barrels. Here's the biggie. The barrels were powder coated. That's fine but the powder coating is flaking off. Powder coat is VERY hard to remove so at this point I have no idea what to do about that. Also, they have quite a bit of rust inside.
- Crankcases look fine – I'll do my normal beauty treatment on them.
December 25, 2021 I'll soon have time to start on the engine.
It's sitting on the workbench waiting it's turn.
December 31, 2021 Spent some time on this today.
Stripped the crankcases and inspected them. They are in good shape, just need my beatification treatment. Next is to wash them, blast them clean with glass abrasive, wash again, "peen" with glass beads, and then wash very thoroughly.
It was interesting that the main bearings were the initial incarnation of "super blend" type - not the final type and this engine was made well after the final version was out so I assume someone rebuilt the bottom end at lease once before.
The I turned my attention to the crankshaft. Checking the nuts that hold it together I realized that they were only finger tight! So, a full inspection was in order. Loosened the connecting rod nuts; they were not nearly as tight as they should have been. The rods came off easily? The journals look perfect and new shells were installed. Either the connecting rod bolts have been sanded or the holes opening in the connecting rods and caps since the bolts slip in and out easily – not good. I'll have to study that. Then I removed the nuts from the studs holding the crankshaft together and saw rust. Once apart I checked the studs in the holes – again either someone sanded the studs (I hope) or opened up the holes in the crankshaft. The bottom two and the middle two should slip in easily and the top two should be quite tight. The peg at the bottom and the two studs the top are what locate the crankshaft halves. The studs are loose in all the holes!
Furthermore, the flywheel/crankshaft cheeks were not marked to show which way they went. I marked them before taking it apart and then confirmed by the staining where they meet that they were the correct way around - lucky!

January 1, 2022I did check a new set of crankshaft studs. They are loose in the holes too so someone opened up the holes. Not sure where I'll go with this, but will ask opinions.
January 2, 2022 The jury is in – the crank is not usable as it sits – had decided that but wanted opinions from others. Did get some good ideas on how to fix it, but I don't have the equipment nor the time right now. So, I'll use one of the cranks I intended for another project and worry about this later. Likewise, the connecting rods are not good.
January 5, 2022 The saga continues. I had a complete engine except head the was filthy and had an entire fin broken off and missing. The engine was supposedly rebuilt - just dirty. So, I took it apart to get the crank and rods. The bores were perfectly done for the 0.040" pistons it had but who wants a missing top fin. Once I got it apart and inspected, the rods are great and the crank journals look can checked out great. The drive side crank shaft outside the case was rusty but OK. Then I cleaned the crap off the other end of the crank – big chunk missing. So this engine would never be able to make oil pressure – the crank is junk. I have two cranks that I know are good that I was saving for projects – one will now have to be used for this project.
January 6, 2022 Cleaned up the next crank only to find that it has a similar problem. It is not nearly as bad but not usable. Completed phase one of the crankcase beatification. They are now spotless and an even dull gray.
January 7, 2022 Cleaned up my last crank. This one I knew was good as I have a set of cases it was supposed to go in. I got busy and pushed that project to the background. Got that crank and it rods out cleaned it all up and put it back together. It already had a new set of studs that were just finger tight so they can be used. The rods need a set of shells but I should have those in stock. Also finished step two on the crankcases, They have been thoroughly washed.
January 8, 2022 Finally, real progress. The crankshaft is ready to go in the cases. The drive-side case just needs it's final cleaning and the bearing installed. The timing-side case is ready:
- The final cleanup is complete and all threads are checked
- The camshaft bushing is replaced with the shoulder type.
- The main bearing is installed
- All studs are installed.
I was
hoping that the engine mentioned Jan 5th would provide a camshaft for this engine. Three of the lobes are perfect, the 4th was damaged by rust. Looks like only the rods and possibly the oil pump will be of value from that engine. The other parts were either missing or bad :-(.
January 9, 2022 Yesterday, I mentioned that the timing side camshaft bushing was replaced. That was actually hopeful thinking. Once in a while when you replace them, everything goes together great – but not usually. So, today tried to do a trial fit of the new camshaft with no crankshaft to see if the cam was aligned. First problem, the bushing was undersized so the camshaft would not go in. You would think the thing to do is to ream it to size – bad idea. They are usually out of line about one degree so if you ream without that in mind, the cam still won't turn. Of course if you have a machine shop with a vertical milling machine you could tram in on the drive side bushing and then line ream the timing side. I don't so I have to improvise. Using a rod almost the proper diameter, I tightly wrap 400 grit paper around it and being careful to keep the hole round I get it where I can just get the camshaft through the timing side bushing. Then you can bring the cases together and give a
cheer if the cam slips into the drive side bushing – never does. Then you must make sure the cases are parallel by measuring in several places and look to see which way the drive end of the camshaft must go to properly enter the bushing. In my case today that was down and back. Then hours of sand a, little test, repeat. I got it there and came in for dinner – can't finish today – arthritis in my thumbs hurts too bad.
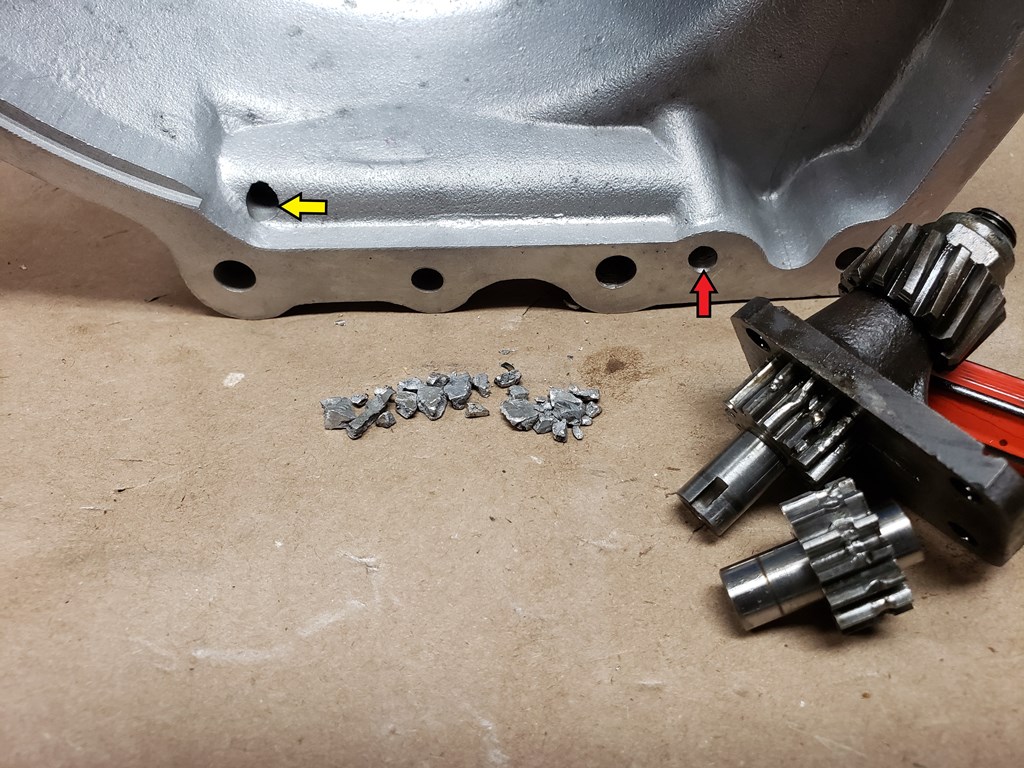
While doing that I was noticing some chunks of aluminum. I noticed a couple yesterday but didn't think much about it. That case has been thoroughly washed three times, water sent through all passages, air blown through all passages, and wire pushed through al passages. Imagine my surprise when I saw a chunk fall from the hole with the yellow arrow. On investigation, the channel between the two arrows contained the chunks you see in the picture and more. On top of that, those chunks were making it to the return side of the oil pump – see the damaged gears. Basically the engine had no right to survive! I suppose the oil filter saved it. Of course, now I need an oil pump. The hole with the red arrow goes directly to the return side of the pump and the one with the yellow arrow connects to the passage for the return to the pump.
January 10, 2020 I was pretty happy with the timing side camshaft bushing yesterday but not completely with the camshaft turning. Today I got out the micrometer and telescoping gages and did some measuring. The bushing was very round – better than I expected and at .8745" - .8750 is spec. Also, the alignment problem was gone in that the camshaft easily entered the drive side bushing.
Then I tried the drive side and was surprised. Apparently someone changed it without sizing. There was a mushroom on the edge that measured .8740 (the camshaft journal is .8735") so there was only .0005" running clearance and then when the camshaft was all the way home it would barely turn even though deeper inside it was .0870. The drive side is much harder to get to so I used a deburring tool and then 400-grit paper and a finger to remove just the mushroom. Then I used the old camshaft with fine valve grinding paste to lap the drive-side bushing. That brought it to size and absolutely in-line with the timing side. If I didn't have the timing side ready to install I would lap it as well, but it is close enough to spec especially considering the new bushing and new camshaft.
I took great care to keep the timing side case clean throughout, but have to re-clean the drive side – fingerprints.
January 11, 2022 The crankcases are clean and together and I've started on the timing side.
January 12, 2022 The camshaft sprocket, intermediate gear and crankshaft pinion are on and the camshaft is timed. Took apart two oil pumps I had and made one good one but it and the cam chain tensioner couldn't installed as I didn't the right nuts and the cam chain tensioner thick plate was bad. Actually, might have them but couldn't find them in the parts that came with the bike. I probably have new ones.
January 13, 2022 The timing side is done except for the cover. The cover is in fairly good shape, just needs cleaning, beatification and the seals replaced. There is one spot where a gorilla hammered on it near the pressure relief valve that I'll have to smooth out, but it won't be hard. The gearbox and inner cover have been stripped so they can be cleaned up and beautified. The gearbox components mostly look good except the kickstart shaft - I'll have to look more at that.
Jan 14, 2022 Gearbox – a new study in weird. My step son was here today so I put him on beautifying the gearbox and inner cover. That went well – first time he's done one from start to finish. Here's the weird.
- The gearbox was put together with grease
- The layshaft still had a ball bearing, but it is not original and is bad. They must always be changed to a roller bearing.
- The gears, main- and layshaft look new as do most components.
- The kick starter shaft and pawl look good but some gorilla hammered on the end of the shaft and the splines are not ery good. They cost about $160 and there are no new ones available so I'll try to use it.
- The two mainshaft bearings have seen better days.
- The outer cover is so banged up that I can't do much with it, but the mechanism is fine.
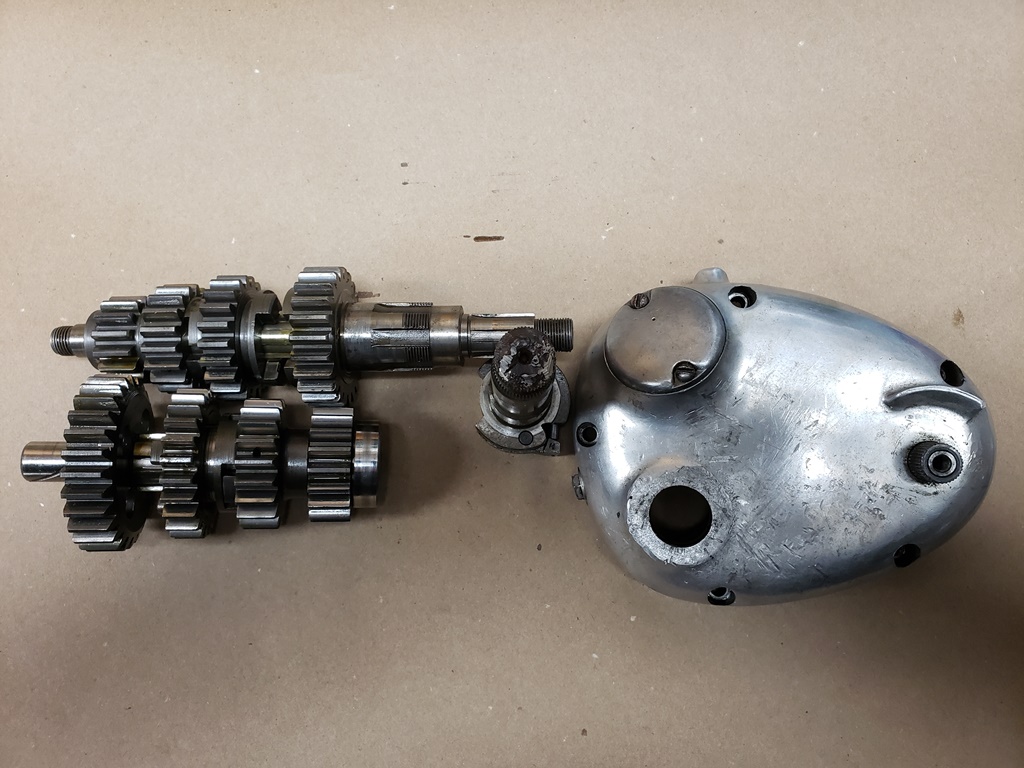
January 15, 2022 Had very little time today but did get the ball bearing off the layshaft, the internals cleaned, the quadrants back in and timed and the bearings in.
January 19,2022 The screaming you probably hear about an hour ago was me! I made the same mistake I've made several times before. At least I finally figured out why I make it.
When assembling a gearbox, you end up putting the inner cover on and taking it off multiple times. Partly to shim the layshaft, and partly for whatever else doesn't go right.
This time, the fit of the mainshaft was too tight in the inner cover mainshaft bearing. So, a lot of time carefully dressing the mating surface was required. Once that was done and the cover would go on, it was time to check for the needed shims. Turned out that 0.030" was good and I even had one that thick. So put it together with that shim, installed a couple of nuts and checked that is shifted properly to all gears – perfect.
Ok now take the cover off, make sure everything is clean, forget to put the "knuckle pin roller", put the cover on and torque everything to spec. Then put on the outer cover to make sure it shifts properly with the gearshift lever – SCREAM!!!!! That damned "knuckle pin roller" must he put in place before the inner cover it installed. Of course, 15 seconds of machining in the factory when machining the cover could easily have resolved that! It's not hard to fix, just undo it all, pull the cover, stick it in, and as my wife your to say: "lick your calf over".
Taking the cover on a off with the "knuckle pin roller" in place is a PITA as it gets caught so you leave it out, hopefully to the last time. Well, it ends up being the last time even if you make the mistake since you have to take it apart one last time.
January 20, 2022 The gearbox is done and tested except that I can't find the outer cover screws. I guess I'll use new socket head screws – I have a set. The gear change mechanism in the outer cover had some rust but it cleaned up OK. I didn't use the cover that came with the bike – showed a picture of it earlier. The one I used was a long way from perfect and it is not show polished, but I did make it look plenty good enough for what this bike will be.
January 25, 2022 Click here for a general update.
February 1, 2022 Spent some time on the cradle today. It was powder coated with no masking. If I could recover it at all it would probably take eight hours. I have some others but each has at least one issue. I found one on eBay that seems good for a reasonable price and ordered it. Hopefully it will be easy to clean, paint, and use. I'm almost to a point to get a table free for this bike and once I do, I want to be able to move faster. The cradle, swingarm, and center stand must all be made to work together before the engine and gearbox go in. The swingarm was not masked either but it's much less work to resolved that.
February 4, 2022 I'm shocked. The cradle arrived today. It was $45 delivered - a real bargain - especially since other than the paint, it is perfect - it's doesn't even have the normal center stand gouges. It's and early one that doesn't have the oil filter mounting holes but that's an easy fix - I have a template I made to drill those two holes. Someone rattle can painted over the original paint so it will blast off easily.
February 12, 2022 Here's some good news. On a whim, I tried sand blasting the barrels. I was told that they were powder coated – they are not! The paint is tough where it adhered to the metal but it will come off - looks like it will take about four hours. Also, the cradle is ready – it has been drilled for the oil filter and it has been painted.
February 16, 2022 I'm having a LOT of trouble breathing and using I'm O2 a lot so I haven't gotten much done. I did install the rear isolastic in the cradle today and can now put the gearbox and bottom end in the cradle. I should have a little help on Friday so maybe I can get that done. I have to have someone carry the bottom end across the shop for me as right now I don't have enough "wind" to do that.
February 19, 2022 I've not been able to breathe properly for about a week so not much has been happening. My stepson came to see me yesterday and I had him move some things around for me. He also spent quite a bit of time blasting the barrels. They're still not done but getting there. Today I could breathe so I got to work. The power unit is together and the rear isolastic is installed as is a cNw reed valve breather.
Once I get the barrels fully blasted and painted I can finish putting the engine together and it can go in the frame. I also spent some time on the timing cover today. There are deep scratches that I can't get out but I will make it presentable. If costs weren't mounting on this so much I would recommend a new MKIII timing cover which adds and anti-sump valve but that's almost $300.
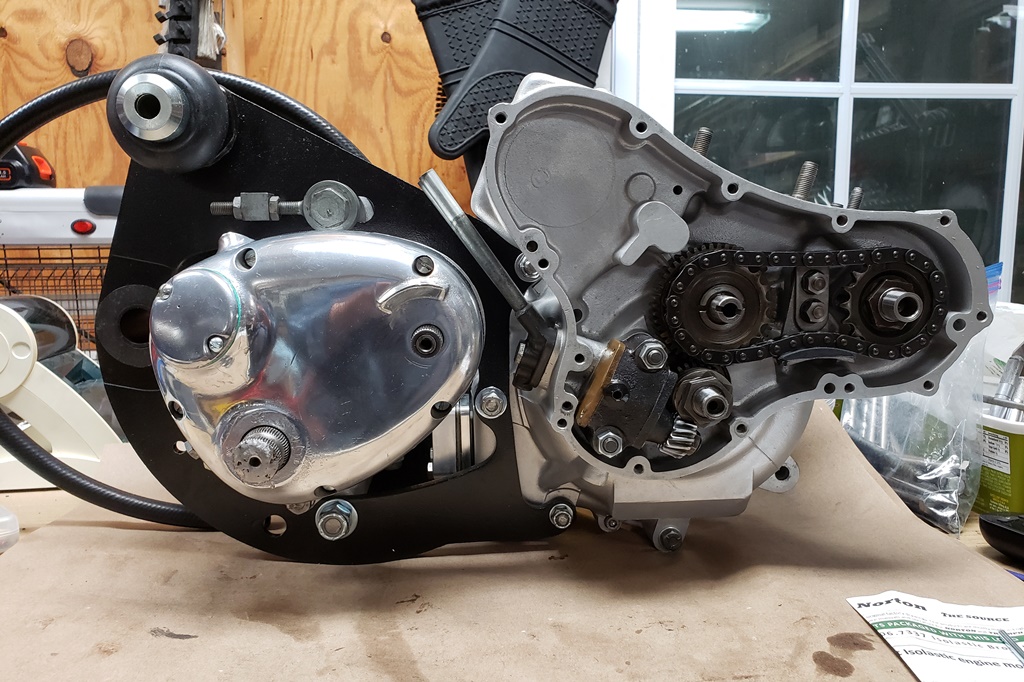
February 22, 2022 Still blasting the barrels - about 2/3 done now - so annoying!
February 25, 2022 Finished restoring and installing the timing cover. Some gorilla use red Loctite on the pressure relief valve. Took forever to get it apart. It did not have any shims and the piston was stuck. Once I cleaned it all up the piston worked properly in the bore so I put it together with two shims and new copper washers and installed.
February 26, 2022 The barrels have been blasted clean and thoroughly washed so now they are flash rusted. I'll give them a once over in the blast cabinet to get the rust off, followed by a lot of blowing to get the blast media off, and then I'll mask before painting. When painting all coats must be done in one hour or you have to wait a week - can't wait since they will rust if not painted so I need an hour uninterrupted on a low humidity day once they are masked to paint them.
February 27, 2022 The barrels are painted. Will wait a few days of the paint to get hard. Need to see what came with the bike for pistons and rings - the bores look fresh but I haven't seen new pistons.
February 28, 2022 The barrels are cleaned and the lifters are installed. Finally found the piston set.
March 2, 2022 Re-honed the cylinders as they had a little surface rust. The bore job looks very good and it only took seconds to get the rust out and a nice cross hatch in. Checked the rings. The two compression rings in each cylinder only had 0.005" gap so I had to gap them. 0.010" for the top ring and 0.008" for the middle. With that all done and the rings installed I was going to install the cylinders when I realized that the piston set only had two circlips. Looked through everything that came with the bike - didn't find the other two. Then I realized that I have the correct ones in stock, but by then I was too tired to proceed. The cylinders are two heavy to do by myself the old way so I hang them from my engine hoist - should be able to do it tomorrow. I hope I can find a set of cylinder base nuts as I'm out of new.
March 4, 2022
The barrels are installed. I love the sound of new pistons/rings going up and down in freshly bored and honed cylinders. In a recent buyout of a collection, there was a set of new-looking stainless cylinder base nuts so I used them. There may be a set of head bolts as well - have to check that out.
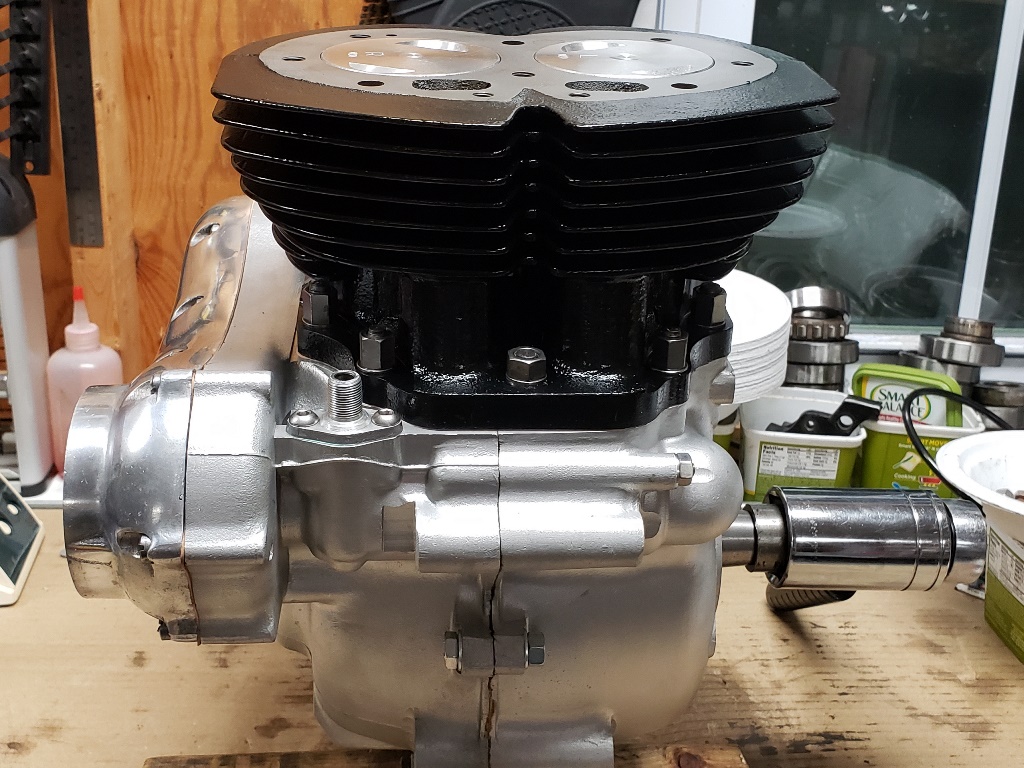
March 5, 2022 The head is installed. It should have taken about half and hour, but I had issue after issue. First there was only one of the 5/16" front studs that screw into the barrel. Searched a long time to find one in my junk as I didn't have any new ones. Then I inspected the pushrods. One had a loose end and two had big gouges in the side. So it was time to search again. I came up with two sets of pushrods in my search. Of those three sets, I was lucky and found one usable set! The head bolts that came with the bike were rusty and ugly. You guessed it - again searching. With all the parts finally in hand, it didn't take long to install. I still have to torque the head, adjust the valves, and buff and install the rocker covers. Once that's done I'll turn my attention to getting my rider off the table so this can go one.
March 7, The engine is together and torqued, the valves are adjusted, the rocker covers are polished and installed and the engine is moved to to the build table. So, it's time to install the frame! Wanted to get that done today but I had to have an echo-cardiogram. Cool to see your heart doing it's thing - not cool waiting to hear about what it's not doing! No worries, I basically know - I've had lots of echo-cardiograms. For those that don't know, it's basically the same machine as a sonogram.
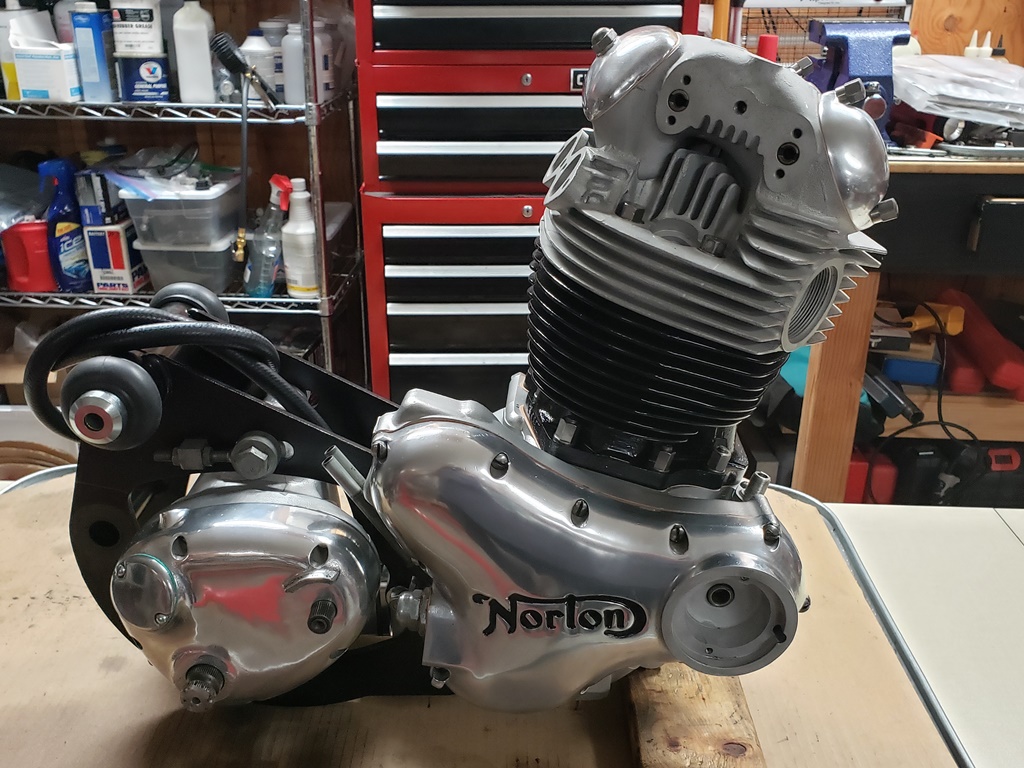
March 8, 2022 The things slowing me down are not letting up! Before putting the frame on the power unit I install the certification label and the headstock bearings. While checking that I had the label or this bike, I realized that I fat-fingered the serial number in my request to Andover Norton, and they did what I said – and extra zero in the middle of the number. My fault – they did what I asked, but you would think they would realize that it was wrong and ask! So, I have to reorder that.
Then came the bearings. I had a new set – no problem. But I looked everywhere twice – no triple tree and more importantly no bearing spacer. I finally found a bearing spacer for one of the bikes I have apart so I least I could install the bearings. Well, the nicely powder coated frame was properly masked but the raw headstock metal was left to rust. Took a good while to clean that up but the bearings are now installed and I found a used 750 triple tree that I'll restore and use.
After much searching I found the gorilla-attacked rear iso stud. After a lot more searching, I found a good used one, again from a bike I have apart.
Here's the result:
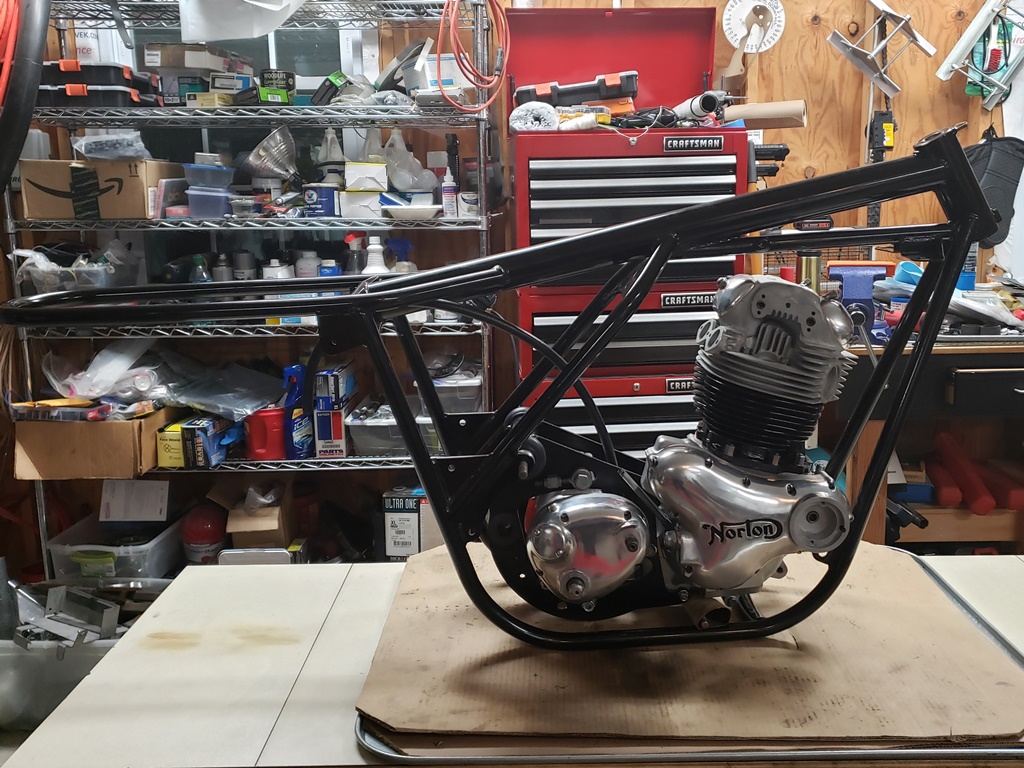
March 10, 2022 Well, I'm spent about eight hours over two days on the swingarm :-(. The powder coater did not mask anything. That normally means scraping/sanding off the inner edges that wrap around the cradle. Did that without too much trouble but he carefully insured that the inside was coated! The bushings are a press fit - there was no way they were going in. After a great deal of time with an xacto knife, dremel, and sandpaper wrapped around a socket, I finally got all the coating out. Then i realized the eyes where the bushings go were not round - probably dropped. A LOT more work, and that was resolved. Both cups that hold the large o-rings were covered in paint and dinged - fixed them. I finally pressed in the new bushings. As usual, this shrunk the bushings to they went from perfectly fitting to too tight. After a LOT more work, I have the spindle sliding through both sides perfectly. Next problem?
The damned swingarm is twisted and the eyes do not line up - they are off about 2 degrees - if you force the spindle in, the bushings are bound. I'm pretty sure I can fix that, but I need help to do it. This all is why I don't powder coat swingarms and I test fit before going through so much trouble.
Once this and the 69S are done, I have one more customer bike to build and a couple to upgrade - I'm going back to just rebuilding bikes for myself and to sell. I'll be 72 Saturday and I have no idea why I've let myself get stuck with deadlines, the embarrassment of possibly not making them and working more than anyone I know.
March 13, 2022
The swingarm is finally squared away and is installed. The fork yokes are installed. The front isolastic is powder coated and installed and several parts are powder coated and ready to install. Before the horns and rear fender can be installed, the battery box and oil filter housing must be installed. The battery box is a mess but I think I can save it – hope so, I don't have another. The rear shocks are shot so I'll install a new set.
The front isolastic is always a bear to install. I usually say you try for 30-60 minutes and it magically slips in and you wonder how it happened. After 90 minutes of trying, I sat back and figured that there had to be another way. The light came on and I was done ten minutes. It's VERY precarious but I protected the frame, removed the rear isolastic stud which let me lift the rear of the frame and pull it back. Then the front had room to just go in. It is exciting having the engine and frame flopping loose while putting it in place! As I got each set of mounting point holes in the front isolastic somewhat lined up, I stuck a long Phillips screwdriver through it. When I had all three front mount points secured with screwdrivers, I put the rear stud back in which made it all stable again and it was then easy enough to replace the screwdrivers with the proper bolts.
The head steady is the pre-74 type that cracks. I need to find a 74 or 75 type for it - hopefully used.
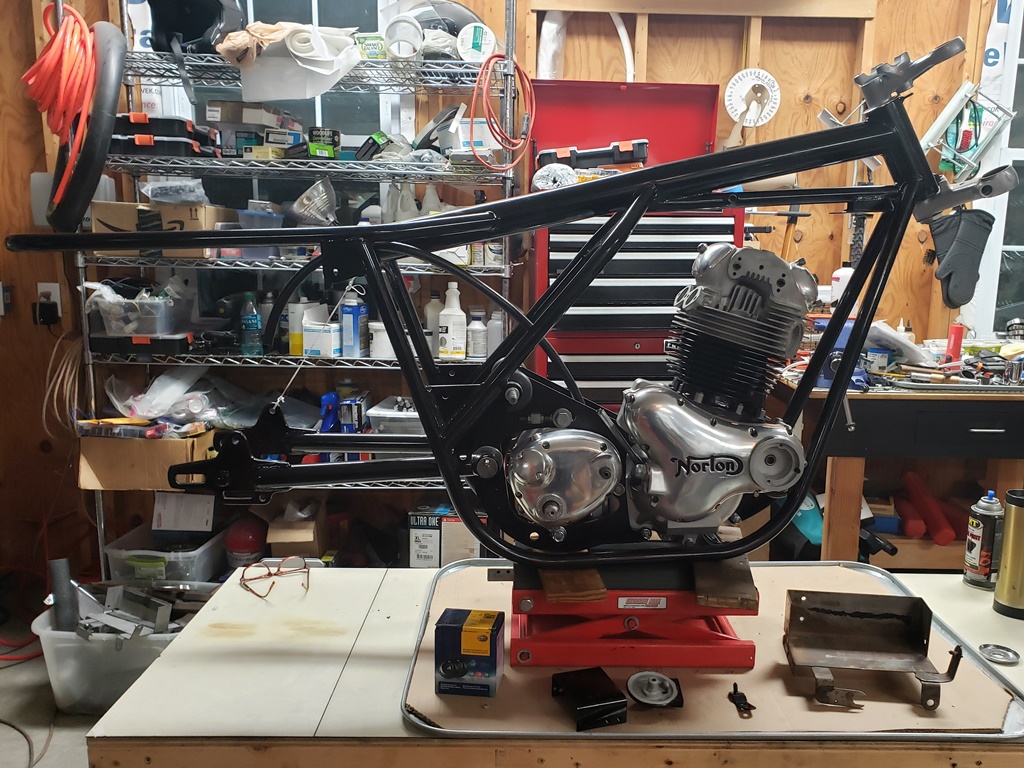
March 15, 2022
The saga continues! The rear shocks are shot so I installed a new set of Girling shocks. In the process I realized the swingarm legs are not exactly on the same plane. Front to back, the right side is about 1/16' lower than the left. After the massive effort to get the bushing squared away due to the powder coat, and since I don't have another one, it's going to stay. Once the bike is done I'll ride it and make sure the handling is OK – these bikes aren't that precision anyway!
Then came the battery carrier. I did the final blasting and straightened it – it was in sorry shape but once straight and clean it looked good. Since I had straightened it I did a test fit to be sure everything would align. That's when I noticed that the welded-on horn/rear fender mount was missing! Oh well, it looks good in the recycle bin. I had a spare that I saving for a full restore so I cleaned and blasted it. It fits perfectly. Hopefully I can powder coat it tomorrow.
March 17, 2022 The battery carrier is powder coated and installed. The Z-Plates are polished and installed. Several small parts are powder coated as well. Took the front forks apart planning for a guy to come tomorrow and polish the sliders.
March 18, 2022 No show on the help. Started to install the horns so I can put the rear fender on and realized I'm out of right angle spade connectors so had to place an order. Then I started on the tail light. The bracket for the turn signals was broken loose on one side and both sides bent. All the used ones I have are worse so I straightened and brazed it. The tail light components are powder coated and the tail light itself is original Lucas in good shape.
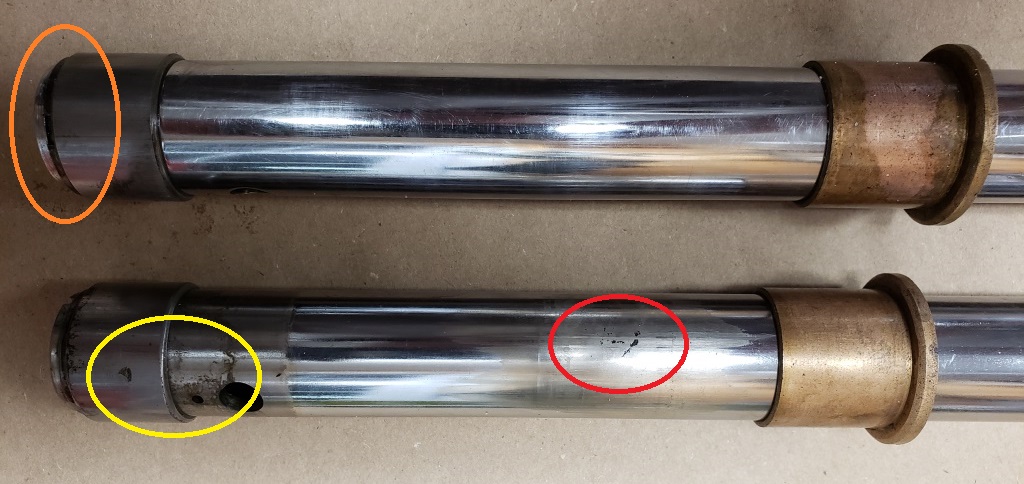
March 20, 2022 Polished the fork sliders. Other than some deep dings and scratches they came out fine. Surprisingly they are internally good – read onto understand "surprisingly".
In the picture, you"ll see a red oval – that's a defect in the tube and guaranteed leak. The yellow oval shows a defect area in the tube and a defect in the bushing. The orange oval is weird. The bottom bushing is supposed to be able to turn on the tube – that one can't and the circlip that holds it on was obviously driven into place and isn't even in the slot all the way around.
I haven't been able to get fork tubes for about 6 months at a reasonable price. I'll look through my used ones to see if I have one good one to match with the one usable one. Otherwise, I'll have to get a set from JRC which will cost double what I usually pay (still way less than retail).
March 21, 2022 None of the used loose tubes I had were usable but I did have a complete used front end. The working part of those tubes look new. There are a few minor imperfections in the top part, but they are fine. Had quite a bit of trouble with the threads on of this bikes' sliders but since I already polished them I did the work to cleanup the threads. The forks are installed along with a temporary heading and the instruments. The glass in the speedo is broken - have to ask the owner about that and the instrument cups are a mess so the will come back off to be refurbed. The Norton front end assembly is fickel - you must tighten it all at once and all parts have to be there. I even aligned the tubes today.
March 26, 2022 I haven't updated this for a few days but I've been working on the bike.
The bike came with two front fenders, one terrible and on I wouldn't normally use. I cleaned the latter up. It has a place on the back side where a dent was beat out, and some more blemishes but otherwise, it's good. The bridge and stays were a rusty mess. They have been blasted and painted.
The bike also came with two rear fenders – neither usable. I mentioned that I powder coated the tail light mount and bracket – what a mistake that was! Tried to put it altogether and it became clear that all components were bent! Took me five hours of fiddling to get everything straight and installed. At one point it all looked good and then I tried the fairing – not even close! So, it call came off, reformed, reinstalled and checked – about 20 more times! Anyway, the rear fender and tail light with turn signals are now install and look right.
Then I started on the front wheel. The bearings are bad so I have to change them. The disk is a rusty mess that has been turned to about half the thickness. I went though the disks I have and I have one that came with a parts lot, has already been ground, but was not properly stored. It cleaned up fine and I'm in the process of painting the center section. Once that done and the bearings are replace I can install the front wheel.
Took the caliper apart. All it needs is cleaning, new seals, and a bleed valve.
March 28, 2022 The front wheel bearings are installed, the disk is restored and installed, and the wheel is a clean as I get it in this cold weather. The rim and spokes are original and except for one spot, the rim is decent.
The rear fender and tail light are fully installed now. The tail light and turn signals are tested and the wire terminated so one I make the harness, they can just plug in.
Time to work on the rear wheel. Once that's done there'll be another big event – the center stand and the bike able to stand on it's own.
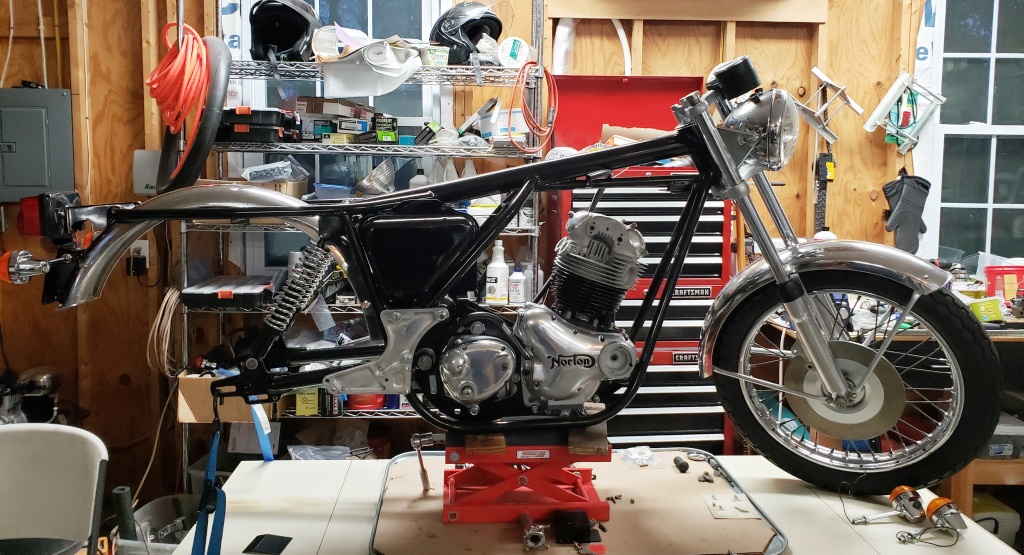
April 3, 2022 Ive had company in the evenings so I have done a write-up, but I have been working on it.
First up, the rear wheel. The bearing in the hub were bad – not a big deal, I always have those so I changed them. However the bearing in the brake hub was also bad and I had to order it. Also, the brake backing plate was in terrible condition. While waiting for the bearing, I blasted, straightened, and powder coated the backing plate and I plated the bare metal parts. The brake shoes looked new but glazed and it was clear that the brake hub was not properly adjusted – the cush rubbers had melted. The speedo drive that came with the bike still had the cable connected and when I tried to unscrew it, the speedo drive guts came out. So I found a used one, cleaned and polished it. When I went to check it on the hub I realized that the hub cover had been rubbing on the old speedo drive and was deformed. So, I changed the hub cover and installed the rear wheel. Of course, it would not
turn ☹. On investigation, the speedo drive I spent so much time getting ready was warped and would work on the bench but not on the bike! Pissed, I took the one from my rider and installed the rear wheel. Anyway, thats all corrected and the rear wheel is installed. I even had a good used chain to put on it since the one that came with the bike was toast.
Next came the center stand. The bike came with the old spring that is not nearly strong enough, the old-style bushings, and only one high-tensile bolt so I used a new-style installation kit and its now installed. I'm always more comfortable with them standing on the bench on the center stand!
Today was primary day – what a PITA. Putting a primary together is normally a 20-30 minute job – not today! I must have tried 10 combinations of washers and shims before I got the inner primary properly installed. Fortunately, my stepson cleaned and polished it the other day so I didnt have to do that. Then I dug out the primary chain – first one I've seen with a master link, but one plate was missing so it was trash. I had a good used one so I cleaned that up. Then I checked the clutch – bad bearing ☹. Fortunately, I had one in stock. Next problem, the clutch location spacer was nowhere to be found and I didn't have one in stock. Searched a long time and found a used one and shims too. That part went together fine. The clutch plates and stack height are suspect but I decided to install them and see if they will work. The clutch will probably be a bit heavy, but that's easy to deal with later. Then came the stator – Ive never seen one so out of alignment. Instead of at least 0.008" all
the way around, there was 0.0" at 5 o'clock. I couldn't find anything wrong with the inner primary, engine, or studs so I opened up the holes in the stator little-by-little until it had the proper gap – first bike ever Ive done that to! The stator is original – date code 8/72 but I doubt that it was on this bike and there ere no rub marks on the rotor. I did test it and it appears to be good. So, then the final problem of the day. I was putting the final 15 ft lbs of torque on the stator nuts when one would not tighten. Fortunately, the nuts threads gave way and damaged the stud. I installed a new stud and the proper nuts – it came with hardware store nuts. I would have installed the outer primary but the location dowels are missing to I need to find some of those – I probably have used.
Along the way the last few days I took the master cylinder and caliper apart. They need rebuilding but appear to be OK to use. The bundy is clogged and the brake hose is toast so I need to see about that.
April 4, 2022 It's a wonder I have hair! Found a used location dowel and put the outer primary cover on. The center stud should be flush with the cover but it sticks out 1/2". It's the one that came with the bike but it certainly is not for the bike! Now I have to take the primary all apart again and put in a different center stud!
April 5, 2022 Went searching and found two chaincase center studs. Took the primary all apart, installed one, and put it all back together. Besides the time, that means three more chaincase to charncase tab washers, another clutch location circlip, and a another clutch center tab washer. Fortunately, none of those is expensive.
April 8, 2020 Working on restoring the instrument cases and master cylinder. Polished the caliper - came out very nice. Hope to powder coat the instrument case and master cylinder tomorrow and assemble and pre-bleed the caliper The caliper discs appear to be almost new but were sitting around for a long time. I cleaned them with brake cleaner, brushed off the rust on the edges, sanded them with 220, masked and painted the bare metal. Seems like a lot to do with an expendable pair of parts, but they are FERODO and cost about $25/set so it's probably a wash - my time against new.
April 9, 2022 The caliper is put together, pre-bled, and installed. There are a couple of gorilla induced imperfections inside, but they should not cause a problem since they are on the disc side of the seal. The master cylinder looks great and I'm hoping it will work well. It is not perfect in the core and I could not get it together do to gorilla damage at the beginning of the bore (bevel damaged). The secondary seal would not go in and I tried a LONG time. I finally took it back apart, re-cut the entry bevel, and the smoothed it. Then, of course, I had to completely re-clean the body. With the new bevel, I was able to get it together. I've benched tested and it works - hoping it doesn't leak! I don't have another to restore and the last one I bought new was just over $345. I polished the handlebars and installed them as well - hoping to finish the front brake today, but I ran out of steam.
April 10, 2022 Restored the handlebar switch clusters – they came out nice. Fairly routine, couple of broken wires, dirty contacts, and ugly. Got stuck again on the front brake – the bike didn't come with the screws to put the master cylinder and switch cluster on and I'm out of them. Placed and order. Started to restore the side stand, but it will need a little welding – the stops are mushroomed over. I'm only equipped to braze, not weld so I'll have to get that done.
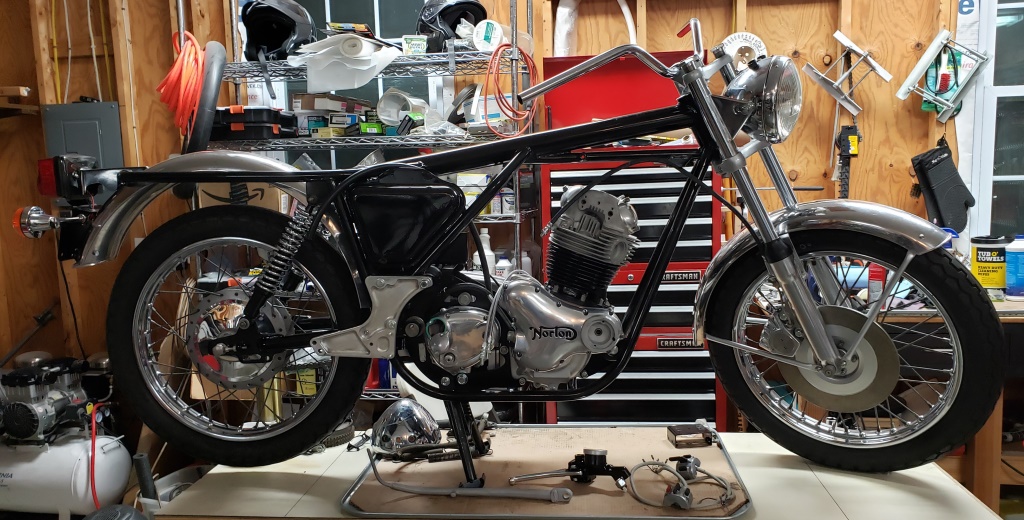
April 11, 2022 I didn't have a lot of time today but did work on the instrument cups. It turns out that one is OEM and the other is after market. They look slightly different. The aftermarket one is porous and since I'm going to powder coat them I had to fix that. JB Weld has a high-temp version that is OK under powder coat – I used that to fill the voids and some deep scratches in the OEM one as well. It is really for deeper/larger cracks but it seems to work OK. I'll do a little more sanding and then coat them. For sure, they will look better than they did!
Started to put on the timing side foot rest and realized that it's bent upward and forward. I have others but they are very ugly - this one is nice. So, I'm thinking about how to hold it so I can bend it back into shape.
The weather is supposed to get nice this week so I may be back on the other bikes I'm working on that need decent weather for testing.
May 1, 2022 I've been off on other bikes for quite a while and am still not done, but I did get some things and so I did a little on this today. The corrected certification label arrived and it is installed. The instrument cups have had the deep scratches filled and smoothed. I have a plan and got what I need to make a footrest holder so I can straighten them – I have no idea if it will work but at least it's worth a try.
May 16, 2022 Finally getting some small things done. The left fork has a very slow leakofrom the bottom bolt. Took it apart and replaced the fiber washer. The one I put in was new so I'm not sure why it leaked, but it is fine now. I tried several things trying to get the instrument cups to look the same and to fix the bad spots before powder coating. That's not working out so I sanded and primer and will paint them. They will look good, it's just a lot of extra work. Also blasted more small parts getting ready for power coating. I'm waiting for the speedo and tach to come back from being rebuilt. Once I have them and they are mounted the front end, including the headlight shell and turn signals can go on to stay and I can start wiring.
May 21, 2022 I've had to finish some small jobs over the past few days but I'm back on this bike now. I finished painting the instrument cups today. They can go on soon. I started wiring in earnest today. It's going slower than usual – I jumped right in without spending time to organize so I'm spending too much time looking for things. I'll fix that before continuing. The master cylinder and right side switch console are on but the brake hose is too long – hopefully I have one that is right, If not, I'll have one made. The speedo and tach are finished and on their way back to me by slow ground. They are supposed to be here the first week of June.
May 22, 2022 More wiring and lots of little things done today. Andover Norton sells 23" and 25" brake hoses. The 23" are too tight and the 25" would work but are longer than looks good. I have a guy who makes custom DOT approved stainless steel hoses in the exact length I want so I ordered one. I'm not sure with inflation and postage increases, but last time they cost me $2 less than the AN rubber hoses. I searched and searched for a clutch lever and mount and just when I gave up, I found an ugly one. It's pretty now! The forks are re-filled with oil and the instrument cups are installed. If anyone knows what I did with my WD40 spray bottle I should would appreciate the info - I'm lost without WD40!
May 27, 2022 The WD40 mystery is resolved – somehow, it ended up in the trash! All is well now!
I've been very busy and didn't update this but I have finished some things. All oil lines, except the rocker feed, are installed now, including the breather and oil tank vent. This was being held up by needing the air cleaner back plate installed which is also done. The rocker feed lines can be installed at any time, but I like to install them after finishing the wiring.
The front brake hose came in and it is now installed and the brake bled.
The Tri-Spark MOSFET rectifier/regulator is installed. he flasher and clip that came with the bike were dirty but work fine, they are installed. I'm continuing to build the wiring harness.
The owner and I have talked about color and I'm getting his tank and side covers ready to be sent to the painter.
May 29, 2022 The coils that came wiiht the bike measured .7 ohms rather than the required 1.5-2.5 ohms each. I found a used set in my parts and cleaned them up. They measure 1.6 ohms each and they are installed.
All required wires are run. Before wrapping with professional automotive harness wrap, certain sections will be individually protected and most wires will be terminated. I'm out of fuse holders but the supplier finally has them, so they are on order.
To be able to install the wires for the rear brake light, I installed the drive-side footrest and brake pedal. The foot rest is fine, but the brake pedal is bent. I'll try to straighten it.

May 31, 2022 The speedo and tach arrived today. As usual, they look brand new - in fact, the cases actually look much better than they did new! The headlight shell that cam with the bike had good indicators, a bad 2-way switch and a good amount of pitting in the chrome - it was original and had a single grommet hole. I prefer the three grommet hole version and I had a used one that is certainly not perfect but better than the one the bike came with and it is also original so I'm using that. It looks great from a few feet away and the grommets are even usable. I greatly prefer the original indicator sockets so this will work out well.
Had a helper today and he blasted the tank and side covers. Then we chased all the threads - they are fine now but had a lot of rust. The tank is now sitting on my kitchen counter brim full of EvapoRust - two birds,one stone. The tank has a little interior rust but will have none by morning and assuming the EvapoRust stays in the tank, there are no leaks. Once I'm sure of that I'll pack them and off to CA they will go for paint.
June 2, 2022 I've been inundated with issues the last couple of days so I haven'tt finished wiring but I'm getting there. The tank is fine and left for CA today.
June 6, 2022 This si a pretty big day in the life of a build. The wiring is done and tested. The speedo and tach are installed as well. Getting close to working down a checklist to finish. The carbs are the next big thing. At first glance, they don't look great but I'll check carefully before deciding to replace them. A new set of Premier carbs is always a pleasure but we'll see.
June 14, 2022 Over the past few days I've gotten some little things done and found more to do. The drive side foot rest is decent, the rear brake lever is bent - I'll try to straighten it. The timing side foot rest is also bent but otherwise decent. I installed the muffler and passenger peg mounts loosely after cleaning them - they are in good functional shape but certainly not pretty. The carbs are worn out - fortunately I have one set left for a 73 750. The twist grip is junk and the junction to twist grip cable has too much free length so I'll have fix that. Still have to make a battery hold down, checkout the exhaust and do something about a seat.
The owner will be in town and wants to pick it up July 17th so I need to keep moving on it!
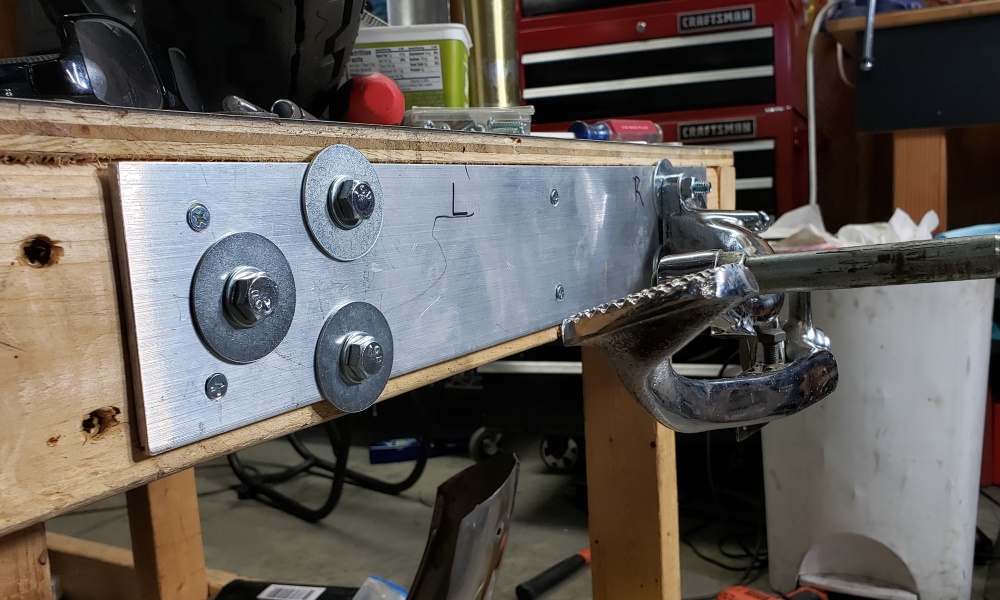
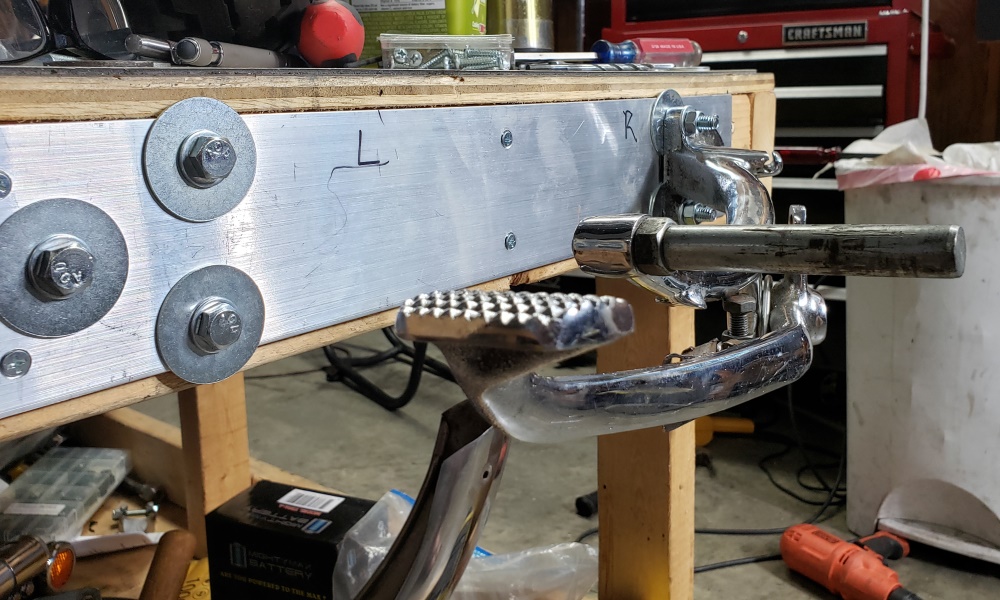
June 16, 2022 It worked! I built a simple rig on the end of one of my motorcycle tables, mounted the timing side foot rest that was both bent up and forward, and used an old fork tube to form it back into place. I'll do the rear brake lever next - need a completely different setup on my rig.
June 17, 2022 It turns out that mounting the footrest makes the brake pedal stable enough to straighten it. Here are the before and after pictures. Once I figured out how to grip the end of the pedal,it was easier than the foot peg.
I should have put the camera on a tripod!
June 18, 2022 The timing side of the bike is nearly done. I'm waiting for a couple of little parts and then I can get the driveside to the same state. The intake manifolds are cleaned up and attached to the carbs. Once my AN order gets here I can finish the rocker feed line, install the carbs and air cleaner, and I keep forgetting to do something about the side stand!
The exhaust is pretty ugly, but the pipes and mufflers are sound so I'm installing them. That's one of the things the owner can do later to make it look good.
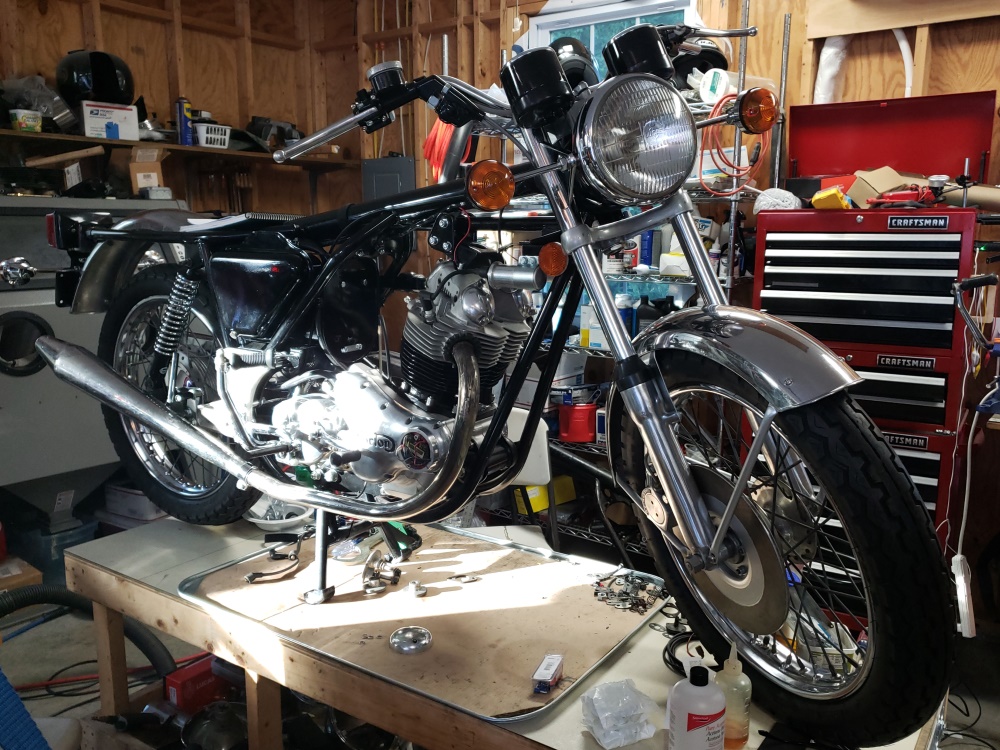
June 20, 2022 It took a bit of filing, reaming, and straightening but the side stand as fixed and installed. The battery is now fully installed and held down. DHL was supposed to bring my AN order tomorrow but they have once again screwed up the customs and I have no idea when the order will get here - those few parts are really holding me back. Especially the rear brake cable and and rocker spindle covers.
June 22, 2022 Installed the rear brake - I forgot I ordered that from Wassell who doesn't use DHL and therefore never has a customs problem. DHL Express in the US continues to be an embarrassment for DHL - I lived in Germany for almost eight years - German companies and people are simply not this screwed up! Cleaned up and installed the drive-side exhaust - it's just as ugly as the other side but it is sound.
June 23, 2022 I've been a little sick the last couple of day and was having a hard time breathing. That got better last night. Installed the speedo and tach cables today so the speedo and tach are now locked into position
What's left:
- Tank: It's finished, just waiting for the paint to be hard enough to ship
- Seat: I keep hoping that Wassell or JRC will get them in. The one with this bike is ugly but the only ones I can find new are almost $500 which is ridiculous.
- Rocker Spindle Covers: Held hostage by DHL.
- Rear Brake Cable: Held hostage by DHL.
- Rocker Feed Line: Waiting until I have the carbs installed - makes pointing the banjos in the best direction easier.
- Throttle Cable: I shortened it but the ferrule popped off. I'll make one from scratch as I know the solder I use and the new cable is compatible.
- Install Carbs and Air Cleaner: Bench sync carbs then install.
- Install rubbers (foot pegs, passenger pegs, handlebar grips, etc.)
- Finalize: Fill fluids and check for leaks. Give the entire bike a once over to be sure everything is tight.
Had a bad realization a couple of days ago. The owner doesn't have this registered and therefore, I have no plates. Getting caught without plates would cause the bike to be impounded and a court day for me. I could stick on a plate for another Norton any probably get away with it, but if caught, impounded and me led away in shackles for processing - not doing that! The owner is trying to do it remotely since he's out West and wants it registered in Maine where he'll be this summer. I hope he's successful. It will make me nervous to turn it over to him without a good shakedown run or two.
June 28, 2022 It looks like the DHL customs issue is finally resolved - hopefully DHL will now deliver the parts!
June 30, 2022 The parts are finally delivered.
July 2, 2022 The throttle cables are made and the rear brake cable is installed.
July 3, 2022 Did several small things and one big on. The rocker spindle covers are on, the air cleaner front is restored, and the air cleaner is installed. I install the carbs after the air cleaner, especially when using the full-sized "hamcan". The cabs are fully bench-synced and are now installed as is the fuel line. The only thing stopping it from being started now is the tank. There are still quite a few little things to do, but they don't amount to much. The only hard job left is installing the gas cap on the tank when it gets here - scary job!
What's left:
- Tank: It's finished, it's on it's way here.
- Seat: I keep hoping that Wassell or JRC will get them in. The one with this bike is ugly but the only ones I can find new are almost $500 which is ridiculous.
- Install rubbers (foot pegs, passenger pegs, handlebar grips, etc.)
- Finalize: Fill fluids and check for leaks. Give the entire bike a once over to be sure everything is tight.
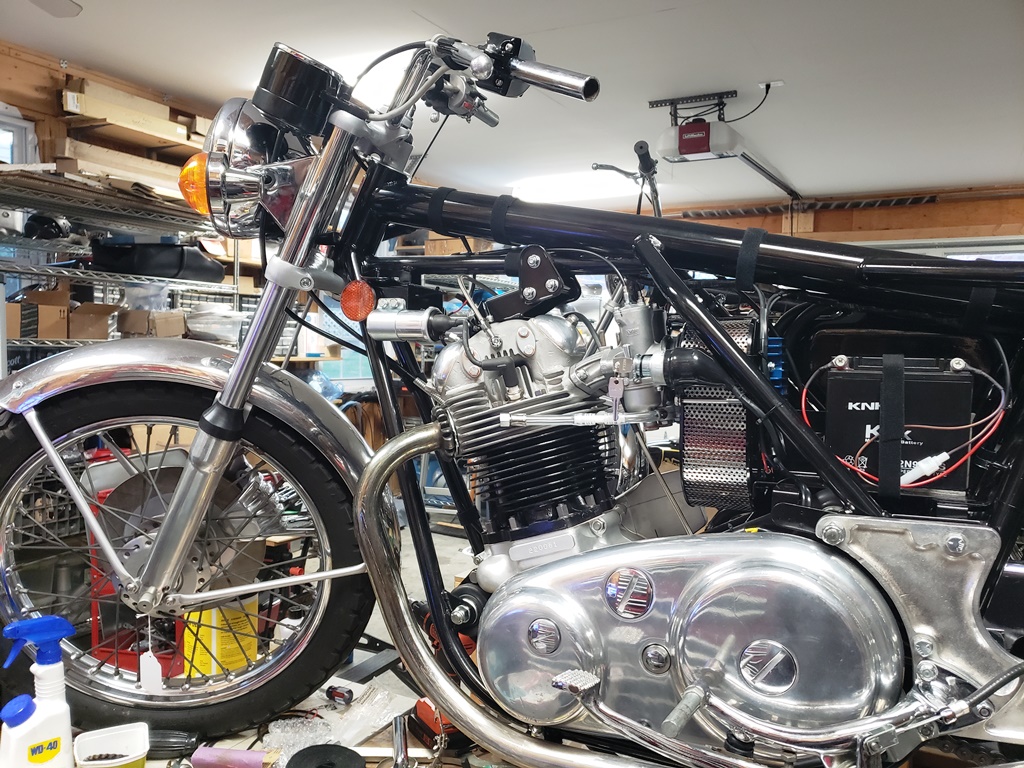
July 4, 2022 Happy Independence Day! This is a big day. It's basically done. All parts other than tank and seat are installed, fluids are in, everything is checked over and it's ready to come down from the table which will happen tomorrow when I have some help to move bikes around - assumes no rain. I'll have to move two bikes outside to get this one down and another up then bring those back inside. This is a good looking bike! The rims and exhaust let it down and the fenders are not great but those are things that can be changed over time.
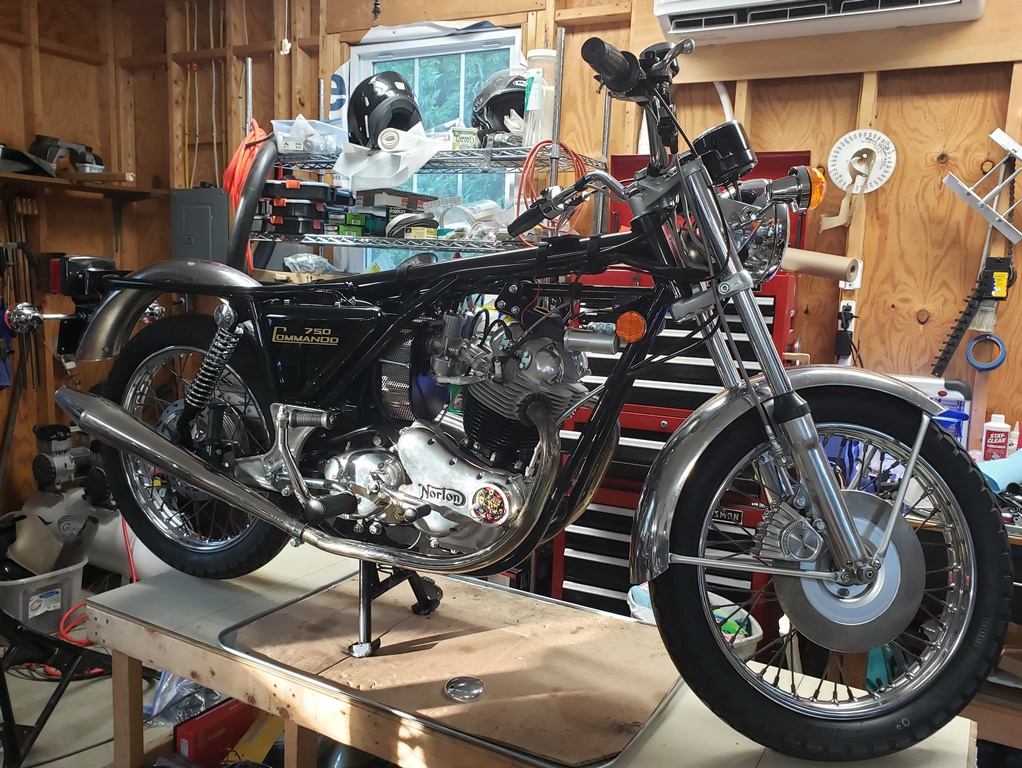
July 7, 2022 The beautiful new seat arrived and it fits perfectly.
July 8, 2022 The license plate and registration arrived from Maine so now I can test this weekend.
July 9, 2022 Lots of rain today so no testing. The tank is still not here so I cleaned out and installed a old Norton tank that I'll (hopefully) use tomorrow to test the bike.
July 10, 2022 First the good. Put in a little gas, checked the oil and started it up. Made sure oil was returning and that there was enough oil - all good. Adjusted the idle and made a movie.
I was worn out so I sent my stepson for a shakedown run (he owns a Norton of his own). When he got back he had a scary report. The oil pressure light kept coming on for long periods. It was a hot day and they can flicker at idle on a hot day, but they should not come on while riding. Changed the switch and installed a temporary oil pressure gage. All was normal. Then some more riding and he reported another problem - noise from the gearbox. So, I took it out- the gearbox was fine but the rear chain was making a lot of noise. while looking into that, I noticed that the engine smelled hot and then noticed oil in the front of the engine - this is the second time a new copper head gasket in a Norton has failed new! So we worked until about 11pm and had it mostly back together.
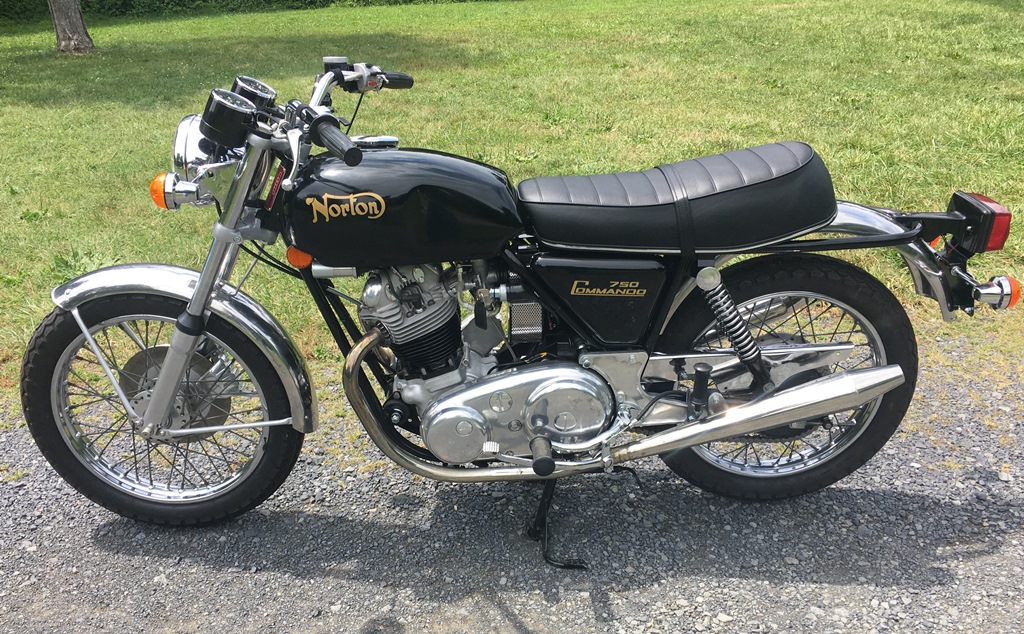
July 11, 2022 Finished up putting it back together, marshalled all my strength and got it down by myself, took it outside and washed all oil off. It started right up so I went for a ride to dry it off and to continue checking things. Right now I see only one issue. The rear chain is still making noise. I think it's hitting the chain guard. The chain guard is a bit of a mess. Tomorrow I'll take the chain guard off and go for a ride to see if it is the chain guard causing it. Once that's sorted out I think it's done but I will verify that all is well with the new head gasket - it does smell normal now. The owner wants to pick it upon the 17th so I hope so!
July 12, 2022 Thunderstorms today so couldn’t take it out. The tank arrived. Developed some minor internal rust - after taking care of that it was time for the hardest/scariest Norton job – installing the gas cap. Even with help it took an hour! With a little luck and good weather, I'll be done tomorrow.
July 13, 2022 The damned gas cap won't close. A common problem but one I've always been able to resolve - not this time. I finally took one from another tank and installed it. The owner is coming Friday morning now rather than Saturday so I'm really rushed. Installed the mounting hardware in the tank and the petcocks. I normally check the petcocks and find nothing wrong, so I just put them in. Of course, after filling the tank half full I tried both and one would not pass gas! OK, tank back off, laid on it side, bad petcock out and in with another new one. Picked the tank up to put on the bike and got a gas bath! I forgot to close it after checking it :-(
Need to install mirrors and do a final once over but it should be good. I went for a ride today pulls strong, brakes need braking in, handles fine, and everything sounds good. When the owner gets here I'll have to adjust everything for him, I'm about twice his size and it's setup for me right now.
July 14, 2022 Installed the right-side mirror - the master cylinder is meant for the current ones AN sells. The left side just has a 5/16" hole so drilled it out and tapped for 3/8" x 24 and installed. Went for one last test ride and filled it up with gas.
July 15, 2022 Delivered! Smiles all around!
|


|
Copyright © 2003-2026
Greg Marsh Enterprises
8116 Arlington Blvd. #171, Falls Church, VA 22042
(703) 200-4025 marshg@gregmarsh.com
|
|