|
|
 | Sunday, July 26, 2026 |
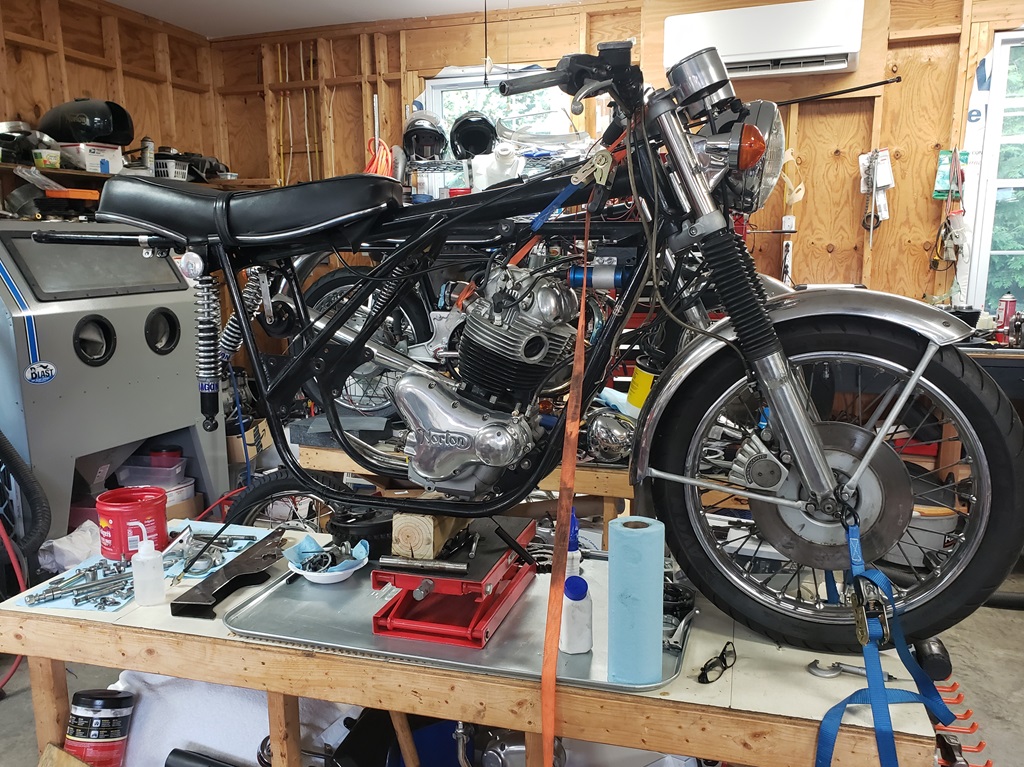
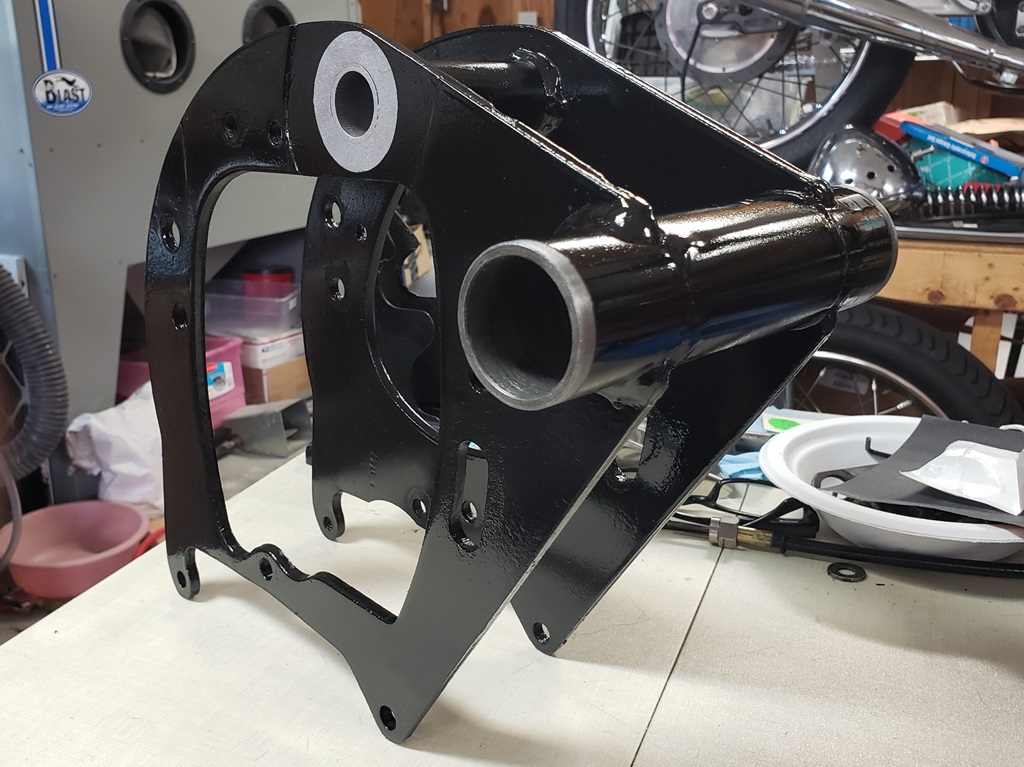
July 21, 2024 I generally maintain a more or less daily log on each major project I do. I thought I would put all the smaller project in one "blog". It turns out that the Black Interstate Combat that I thought would take about two weeks has become a big project so this page is for that bike, so...
Started on the Black Interstate today. The owner's request:
I bought this bike as a re-commission. Fresh engine with re-built
front end new main wiring harness, Mikuni vm34 jetted for combat from Map Cycle.
Unfortunately, the bike not only came with a 40-year-old Boyer ignition but also all the original electrical components. The bike has become progressively harder to start and no ignition warning light, even after I changed the indicator bulb and new battery.
I also believe there might be trouble with the choke circuit and or float height.
As it goes I have reached an impasse and would like to seek your professional help. I would like to see the old Boyer go away as well as replacing the Zener diode and rectifier or whatever you suggest.
Since the wiring appeared to be messy and I will be installing a Tri-Spark ignition and Tri-Spark MOSFET regulator, I decided to take care of the wiring first.
Of course I ran into a weird problem right away! I could not get the tank off! After a long struggle I figured out why. The timing side front tank mount stud is installed about one inch to the right of where it is
supposed to be and is tight against the outside of the hole in the mounting ear. The customer Purple Interstate I have in the shop definitely has an original metal tank, and this metal tank does not match - most likely made in India. I finally had to carefully pry it off.
Right away I could see one of the owner's issues. The charge light does't work because the red wire and the white/brown wires to the assimilator we cut and the wire from the stator was not connected. I'll talk to the owner. I normally remove the silly assimilator and use the red headlight warning light for an oil pressure switch. Also, he was told that he had a new main wiring harness - not true - it's a mess! The old Boyer and old charging equipment have been removed and I'm working on eliminating the excess wires. I also noticed that the bike has the old-style head steady that cracks. It also two frame grounds and no direct engine ground. That may have been a part of his starting/running problems.
July 24, 2024 I spoke with the owner today. I will eliminate the assimilator, install an oil pressure switch, and most likely replace the wiring harness. I will also attempt to install the cNw reed valve for 1972/73 750s. I would rather not have to remove the primary and gearbox to get access. Matt (cNw) says it can be done with everything installed. I'be installed plenty of them but with the engine on the bench. Also, I will eliminate the check valve in the oil feed line. I explained how to manage wet sump'ing and he should have no problem. If later he decides it's a PITA, he can send the timing over to AMR for their mod. He verified that the tank is made in India. I have a couple of ideas how to mount the tank so it's better. Eventually, he would like to switch it to a Roadster.
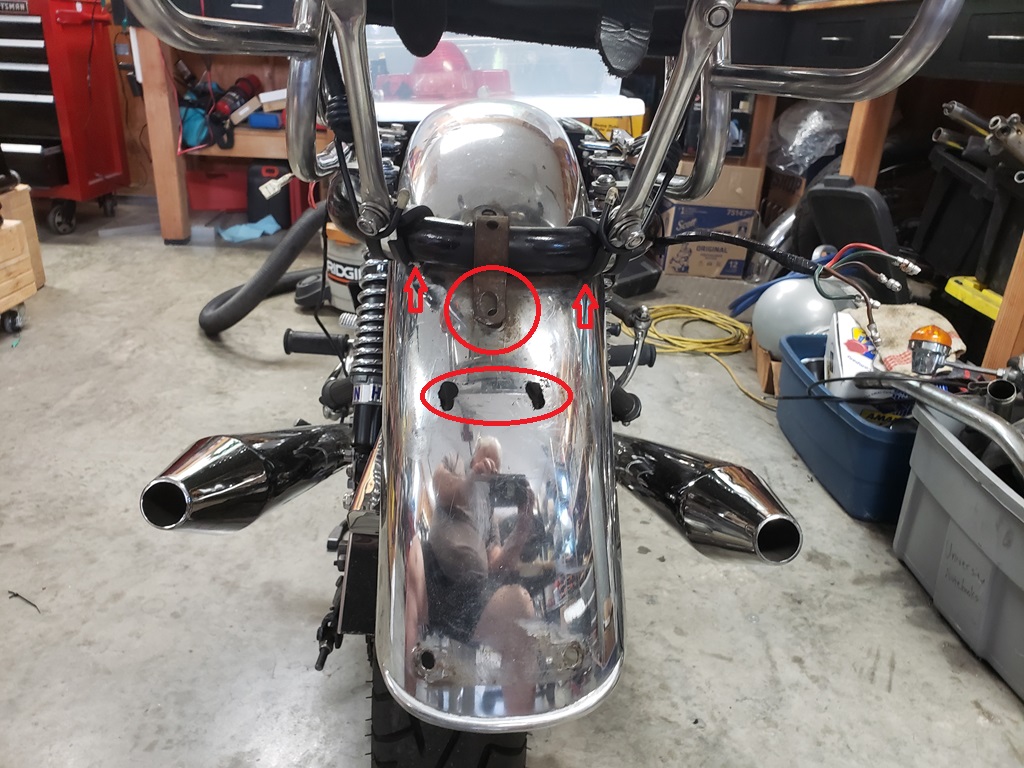
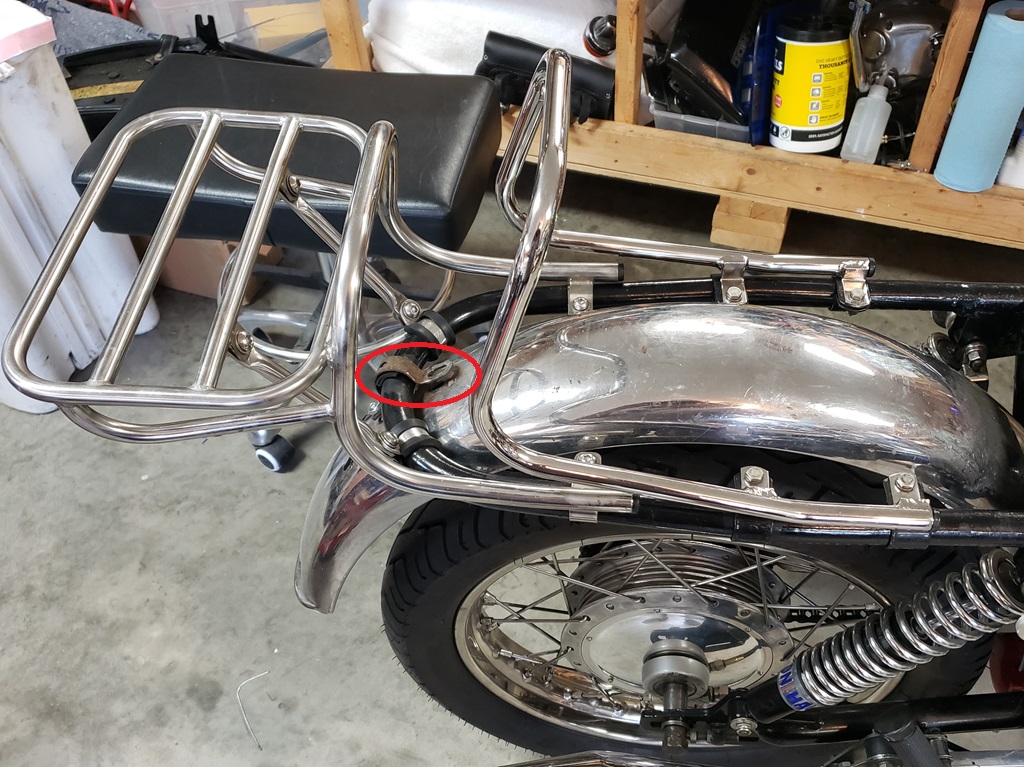
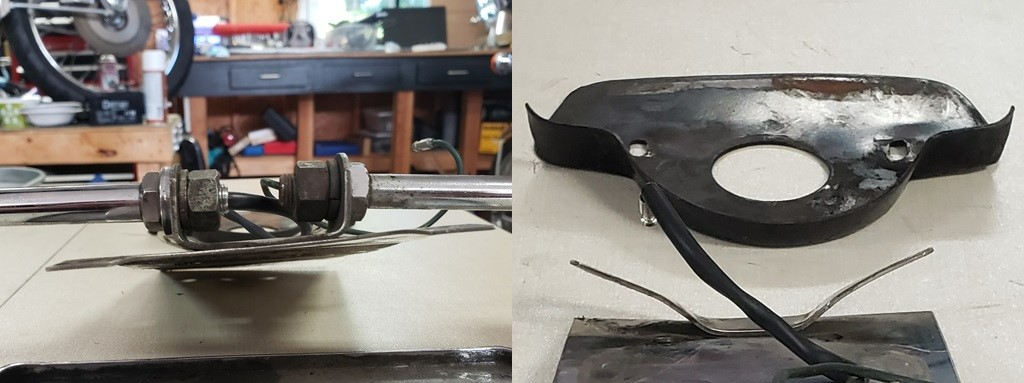
July 28, 2024 I'm wiring the 850 Recommission and while I'm at it, I'm cutting all the wires for the Black Interstate. The main wires are all cut and I'm waiting for some to be answered on that bike so I worked on this one. See the pictures. I needed the taillight fairing off so I could get the old harness out. While working on that I noticed that the rear fender was way out of line. When I got the fairing off it was clear why. The red circle shows the missing mounting bolt. The mean that the fiberglass fairing was all that was holding the rear of the fender up. Then I could see why it was out of line. The luggage rack does not let it come as high as it should (arrows) and forces it away to the right. The oval show the gorilla work to get it all together!
The second picture shows where the fiberglass is broken. There are also cracks that are not visible in the picture. Depending on the exchange rate those fairings cost between $90 and $110 delivered! I will try to fix this one. The picture also shows on of the luggage rack brackets pushing on the fender.
I'm going to remove the luggage rack, put the rear end together properly and then fit the luggage rack
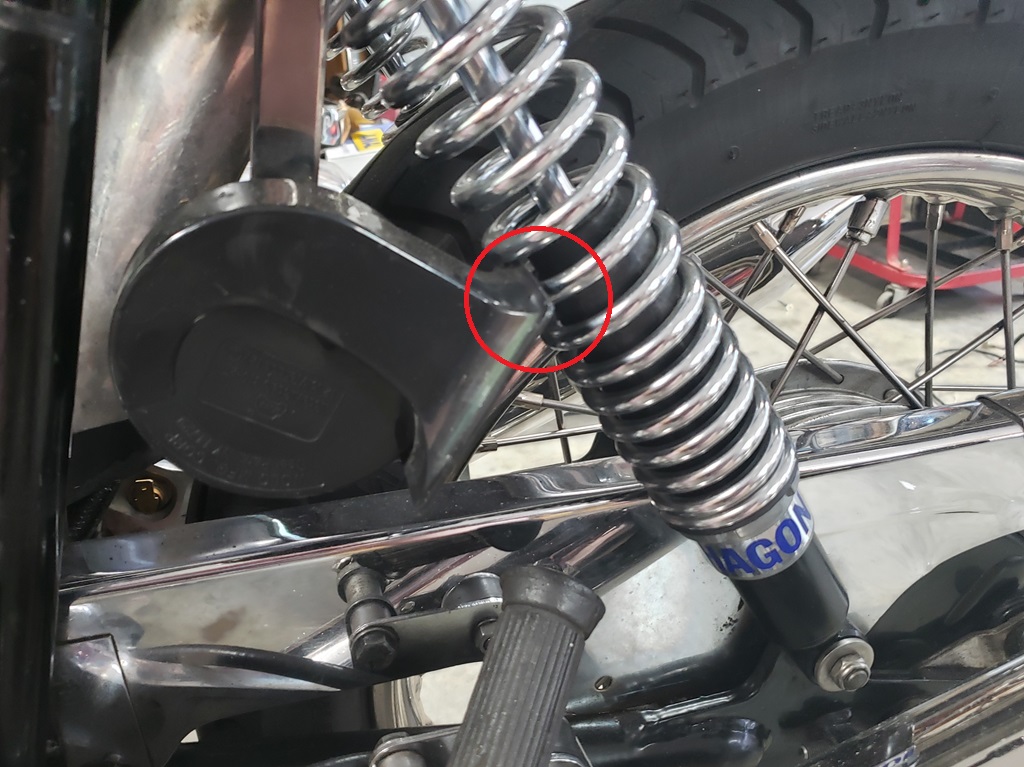
The third picture is actually funny. Rather than the horn being in the proper position (I'm fine with that), an after market horn was installed as shown. It's plastic and won't last long stuck in the rear shock. I generally used very small horns that are much louder and cost almost nothing. Depending on how much I take apart to fix the rusty battery box and to get the fender properly installed I may put the small horn in the normal place. They also can go approximately where that one is and not look obtrusive.
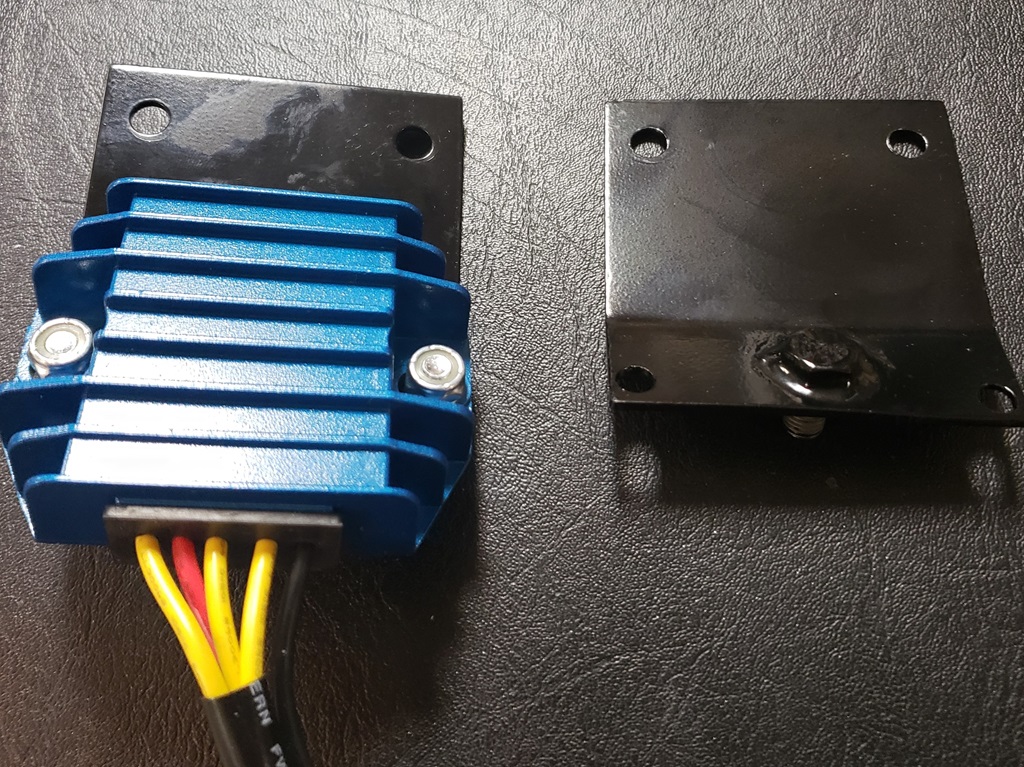
July 30. 2024 I'm continuing to wire the Black Interstate and the 850 I'm recommissioning. Both are getting Tri-Spark regulators and Ignitions. On my last build I worked out a good way to mount the regulator and I made two mounts today. The standard middle rear fender mount is the basis. The single bolt that secures the fender is brazed to the bracket and then two additional holes are drilled. Then I powder coat it. The bracket on the right is ready for the regulator to be installed and the one on the left has it installed. What looks like a bad spot in the powder coat is just a spear from dirty hands.
August 6, 2024 See today's update here to see what's holding up progress on these bikes. I really expected that bike to be gone a while ago!
August 17, 2024 I started the 850 Recommission today and that went fine except it wore me out. After a rest, I got a second wind and cleaned up/moved things around so I can fly the Interstate Combat - hopefully tomorrow. Once on the table I intend to work on the Mikuni first in case I need to order something for it - I don't have any Mikuni parts in stock. The last Combat I sold had a Mikuni that I got from cNw. It was surprising, but when I started that bike, NO changes were needed to the carb - even the idle was good! So, I wrote cNw to find out how it was jetted and adjusted and Matt sent me his setup sheet for a sea-level Mikuni on a Combat. So, I intend to set it up just like that - no point in experimenting! Of course, if there are problems I'll figure them out, but I don't expect any.
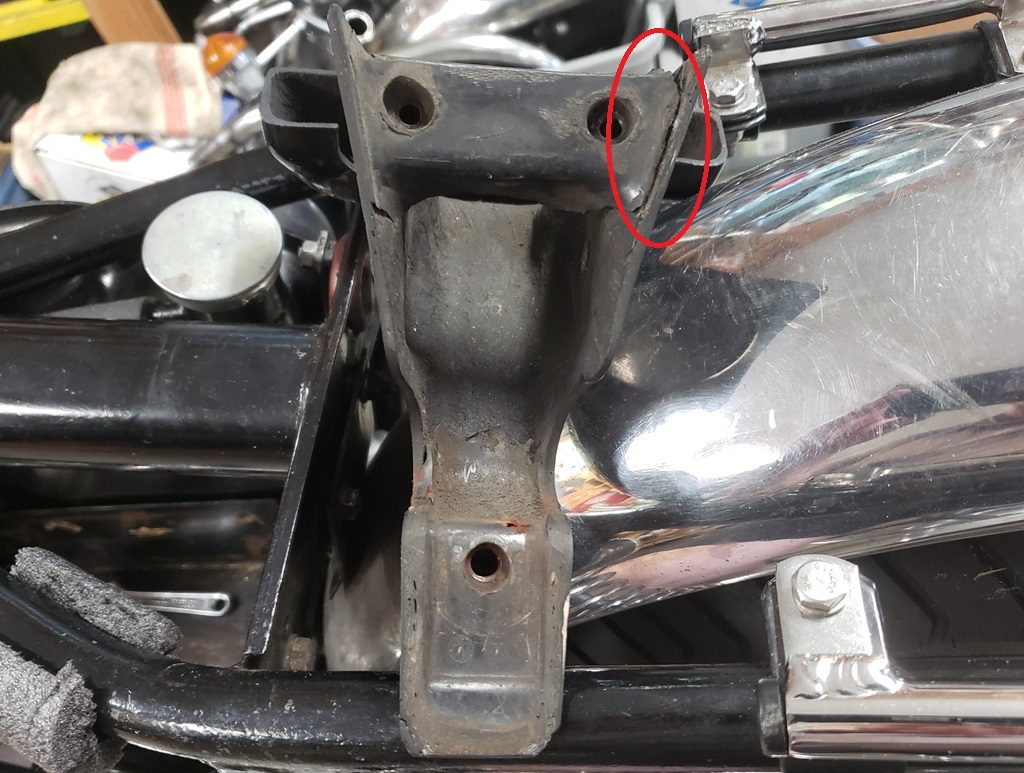
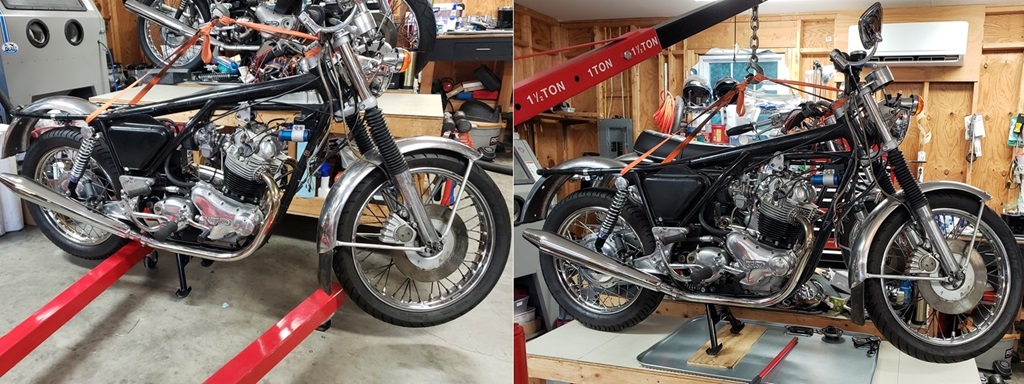
August 18, 2024 I made progress today Black Interstate Combat! The first picture shows the luggage racks. It's mostly there so I know how to put it back together after I sort out the rear fender mess. The rear fender is from an 850 (different taillight) when has been modified (poorly) for a 72 taillight. the red oval show and improperly installed, rusty mess of a fender rear support bracket - I'll fix it.
All bikes I work on must fly! The second picture on the left shows takeoff, and on the right, landing. It is comfortably on the table now.
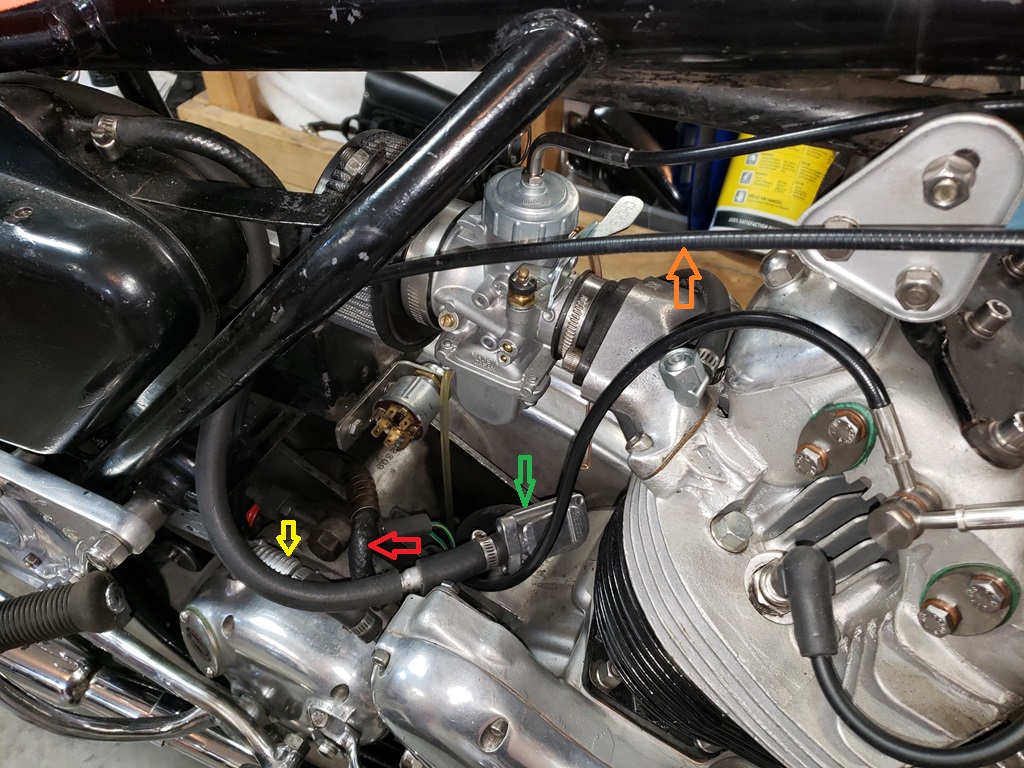
The third picture show several concerns:
- Red Arrow: Terrible oil return line routing, incorrect hose type, and being damaged by the routing - the entire line must be replaced. You can't see it, bur the feed line is way too long and partly kinked.
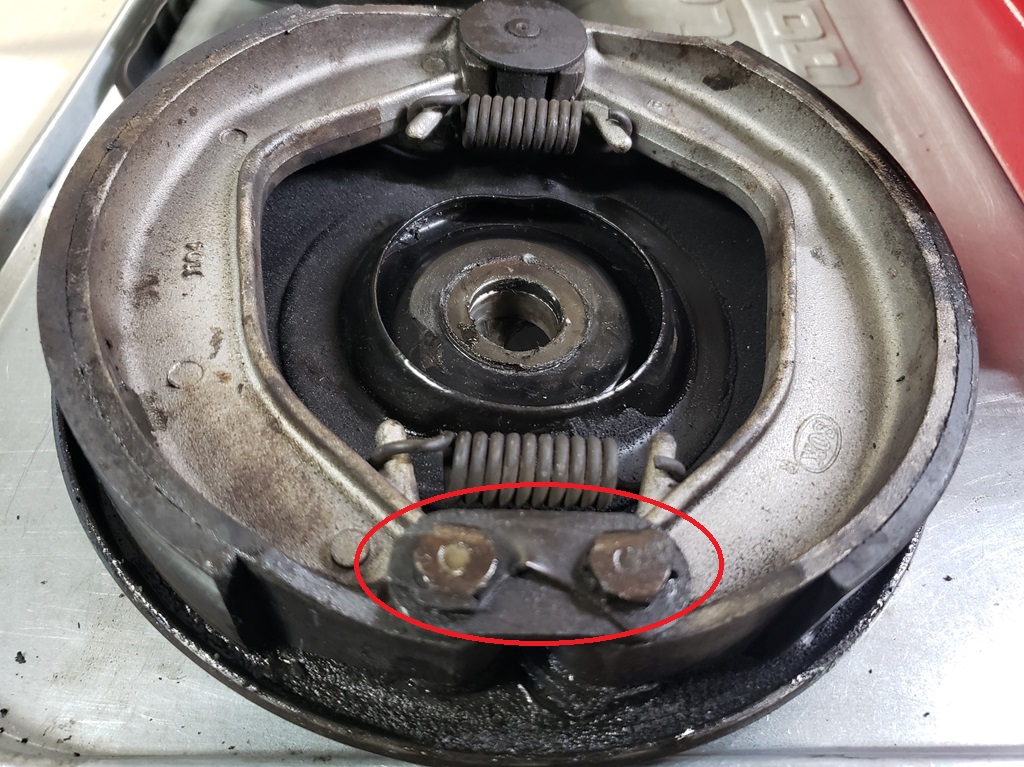
- Yellow Arrow: Engine destroyer check valve. I will not start an engine with one of those installed. I'be rebuilt two engine destroyed by them.
- Green Arrow: PCV - people install them rather than a reed valve - pretty much a waste of time., I'll install a proper reed valve. cNw swears it can be done with the gearbox inplace.I have my doubts with my big/arthritic hands, so I may have to remove the gearbox. Also, the hose routing is a mess.
- Orange Arrow: Terrible clutch cable routing.
Took the carb apart to see how it is jetted and the condition:
- Main Jet: 230; cNw says 240
- Slide:2.5; cNw agrees
- Needle: 6dH3, circlip in the center slot; cNw agrees
- Needle Jet: 159 P0; cNw says 159-08 - this is most likely a big part of the performance issue.
- Pilot Jet: 35 - it was completely blocked alone with the rest of the pilot circuit; cNw says 40
- Air Jet: Forgot to check; cNw says 2.0
- Enhancer (choke): In good condition
- The carb had some sort of grit in it - need to carefully check the air filter. It also had some aquamarine color substance in it - I have no idea what that is!
There is something weird with the carb cable - I had to screw the carb off the top - I could not unscrew the top due to the cable - I'll have to figure that out. It's a shame that it's a brand new carb and the jetting is not good - especially the needle jet.
I'm looking for the carb parts...
The other thing that bothers me is that the frame paint job it terrible even for a rider-class bike. I'm trying hard to ignore it - my job is to get the bike running correctly and to be as reliable as a 52 year old motorcycle can be - it's starting to look like a lot of work just to accomplish that!
August 19, 2024 Today was going great. I was getting things apart to get the oil tank and battery box out. Lots of stainless steel fasteners, no anti-seize so all fighting me. Had to use my electric impact on some of them. Got the timing side apart and start to the other side, feet tangled in cord, down I went. Lots of clear shape - should have been fine. However, I was lazy and did't fold up the engine hoist and put it away. Fell full for on the corner of the steel leg with the back of my shoulder joint. Cannot lift my right arm, hurts too much to let it dangle. Tried to keep working but gave up. My goal each year is no ER. I'll get cleaned up and once there's time for the illegals to clear out, I'll head there. At least I was able to pickup my right arm and lay it on the table with my left arm so I could write this. Hopefully, nothing is broken and no ligaments, tendons, or muscles are torn, but I'll be shocked if not. Anyway, will be OK one way or the other - no other
damage.
Just got home from the ER after five hours. Nothing broken or out of place so hopefully just muscles which I can rehab myself. I may take a day or two off - I can lift my arm with the other one but cannot lift it by itself - much like a rotator cuff tear but I'm pretty sure that did't happen. I was concerned that I broke my shoulder blade.
August 20, 2024 No work today. My cleaning ladies were here today and one of them was a licensed PT in the PI and is working on getting licensed in VA. No cleaning for her today!
All three of them "mother" me and she iced my shoulder for a while and then worked on loosening it. It has helped some, especially since my neck tightened up over night. There are certain motions my arm will not do on it's own, but my arm can hang straight down now without pain - that's very helpful. I'm 99% sure my bicep tendon is re-damaged, my triceps tendon is newly damaged and probably one more rotator cuff tear. However, I can now rest my elbow on the table and scratch my nose without a lot of pain - could not do that at all last night so the bicep damage is nothing like a few years ago.
I'm having a bit of trouble getting genuine Mikuni jets. Thought I has it all figured out a MapCycle.com but as I tried to go to checkout, the page closed and the cart was empty - annoying - I had just spent a LONG time putting the five parts in the cart!
I could go out and do some light work, but I'm not going to until I can put the engine hoist away. I have to partly pick it up to pull the pins to fold the legs (poor manufacturing). It's heavy steel and all I can do to get it done with both arms. I have flat jacks - I'll probably use them instead of just lifting. Had I taken the time to put it away when I should have, I would have no problem now :-(
August 21, 2024 My arm is working a little and does't hurt too much if I keep it below my chest. I figured out how to put away the engine hoist without my right arm doing much, so I was able do a few things today.
I mentioned before that the hoses were run wrong and might not be the correct material. The feed line was a fuel line - really bad idea for hot oil. The original herringbone return line being run wrong is now damaged so has to be replace - it's a shame - those original lines last basically forever and are no longer available. Both will be replaced with transmission oil cooler hose which is very safe for the purpose.
I noticed that the oil tank, besides being ugly was weeping at the bottom and at each hose connection. None of the hose clamps were more than finger tight and the bottom of the tank has already been fixed once and is weeping. I generally send oil tanks to cNw for their service. The take them to bare metal inside and out, seal off the chain oiler, cut off the bottom mount and weld a plate over the bottom so it cannot crack, and powder coat them. I happen to have one already done because I send them in batches so I'll use that one on this time. It's a $170 service but the potential wreck caused by the bottom of the tank spilling oil all over the rear wheel at speed and the potential engine destruction in the process makes it an important and worthwhile upgrade. I was shocked at the amount of sludge in the bottom of the oil tank. Nortons always have some but the oil would't even drain through it - I had to keep sticking a screwdriver in the drain hole to get it to flow. On top of that it stunk - sort of like gear oil but much stronger.
The battery carrier is a mess and I need to provide a way to keep the battery in place - both are much easier to do with it out. With the battery tray and oil tank out, I could see even more problems. The gearbox quadrant spindle and selector spindle are both leaking. to fix those and to not fight the breather, I'll take the gearbox out and replace those seals, clean it all up, and replace the breather. Of course, the entire primary must come apart, but that's not really a big deal and it will be nice to be sure it's all good.
Many bikes I work on have most fasteners way over tightened. This one is the opposite. All the head steady bolts and nuts were barely more than finger tight so it was doing nothing to speak of. I also noticed that the rear ISO appears to be the original non-vernier type. If that's the case with this much taken apart it's time to fix that - I haven't checked it carefully yet but the rubber boots are certainly not on correctly for a vernier version.
So, all that said, sometimes you have to make a mess to clean up a bigger mess!
August 23, 2024 Well, all I could think of for a while was the old saying: "Greasy, Grimy, Gopher, Guts!". The battery carrier had about 3/16" of road grime on the bottom and supports. You cannot blast grease and grime - the media just sticks. Scraped, cleaned with WD40, cleaned with denatured alcohol, washed in hot water and soap and finally got it clean enough to blast. Then, how do you blast one armed? I figured out that I could put my right arm in the hole using my left hand and once it was in the resting it could work without problem. I blasted the battery carrier, rear fender loop, head steady spacers, and head steady. The battery carrier has so many nooks and crannied that it will have to be washed a couple more times in hot soapy water and then blasted again. It is coming out nice however.
Since not much oil came out of the tank, I was curious and removed the engine drain. Even though it had the dangerous feed line check valve, it certainly wasn't working - the sump filled a 36 ounce coffee can to the brim!
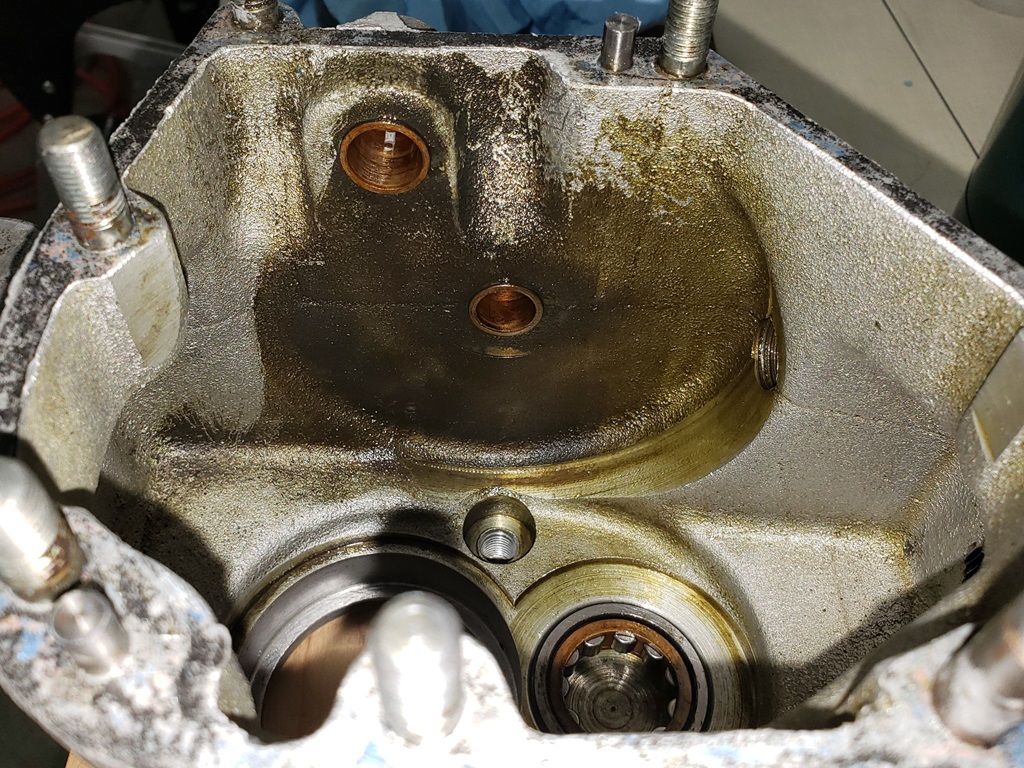
Since I decided I have to take the gearbox out, I started on the primary. Finally, something was tight - WAY too tight. The outer cover nut was extremely tight - I'm hoping that the cover is not ruined. There was absolutely no gap between the inner and outer covers and the slot was filled with gray sealer before the cover was put on - both of those things ensure leaks! The primary was a testament to how to not do things:
- The primary chain is supposed to be adjusted for a 3/8" total up and down movement. I measured it at 1-3/4". The chain has been slapping in the inside top of the inner primary!
- Disassembled the clutch. The center nut used the 850-style tab washer - good thing, I unscrewed it with my fingers!
- The rotor nut was on so tight that I could not get it off with my longest breaker bar so I used my electric impact. Besides holding the rotor on, it forces the front sprocket onto the taper and usually the sprocket is very difficult to get off as it should be - wait for it!.
- The stator nuts were barely tightened.
- The rotor came off very easily and the rotor spacer was installed correctly. However there were spacers between the rotor spacer and sprocket. These caused the rotor spacer to have no pressure against the taper and for the first time ever, the sprocket just slid off. That was an total engine destruction waiting to happen!
- The three screws that hold the inner primary to the engine had no sealer so the wet sump was draining into the primary.
- The crankshaft seal is weird. It's either in backwards or a all rubber seal - I was to tired to look at it further and I had already overdone it with my arm.
Other than taking the rear wheel off so I can replace the hoses and taking the gearbox out, I think the taking apart is done.
August 24, 2024 Lots more wrong today and only got in about five hours before my arm/shoulder started hurting too much, Today's progress/discoveries:
- Took the inner primary off. the three mounting screws and the crank seal are were all leaking badly. Will have to change the crank seal - it is not the correct seal and not installed all the way so it was cut by the key.
- Took the rear wheel off. Lots of watery grease on the axle, seals in wrong, cush drive rubbers worn out, heavy grime, so far, can't get the backing plate separated from the hub and the bearing seals are installed wrong in the drum.
- Noticed that the swingarm is leaking - at least needs new o-rings.
- Jacked the bike up so I can take the gearbox out but noticed that although the center stand is new, it has the old style pivots and the cradle is wallowed out - will have to remove the cradle to fix that so will now take the swingarm off - hopefully the spindle and bushings are good.
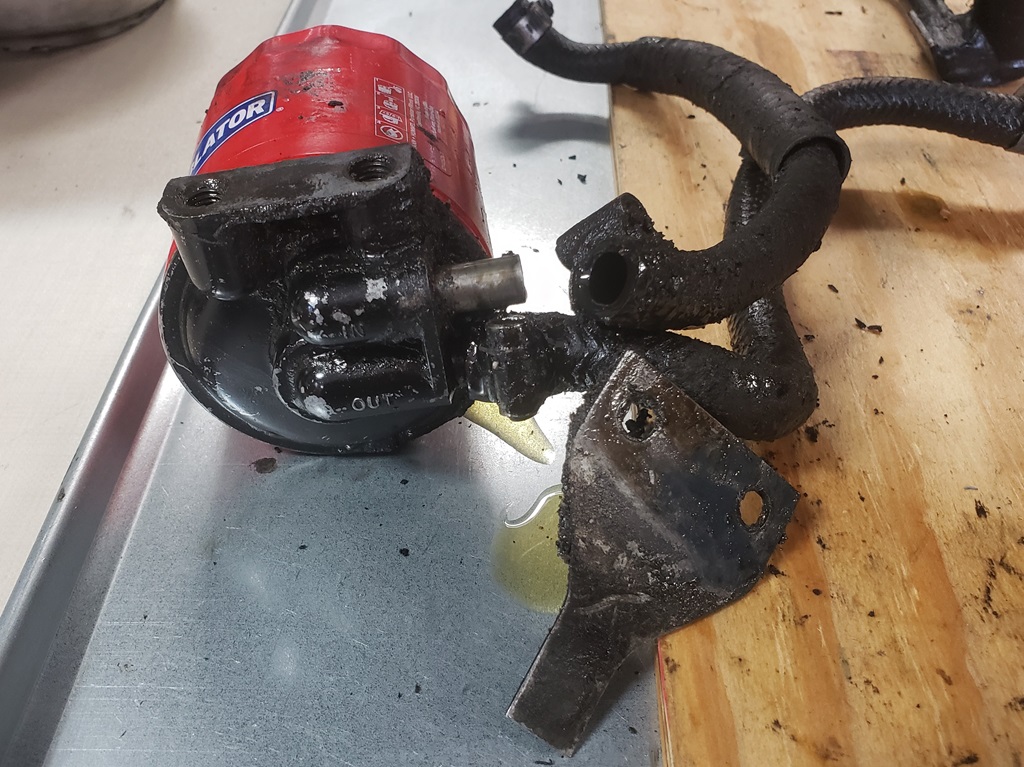
- Took the oil filter housing off so I can change and properly route the hoses. The "in" hose simply fell off! The "out" hose easily slipped off without unscrewing the clamp - yet another disaster that was waiting to happen!
I let the owner know that this is going to take much more time than originally expected!
August 25, 2025 Another long, filthy, one-arm day! Too tired for all the details so I'll cut to the chase.
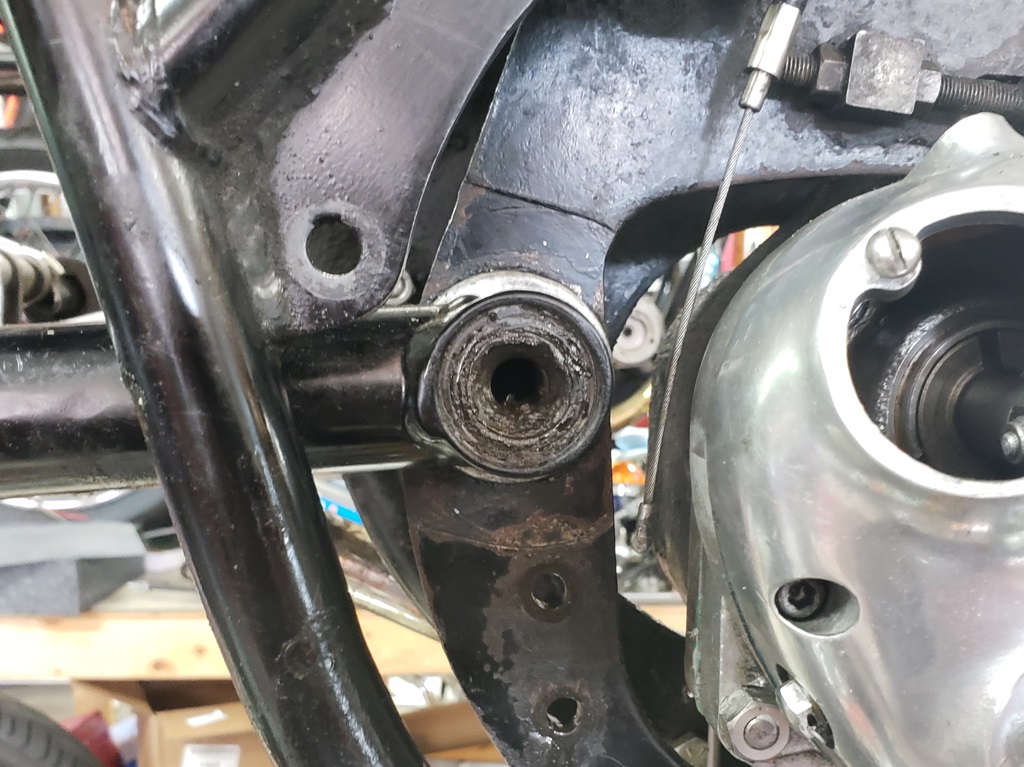
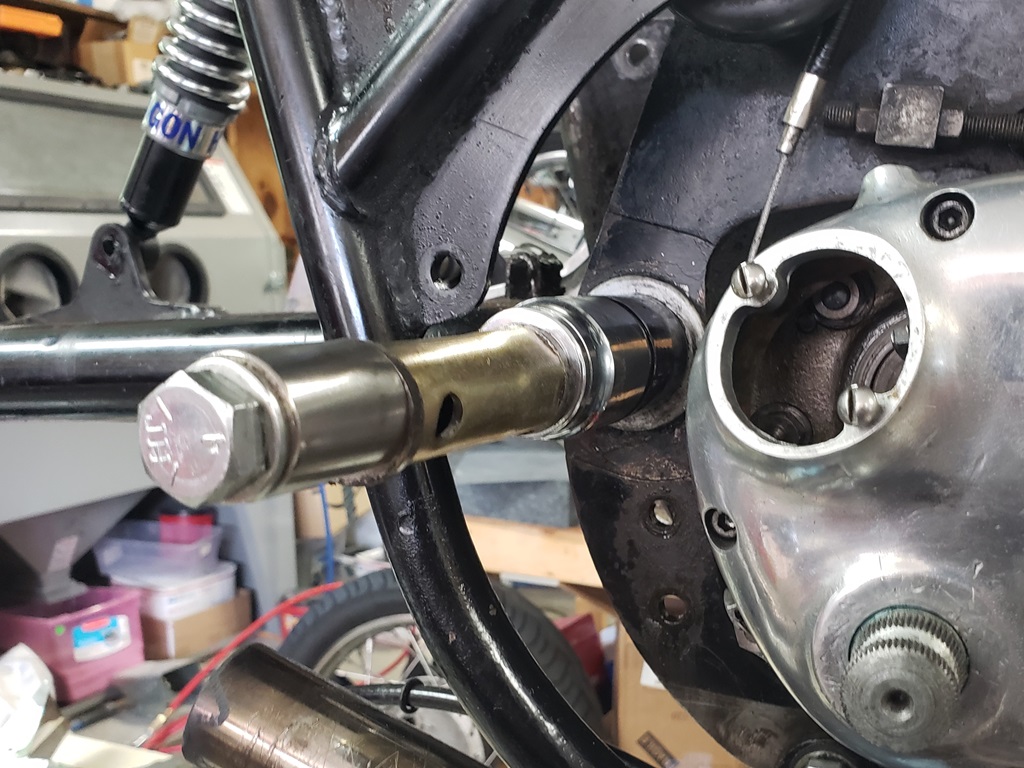
Until today, there wans't going to be a lot of parts expense. Well, that has changed. I thought the swingarm was leaking based on the tracks leading down from the caps. Actually, the leaking stopped LONG ago! The first picture shows what I saw when I removed the cap. Grease! OK, let's pull the spindle and see what damage was done - nope! OK let's try a slide hammer - nope! OK, rig a puller - it will either come out or the cradle and swingarm will be thrown away. It finally pulled out. At first glance, not terrible, but then put on glasses - worst worn spindle I've ever seen. Generally, the bushings are so much softer than the spindle that the spindle does not wear if all is installed right and 140 oil is used as designed. The OD of this spindle is .007” smaller than the non-worn part! It's junk, the bushings are junk, and wait for it…
The swingarm will be OK, I think. So, then I checked over the cradle. The spindle is quite loose, the ISO is an original, rusty, worn-out mess, the center stand holes are very worn out - the cradle is toast! Fortunately, I collect cradles so I should have a good used one. New cradles are over $300!
It was a real balancing act to get the gearbox and then cradle out one-armed but I got it done. Then I sat there cleaning things for quite a while - I'm tired of filthy hands!
August 26, 2024 After cleaning on the frame for what seems like forever, I thought I would cleanup the rear brake. Notice the two screw in the oval. They have been rubbing on the inside of the brake drum. At first I had no idea how. There was a missing thin spacer but that should not have cause this. Also, notice how oily/dirty it is. There should be NO grease and grime there! After loosening the tab washer, the screws came out with fingers only. Then I proceeded to disassemble the entire brake plate with no tools! The result? See the video. Long story short, the brake back plate is trash - it's a shame because it's powder coated so not original and was probably new recently. Also, the shoes appear new but they are soaked with oil. I'll sand them and see if there's good material under the surface but I don;t hold out a lot of hope. The only steps forward today was that I installed the reed valve breather and I identified three cradle candidates. On is from a 750 and needs
cleaning/blasting/painting. I prefer to use the later center stand pivots and if I use the first one would have to ream out the holes. The next is an 850 version but I would have to build up the area where the center stand rests when down - not a bid deal. It also needs to be blasted and painted. The last one is excellent except that I think it is powder coated and not well done. Getting powder coat off is VERY difficult. I will try that one first - if the finish comes off then I'll use it. Although I could powder coat them, I never do - I don't like powder coat for cradles because the mounting bolts can loosen.
August 27, 2024 Doctor and PT today so not a lot done. Did decide on the cradle. The powder coated one has all good holes so I chose that. After cleaning, I blasted for a long time, I cannot get all the power coat off, but I did get it removed from the mounting areas and I roughed the entire surface. I will go over a few chipped spots with sandpaper to feather those areas. Then I will paint it - it will look and function great.
I probably won't update this for a couple of days. I have a couple of small projects to knock out between getting the cradle ready. Since the gearbox seal is bad and I have
worries about the sleeve gear bushing, I will disassemble the gearbox and when I install the cradle, I'll install the gearbox housing at the same time - much easier for a one-armed man that way!
August 29, 2024 Didi't accomplish much today. Had the podiatrist this morning and cardiologist this afternoon and have been fighting with over hydration all day. I had a steroid shot in my foot this morning and it has not kicked in yet - when to does, I'll be much better able to get things done.
I did find two rear brake backing plates on eBay and made offers on both. I made an offer on a NOS one yesterday, but they countered too high. Hopefully one of the ones today will take the offer and it will actually be usable. It will need to be blasted and powder coated but that's no big deal. My offer on each amounted to $50/delivered. I won't go over $60 delivered since it is very hard to tell the condition.
August 30, 2024 the seller of one backing plate responded with a counter-offer - silly as I wrote a note with the offer that it was final. The other seller accepted the offer and the backing plate should be here Tuesday.
More sanding and blasting on the cradle and then masked it for painting. I convert my powder coat cabinet back and forth for painting. Got it setup for painting but the humidity was too hi even though my shop has AC. Should be fine to paint tomorrow.
August 31, 2024 Painted the cradle. That went fine but I did skip a step! I forgot to make sure my suction was working. The vacuum was running but it kept seeming like there was a lot of paint in the air. Fortunately, unlike usual, I was wearing a mask. The air filter in the picture is basically clogged. Didn't hurt the painting, but I was covered in paint! Anyway, when using the paint shown, all coats mush be applied within on hour and then it cannot be re-coated for two days. I'm hoping when I inspect tomorrow, I'm happy with the job or I'll have to lightly sand and try again Monday evening. Generally I get it in one try but normally I start from bare metal. From what I can tell right now, it looks good.
Between coats, I restored the speedo drive. It looked a mess and was dripping worn out grease. There is not reasonable way to take them completely apart. I did take the cap, felt and thrust washer out, cleaned as best I could, packed with new grease which pushed out most of the old grease, and reassembled. Then I cleaned it thoroughly on the outside, sanded the paint smooth, and repainted. It looks good now. An interesting thing is that it was installed without the "top hat" so I have no idea how it wasn't destroyed, but it does look OK.
Then I tackled the greasy, grimey, gofer guts swingarm. I mentioned before that it was powder coated. That's usually fine. In this case, there are issues. The rear brake cable was improperly routed and a large area is worn through the powder coat and even into the metal. It will be structurally fine but I'll need to figure out how to fix that area. More importantly, it was not masked before coating. The inner surfaces of the pivot area cannot have powder on them and not only do they but it's not even smooth. Apparently whoever had the swingarm powder coated knew there would be problem because instead of the proper o-rings, it had some sort of flat rings and RTV. No way that will work on a pivot. I have to get that coating off and get the metal flat without removing more than a couple thousandths of metal.
There were some large areas of the frame tubes near the bottom that were bare metal once I got the road grime off. I spot sprayed them with the rest of the can I used for the cradle. Not trying to fix the terrible frame paint, just prevent rust in those areas.
My right arm is working somewhat now. Still can't move it in certain directions but at least I can old things while working on them with my left.
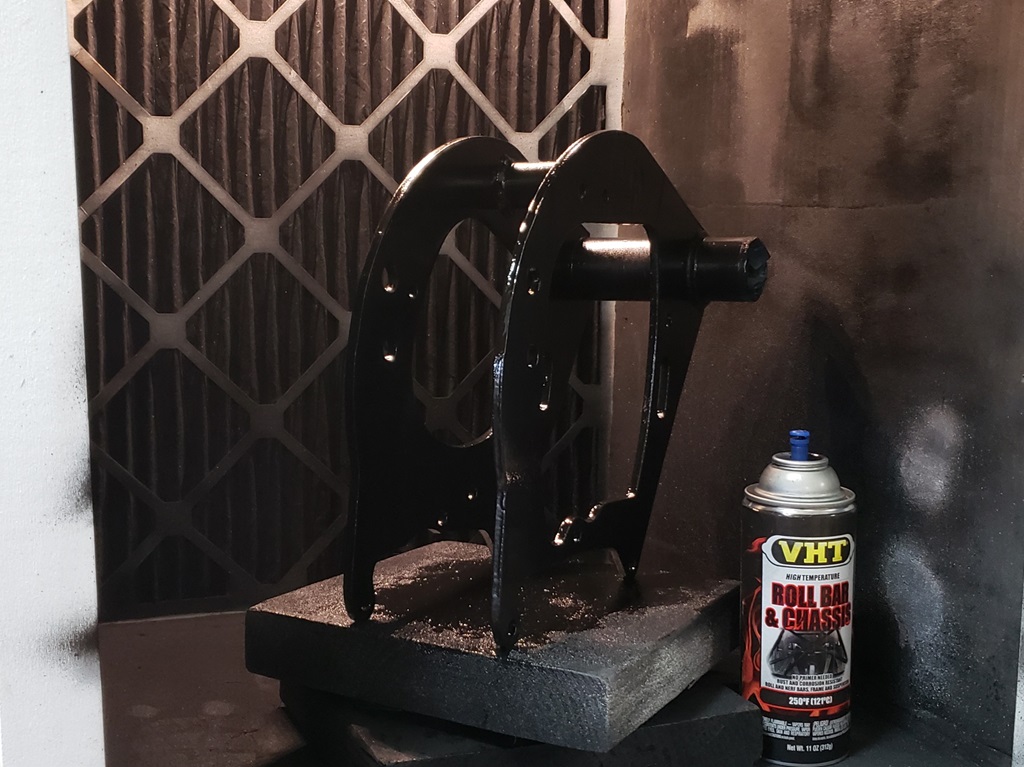
September 1, 2024 Got quite a bit done today. The first picture shows the finished product of the cradle. It came out very nice!
The second picture shows the bad place in the swingarm after a long time in the kitchen sink getting the last of the grease and grime off it.. There are lots of scuffs but only this one is to the metal. The third picture shows my fix. It's a long way from perfect but the area is hidden behind the z-plate and this will at least stop rust.
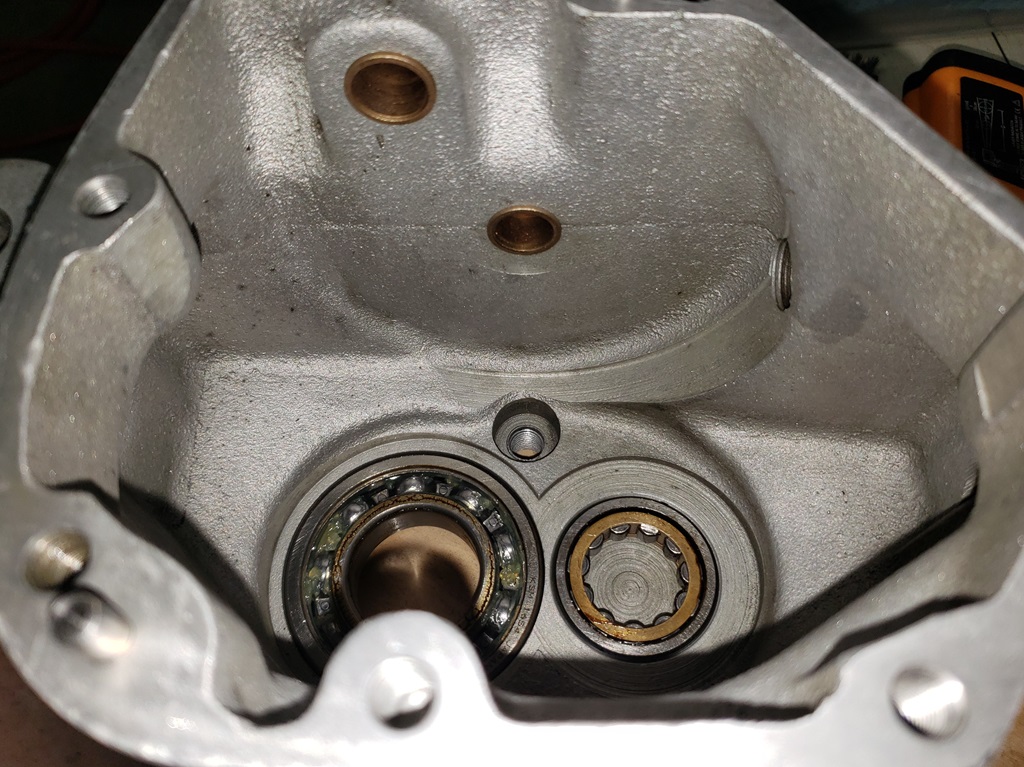
The first gearbox picture just shows some of the grease and grime. I mentioned that I was suspicious of the sleeve gear seal and bearing. The seal is completely wrong, and you can see that the spring is destroyed. On top of that, both the drive and timing side mainshaft bearings are rough. They are not terrible but must be changed none-the-less. Also, the drive-side sleeve gear bearing is a slip fit in the shell and it should be a heat install so I'll have to install the new bearing with bearing set. The layshaft bearing
has been changed to a roller bearing, and it is good. The third gearbox picture shows the case cleaned up. It still needs more cleaning on the inside but I'm being careful of the roller bearing. I may remove it if I can't get the case clean enough with it installed.
More on the gearbox:
The timing side mainshaft nut was overly tight. I normally can easily remove them with a 18" breaker bar. I was having to hold the gearbox with my bad arm and pull with my good. My chain tool holding the shaft from turning slipped, I instinctively tightened my grip and hurt my should more :-(
If this were a bike I was building to sell, the mainshaft, sleeve gear, and possibly clutch center would all have to be changed. Because the sprocket nut was not tight, the sleeve gear splines have wear. Because the clutch center nut was not tight, the mainshaft splines have wear.
Once assembled correctly, they should be OK and they are not dangerous, so I'm probably not going to change them - I'll look at it more when assembling.


September 2, 2024 There's a thing on social media called "Expectation verses Reality".
Today's, expectation: The cradle installed with the new rear vernier isolastic and the gearbox shell,and with gearbox inner cover ready to go on.
Reality:
- Started on inner gearbox cover.
- The cover was ugly and had a lot of gasket sealer. After working on that for a long time, I decide the time was not worth it and since the shell had the same problem, removed all the and dowels and blasted them clean and then peened. Of course that meant a lot of kitchen sink time as well.
- Noticed that the kickstart shaft had a lot of play. Turned out that the steel bushing was worn - fortunately I had a good used one in a parts collection I bought.
- Checked both sides of the inner cover and the shell for flatness on my surface plate. Also, neither surface was flat - they were not bad but making them flat prevents leaks, and it only takes a few minutes per side - not really trying to remove metal, just get rid of high spots.
- With the inner cover ready, I went to work on the shell.
- The first thing I noticed was that the layshaft bearing was not fully seated. That explains why it was put together without shims - no layshaft end play.
- Since the bearing had to come out, I had to remove the shift quadrant and pawl. The first picture shows what was behind them. BTW, the shell still stunk and this was the last of the stink.
- To get bearings out, you heat to about 212F and slam on a piece of wood. Normally quite easy. Had to get over 300F and slam a LOT. The bearing was Loctite'ed in for some unknown reason and not with proper bearing mount!
- Masked the studs and blasted the shell clean again with a lot of kitchen sink time..
- It turns out that the bad sleeve bearing was undersized on the OD and over sized on the ID. So, the new bearing did not to have bearing mount applied. The sleeve gear was slightly too big to fit the bearings (very common), so about 30 minutes of 220 paper and it was a very snug slip fit as it should be.
- Removed the studs and dowels and flattened the surface. The nuts that hold the inner cover to the shell were over-tightened at some point in the past so there was a ridge around each which was removed in the flattening process.
- The bearings are in as are the dowels and the crap is all cleaned from the studs.
- The second picture shows the bearings installed and the inside of the cleaned shell.
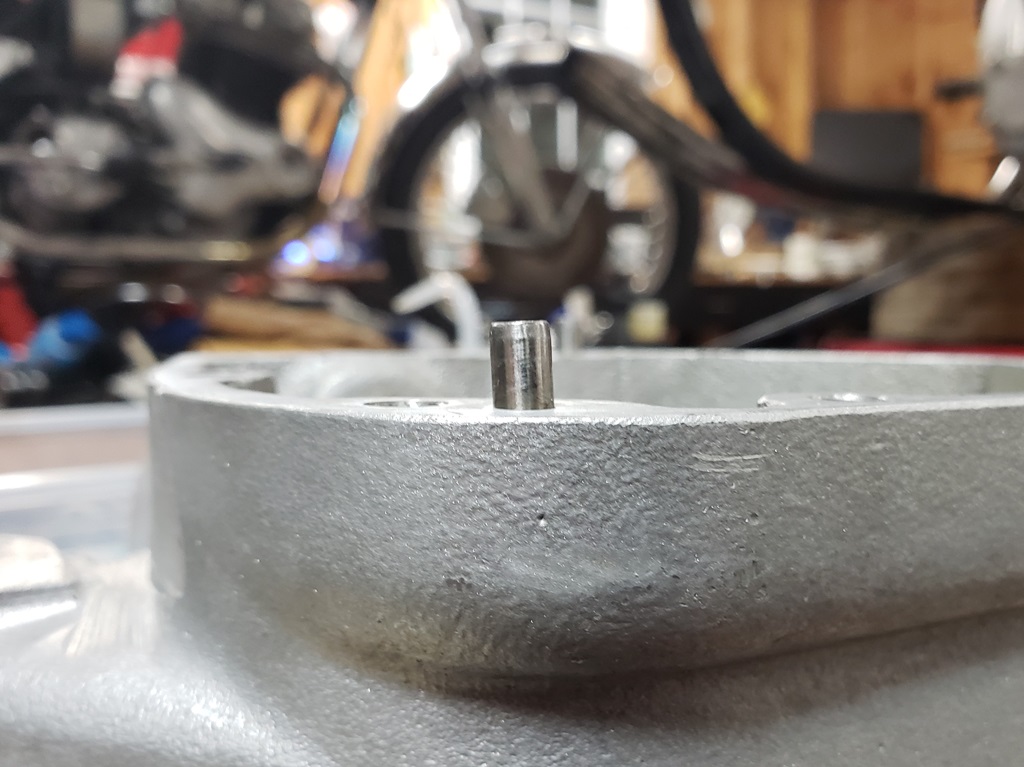
- The third picture shows another issue.The inner cover was very difficult to get off and now I see why. The hole for that dowel was drilled wrong at the factory. I'll find a way to correct that.
So, reality fell quite short of expectation. But, at least all the bad grime is gone. All the gearbox components are covered with black stink. It comes off easily with WD40 and effort and I'll do that as I assemble the gearbox.
So, I hope tomorrow's reality at least matches today's expectation!
September 3, 2024 Reality fail, part two!
Today was the first work day of the month for normal people and of course my biggest IT customer had lots of issues. Got that all resolved at 2:30 PM and then had to go to my business office to pickup may latest Amal order. Without thinking went to open the door with my right arm and hurt it again. By the time I got back and got my arm calmed down, it was 5:30 PM.
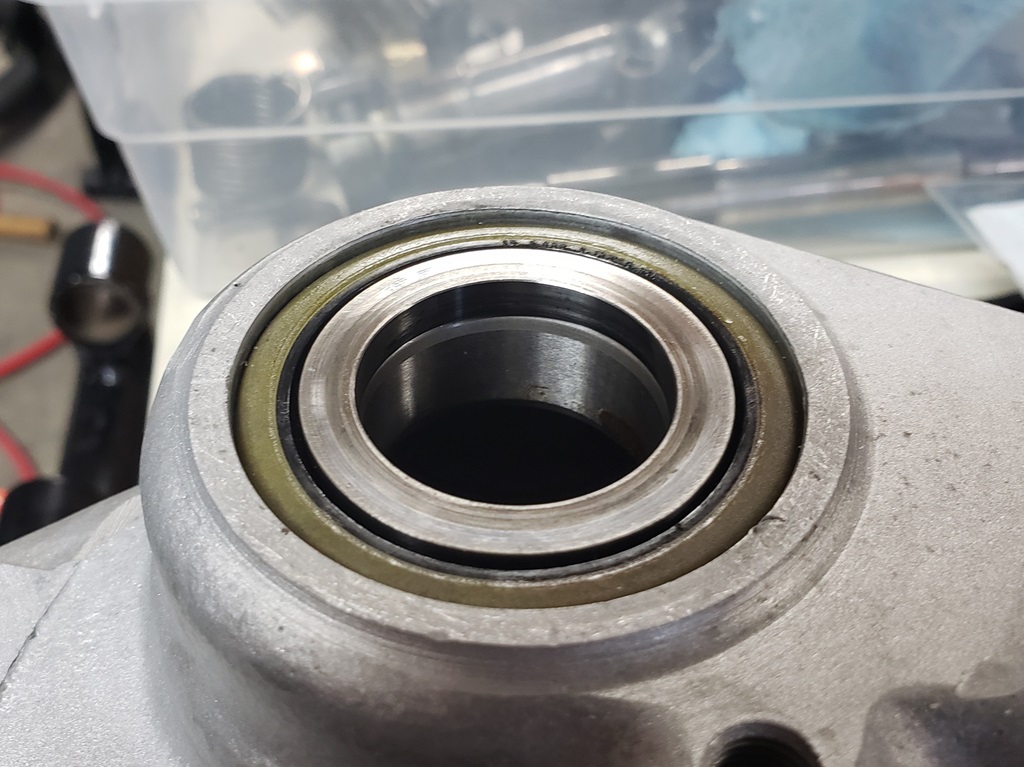
First, I wanted to install the seal for the sleeve gear bearing - that went fine, and the first picture show it properly installed as well as the spacer that it runs against.
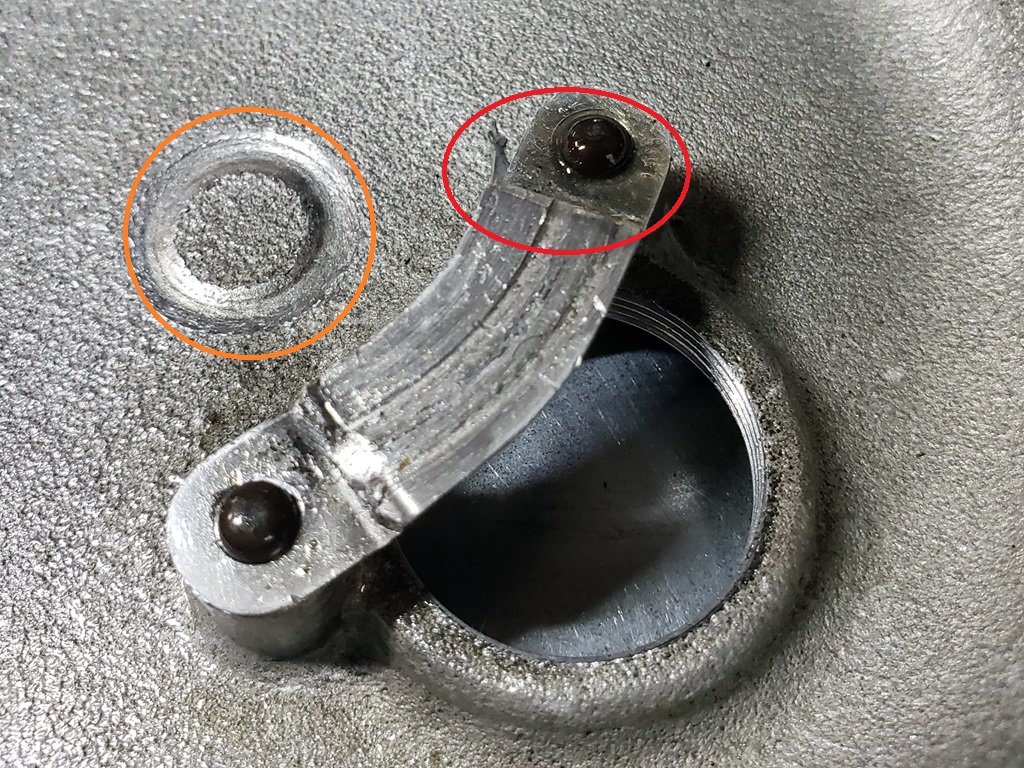
Then I wanted to fix the dowel problem before doing anything else to the gearbox. My plan was to put it together, verify if the hole was in the right place or not and if so, straighten the hole in the shell, put the dowel in with bearing mount, bolt the inner cover on and it sit overnight. First, I removed the dowel and put all the studs back in except the one beside the dowel. Then I put the inner cover on and tightened it down with two nuts. The dowel hole goes through the inner cover into the shell and was probably drilled that way at the factory. I took a drill bit the right size and slid it in - I was shocked, it slid in just fine and when to the bottom of the hole in the shell! So, either both were crooked or something else was wrong. That's when I looked at the dowel - the second picture shows it - very bent! So, nothing to fix, just replace the dowel. This kind of thing is why I look before I leap!
Next, I planned to install the cam plate and quadrant as there is very little room to do it with the gearbox in the cradle. Like everything else in the gearbox, they were covered with black grime. The cam plate cleaned up fine. The quadrant did too but I noticed wear lines inside where the “knuckle pin roller” rides. So, I tried them together and they were a little rough. At first, I figured just polish them, but I noticed a lot of play between the two. So, off to my used gearbox parts and grab a different pair. They are perfect. I've never seen wear there before! At a glance the bad one looks fine (bottom in second picture) and it probably would work, but for how long?
September 4, 2024 Reality (3rd try): See the picture! It only took eight hours to finish what I thought I would finish two days ago!
Today's good and bad:
- Good: Put the cam plate and quadrant in the shell, that went fine.
- Good: Put the new dowel and test fit the inner cover – perfect. While I was at it I sync'ed the camp plate and quadrant.
- Bad: I'm gun shy now so I not only felt the gear selector plunger but took it apart to clean expecting to find nothing to do! Nope! I still haven't figured it out for sure, but it was full of copper. I think it was copper anti-seize but it looked grainy. When I say "full", I mean packed! Took quite a while to get it all out but at least it works fine now.
- Good: Installed the rear ISO – I never have any trouble doing that.
- Bad/Good: Now for the impossible. There is absolutely no way I can install a center stand by myself with a built bike even when I have two good arms. I needed to install it on the cradle as at least I can do that normally with two
arms. I tried my normal ways for about 2 hours and finally decided it was not possible with my bad arm. So, I studied a while and figured out how to use a ratchet strap to get the spring on after about six failed attempts. All while being sure to not scratch the cradle.
- Good: The gearbox shell and adjuster went in the cradle with no trouble.
- Bad/Good: OK, again trying to work with one good arm, it was time to put the cradle in the bike. That took a lot of tries, again being careful to not scratch the cradle. It is in except for the bottom bolt. Stupid Norton uses a bolt that and it's not possible to get the head past the frame without a lot of work. A 4-3/4" stud is the right answer and I have some – where did I put them – don't ask me!
- Good: The jack is still under the bike but it is standing on the center stand which now works perfectly.
I'm very happy to finally be building and not having black hands continuously!
September 5, 2024 Today is not a good/bad day, it's a good/terrible day!
First chased down better bolts for the cradle to engine as the mismatch that was there were all too short. So, that's all done - a PITA but not hard.
Then came the swingarm. I mentioned before that is wasn't masked before power coating. It took a bunch of filing and test fitting to be sure the inner surfaces would be flat to the cradle when installed. Again, a long, slow PITA, but that came out fine. Then there was the issue of the of the inside where the bushings go - the old ones had been pressed into a galled ID. That too took a bunch of work to get it right. At least when done, it all when together fine. The end caps are so pitted on the inside that they won't hold oil and I'm out of them - but I do have some coming. I have to look, I may have a good used one for the drive side and since it can't be seen when the primary is on as long as the inside surface is good it will be fine.
OK, now the terrible. I started working on the gearbox and the next step is to install the sprocket and get it locked down as that locks the sleeve gear in place. That always takes a few tries to find a place on the splines where the nut keeper's screw will align with the sprocket. Once that was done, as usual, I gave it a wiggle test expecting no wiggle - lot of wiggle! At first I though it must be the sleeve gear since I've already mentions concern about it. So, I tried a new one - same wiggle! So then I went to the other side and looked in the gearbox and wiggled - the bearing is solid in the case. So I took the sleeve gear out and wiggled the inner race - the new bearing is no good! Remember, do to my arm condition I put the bearings in the shell, the shell in the cradle, and the cradle in the bike. I will try to replace the bearing in situ, but I might have to take it back apart. so today's expectation was a completed gearbox and today's reality...
The used rear brake I bought on eBay arrived today and at first glance it looks fine. It will need to be blasted and powder coated butt I expected that.
September 6, 2024 I got the bad bearing out and took a new one from a gearbox I was building for another project before I got busy on the current batch of customer bikes. It's installed but that's all I could do today - arm/shoulder hurting too bad.
Forgot to mention: When I bought out Old Britts, I bought their AN stock and their Mikuni stock. I bought the Mikuni stock for a guy who uses them a lot and sent it all to him. the other day i remembered that and asked if he had the juts I need for this bike. He did and they arrived today - pennies on the dollar. So, if I ever get back to the carb - I'm set!
September 7, 2024 Weird Day! First, for most of my adult life I've slept four to five hours/night. In my old age I still do that but I usually go to be between 1am and 2am, get up two-three times for the bathroom and when I see that it is getting light outside, I stay up. Yesterday I was very tired and went to bed just after midnight. Still got up two-three times, but channeled my inner teenager and stay in bed until 10:30am!
So by the time I got up, had breakfast and did some business paperwork the phone calls started – mostly people wanting help with their bikes or wanting parts. Then, around 3pm, the mail came and it included my latest AN order. So I worked on that until about 5pm.
OK, finally to the bike. It was cool and dry outside so the big door stayed open for the first time since spring. Then I felt a change in the universe! I thoroughly tested the sleeve gear, bearing, and mainshaft. No wobble so the new bearing is good. The sleeve gear splines have some wear as do the main
shaft but they run together great, so I decided to use them. Then the miracle happened! I pushed in the sleeve gear, put in the spacer, slid on the sprocket, tightened the nut fully, slipped on the nut retainer and for the first time in history, the screw lined up perfectly!
OK! Clean up and inspect all the gears, bushings, mainshaft and the layshaft. Took a long time to get the black stinky off them but the gears were all very good except the mainshaft first gear. It was not terrible, but the teeth had funny wear. Double checked the layshaft first gear and it was clearly new.
Put all the internals in including shimming the layshaft and test fit the inner cover. Two shims made the layshaft a little tighter than I like so I took the cover back off and removed one shim. Then put the cover back on and torqued it. Very nice end play of the kickstart (layshaft end float). Next went to install the timing side mainshaft nut and it was been mangled so found a good used replacement and torqued that into place.
Started to just put the outer cover on but was suspicious of the flatness. So, removed the internals and sure enough it needed to be flattened. That done and it apart, my inner self said: "surely you won't put that on without buffing it". After a short argument, I was standing at the buffer. The cover is covered with dings that I don't even think I could sand out, but I did make it look a lot better. By then, I was out of steam, so it will go back together and get installed tomorrow. While I'm at it I will replace the seals even though the owner already did that - they come in the gasket set and I might as well.
September 8, 2024 Had a bunch of IT and other issues to resolve and didn't get started on this until about 4pm. Got the gearbox fully assembled and tested - that went fine. As usual getting the clutch mechanism properly aligned was a PITA, and a real PITA one-armed but I got it perfect in the end.
Here's the nonsense for today. The oil level screw was "safety wired". Well, not really. It has two small holds drilled through it and had a piece of safety wire through them - the only thing that did was keep you from putting a wrench on it! It was not locked to anything! So, I removed the wire and used the screw. In truth I don't check the level using that screw. The gear oil is slow to move though the gearbox when filling and it can seem like it is full when it is about half full! When I replace the oil, drain it and leave it for a while to get most of the oil out. I take the inspection cap off, pour in 13oz of gear oil and wait for it to settle. The gearbox holds 14 oz, but getting that last oz out is hard so I check if after it settles - if it needs a little more to get to the oil level screw (looking inside), I add it. It is filled with Valvoline 85W90 conventional gear oil.
Then I installed the end caps on the swingarm. I thought I would have at least the drive side used but I didn't have either.With them on I started the process of filling with oil. The oil moves through the spindle and tiny holes to the bushing slowly, So, I kept adding more - I want it brim full. I will re-recheck tomorrow and add more if needed - probably will be as the bushings are "oilite" and will suck in as much oil as they can hold. Norton calls for 140 but I haven't been able to find that for a long time so I use Valvoline 85W140 and it seems to work well.
September 9, 2024 Finished topping up the swingarm and locked it down. Assuming it doesn't leak, it should not need any service for many years.
The I started on the used read brake plate I bought. The good news is that is perfect except for the paint and original - anodized on the inside and painted on the outside. The weird part is that it surely had the original paint but at one point I thought there was something wrong with my sand blasted as it was taking forever to get the paint off. Normally original paint comes off very easily. I expected 5-10 minutes. Took over an hour! I even stopped and tried a different original part - nothing wrong with my sand blaster. the outside is now powder coated and I've refreshed all the internal parts except the shoes. the ones that came with the bike look new but oil soaked. The ones that came with the brake plate look much better but are the original material so I'm torn whether to use on of the sets or neither of the sets. Once I have the brake plate ready for shoes, I'll try both sets on the pivots - which ever is good I'll see if the clean up.
Once the brake plate is ready and I've cleaned an inspected the drum I'll have to make another choice. If the bearing in the brake drum is good, I'll re-assemble with new axle and nut the owner provided. If not I'll install a Don Pender one-piece rear axle and put the parts the owner provided in stock. Usually getting the bearing out is a nightmare and I can't see putting it back together with the nightmare there for the next time. The parts should be a wash.
Once the rear wheel is ready, I'll re-blast the parts I pre-blasted and powder coat them. While they are baking I'll probably tackle the primary. The battery tray must be installed to install the rear fender so it will be the next to be coated. They are a little difficult with all the nooks and crannies and the overall size, so it will get done be itself. All the other parts are small so they can get coated and baked at the same time.
One possible long pole in the tent is that I know I'm low on powder and I keep forgetting to order more - I'm going to do that now!
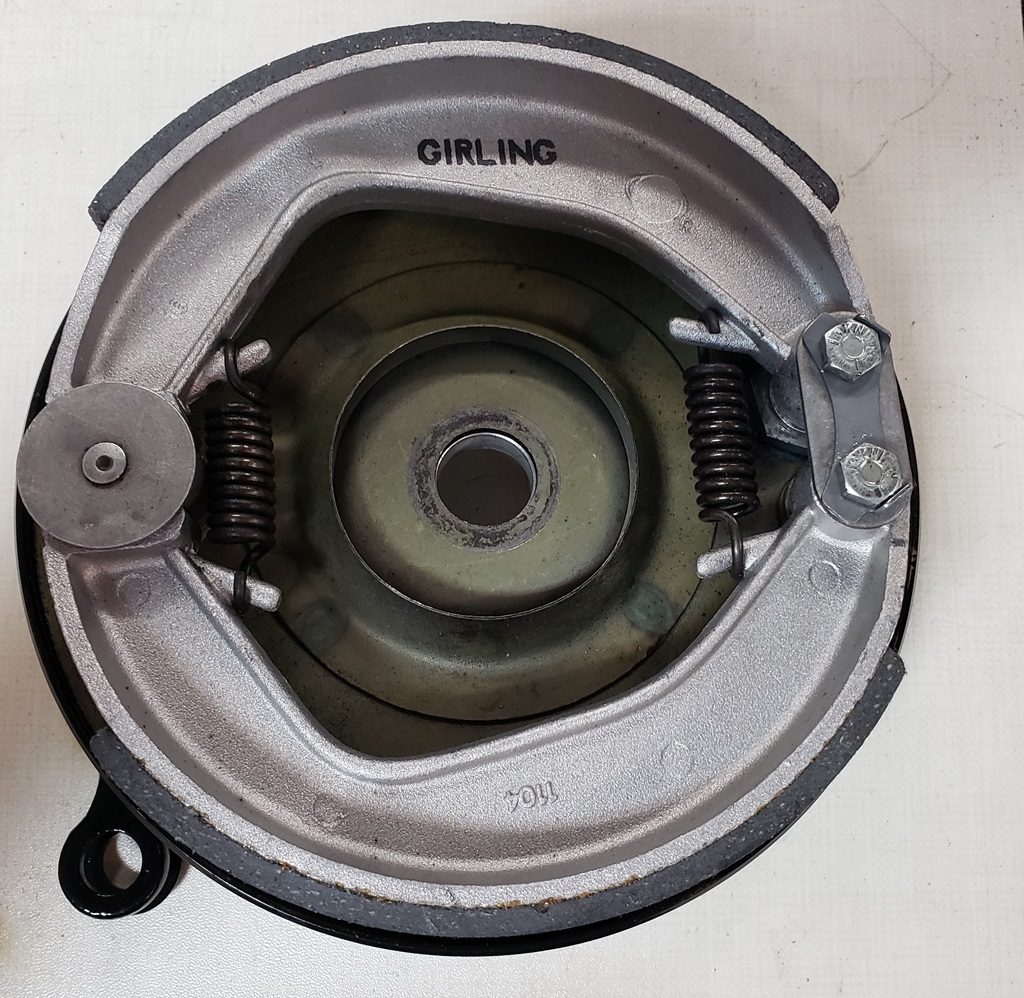
September 10, 2024 See the pictures. The first one is after cleaning, blasting and re-plating the brake plate parts. The second shows the assembled brake plate from the side that shows.The third shows the assembled brake plate from the inside. Everything is fully tightened and:Loctite'ed, It turned out that the pivot holes of the shoes that came with the bike were very worn and the set that came with the used plate I bought we OK but had very little more miles on them. So, I installed a new set.
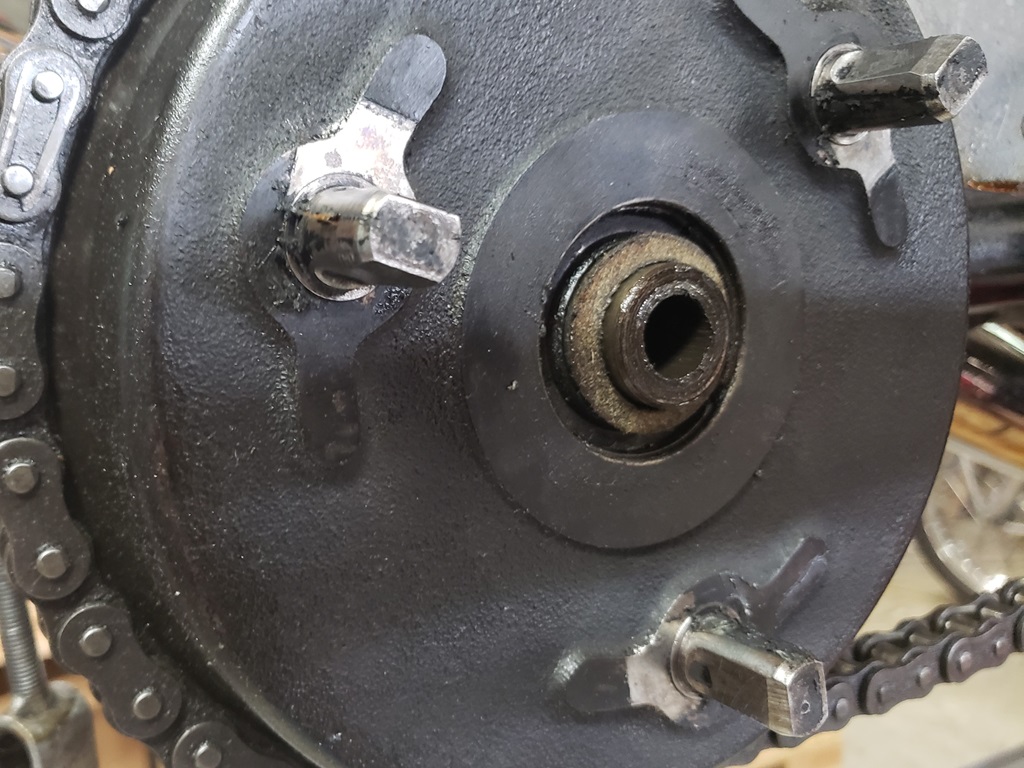
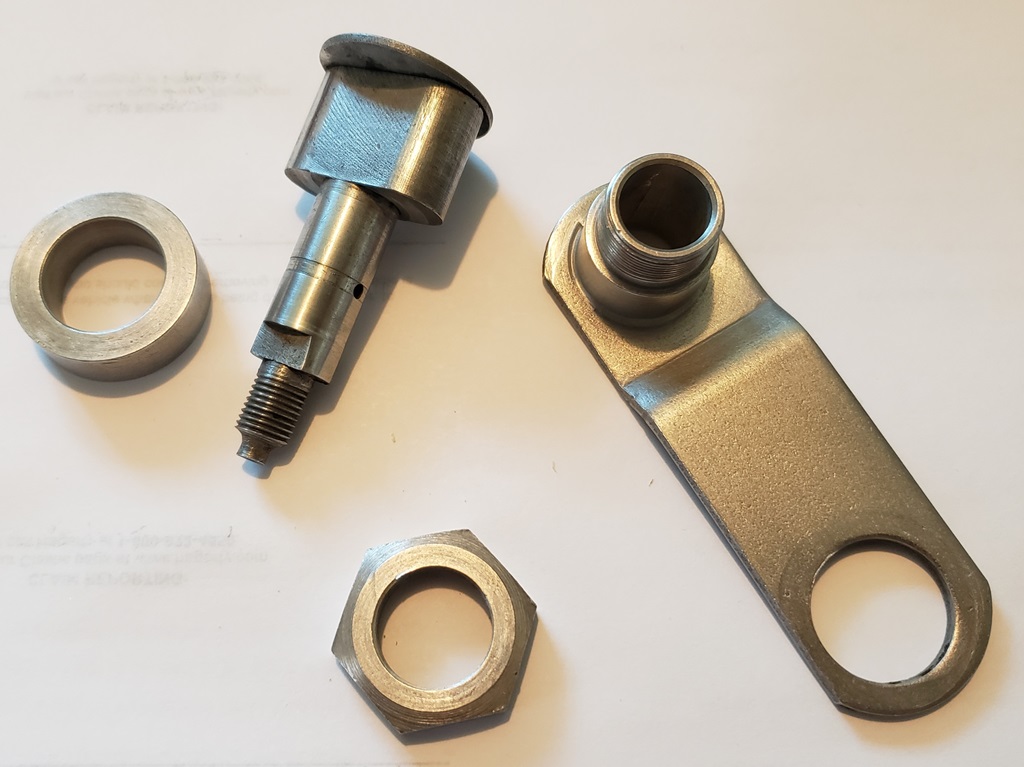
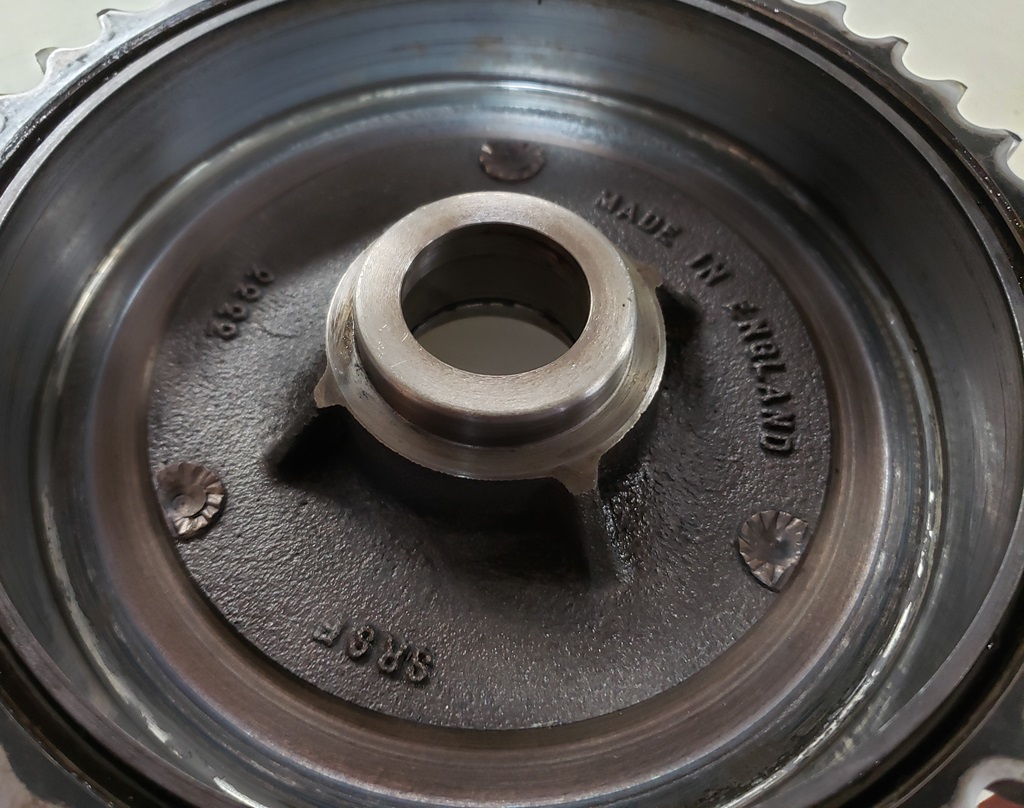
The last picture shows the drum with the "guts" removed and partly cleaned. The bearing is toast. Getting the "guts" out of a Norton rear hub is very difficult so it took a long time. The red arrow shows the groove cut by the pivot lock screws being loose and dragging on the drum. The groove is about 0.012" deep. Fortunately, the drum is still fully usable. So, it will get a new bearing and a Don Pender one-piece axle. Installing the rear wheel and eventually changing the drum bearing are much easier with the one-piece axle and that is especially true with new cush rubbers And, it is still possible to remove the wheel without removing the brake so there is no good reason to not upgrade.
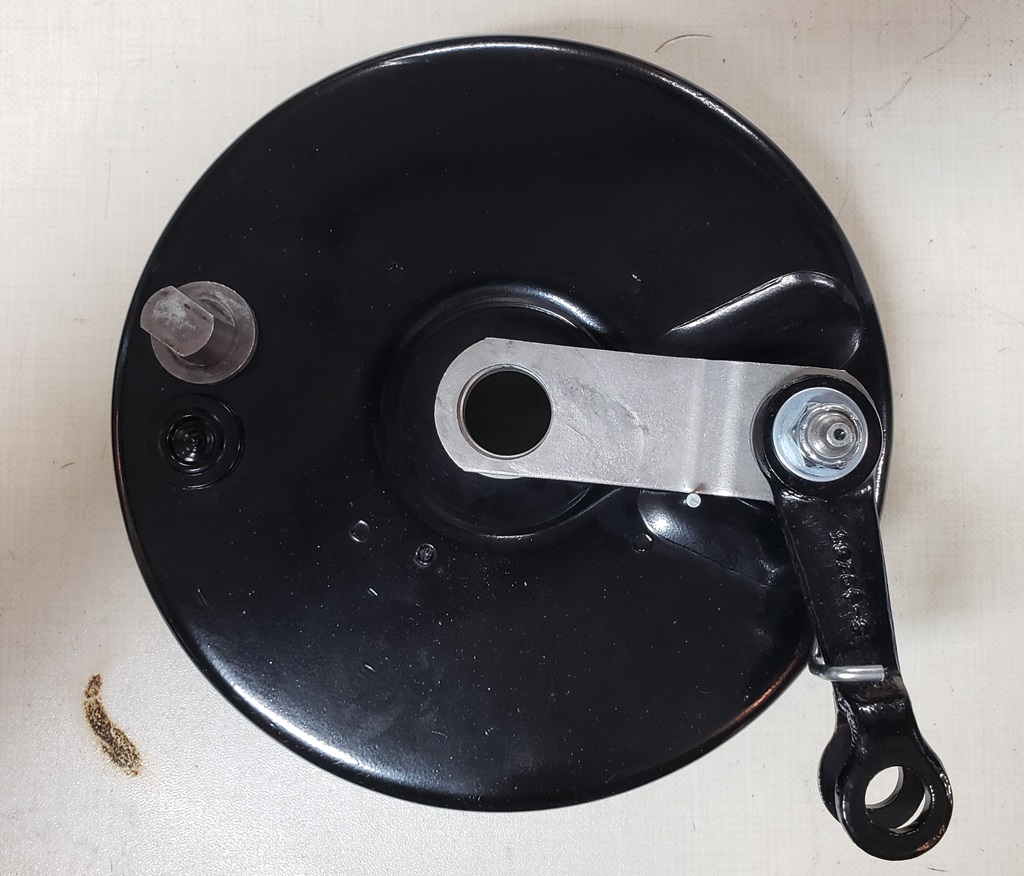
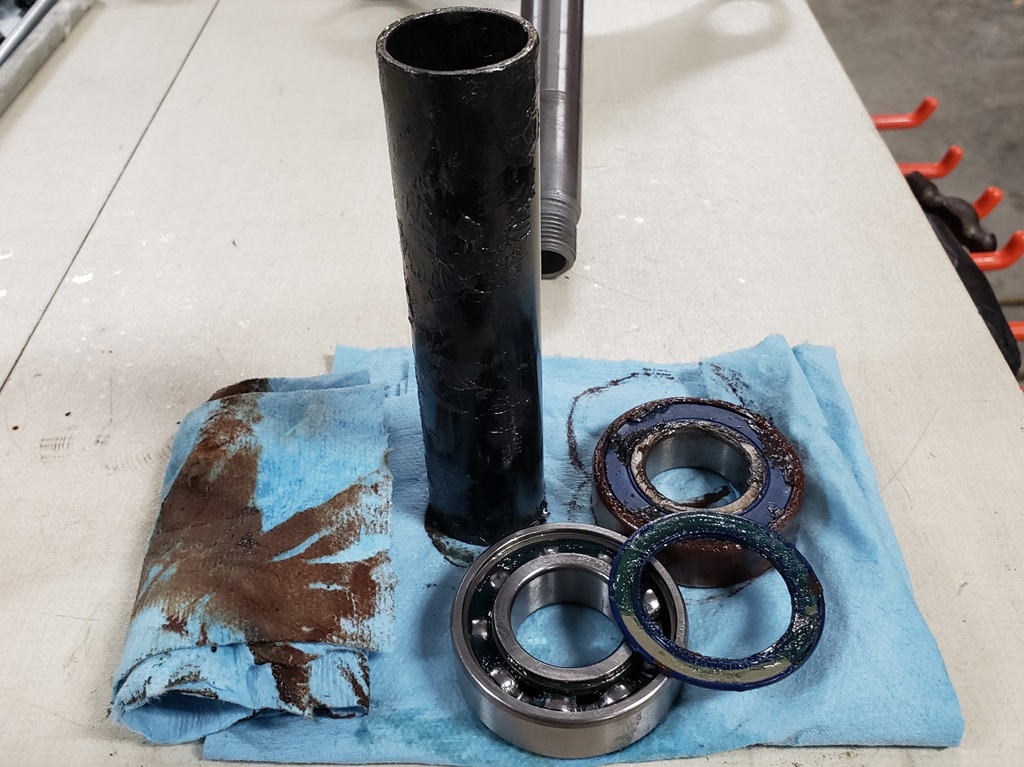
September 11, 2024 Continued amazement! At first, I could not get the new bearing in the brake drum during a test fit. The old one came out hard and I noticed a seal retainer came out with the bearing that was not supposed to be there! The test fit was failing because I could not get it beyond the lip around the circlip. Two fingers, 120 grit paper, and patience and that was resolved. OK, final cleanup, and sanded the brake surface. Then with all the grime gone I could see that the outside needed a new coat of paint, so I masked and did that. I started to check the fit of the circlip when I realized what had been done. First that seal retained in the wrong place meant that the bearing couldn't go all the way in and allow the circlip to fit. The damaged lip was probably from trying to hammer the circlip in. In the end, the idiot ground down the backside of the circlip to get it to fit! This also added to the brake plate being closer to the drum than it should have been making it even easier for the pivot bolts to rub the drum! Fortunately, I have a new one.
OK, check the rear hub bearings, not terrible, not great but the grease was a black watery mess. New sealed bearings are less then $3 each - took it all apart and installed new bearings. The cush rubbers were mangled and rock hard so I installed new. Then in the final cleanup I noticed the hub cap making noise when polishing it - one screw missing, four loose. I stock them so replaced the missing one and tighten the rest.
The rear wheel looks good now and could go on but it's easier to install the rear fender with the wheel off so I'll work on that next and the first step is making a battery hold down and then powder coating the battery tray.
September 12, 2024 And so it continues...
- BSA Triples. Triumph Triples 73+ and 71+ Triumph Twins use a speedo drive with a 5/8" hole
- BSA A65S & A65T used a 11/16" hole speedo drive and Pre-MK3 Commandos use those drives with an adapter for their axle which is between 5/8" and 11/16".
- The Early Triumph Triples and some BSAs use a 3/4" hole.
I mentioned before that the adapter ("top hat") was missing. I wish I had realized that it was the wrong drive. Not only did I restore it mechanically, I even re-painted it! It has a 5/8" hole - can't be used even though the previous owner stuck it on - good way to lockup the rear wheel while riding!
I have a heavy box of old drives so I went through it. I only have one that will work for Commando left and it is chock full of crud. It won't turn but I scraped out all I could and tried to clean it. I left it full of WD40. If I can restore it without spending more than an hour, I will. Otherwise, I have new ones in stock and they are about $50 so it makes no sense to spend a long time restoring.
I wanted to temporarily put the wheel on to get it out of the
way. I ended up sticking it together with extra spacers so I could check it and then get it out of the way.
I didn't get a lot else done due to two doctor's appointments and I finally took the time to do an R&D project I've been wanting to do. I generally surround the battery with self-sticking foam on the battery box, install a bracket to prevent the battery from sliding forward, and then use a Velcro trap to keep it down.
The last bracket I made worked fine but I wanted something better and that would be adjustable for the slight differences in 9ah battery sizes. It looks like I have accomplished that and in the process made it usable for a 12ah battery as well. If at some point in the future an e-start is installed along with a smaller Lithium battery it should be relatively easy to accommodate that too. So, I didn't get the battery tray powder coated today as I planned.
September 14, 2024 I got busy last night and forgot to update!
All the powder coating except the head steady is done, The battery tray is done and installed. The Tri-Spark regulator is installed (it mounts on the middle bracket for the rear fender so that bracket needed to go in before the rear fender. The Z-Plates are cleaned up and installed as they are required for the battery box to be fully installed.
I would have had the oil lines on but I had a rattlesnake situation, Whenever my stepson is here he can't find things in the tool chest and when I point to whatever he's looking for I tell him "You're lucky it's not a rattle snake!" When I took the oil lines off, I cleaned up the protectors and put them somewhere. I looked for two hours but for I woke up and got a pair out of stock - I won't charge for them - once I find the ones about to bite me, I'll use them on my next build as it's a basket case missing most of that sort of thing.
I'm hoping to get the back end all together tomorrow as I still have the front end to do and I can't take that apart without the rear wheel on and the back of the bike strapped down. There's a very dim light at the end of the tunnel - I hope it is daylight and not a train coming!
September 15, 2024 Do you believe in time warps? I worked too long yesterday and was overly tired when I went to bed. I slept longer than normal and when I woke up, I felt like I think a 90-year-old would feel - like I had time warped 16 years into the future!
Finally at around 2pm, I was feeling better and got to work.
I mentioned earlier that I was going to replace the oil tank with one I already had with the cNw update. I figured would get that installed along with the oil lines while installing the rear fender as they sometimes interfere with each other. Grabbed that tank off the shelf and realized that although it was beautiful, it was not a cNw modified tank - I have no idea where I got it. Not wanting to be stuck again, I realized that my poor rider that I never have time to finish refreshing had a freshly cNw modified tank. So, out it came!
OK, time to fiddle. Since the horn was not located in the normal place and the horn bracket was not installed, I decided to leave that alone. Of course, that means that the two rear fender screws must be different. Getting a Norton rear fender to align at each location always takes trail and error, but this meant more. Got annoyed quickly with the dirty fender so went to work cleaning it up an trying to make it somewhat presentable. It is chrome on steel and had a bunch of rust spots and apparently battery acid got on it sometime in the past. I got as much crud off as I could, got as much rust off as I could, buffed the parts that show a little, went at it with metal polish and a brass brush to get rid of as much rust as possible and then with chrome polish to hopefully keep it from rusting. It looks less terrible now.
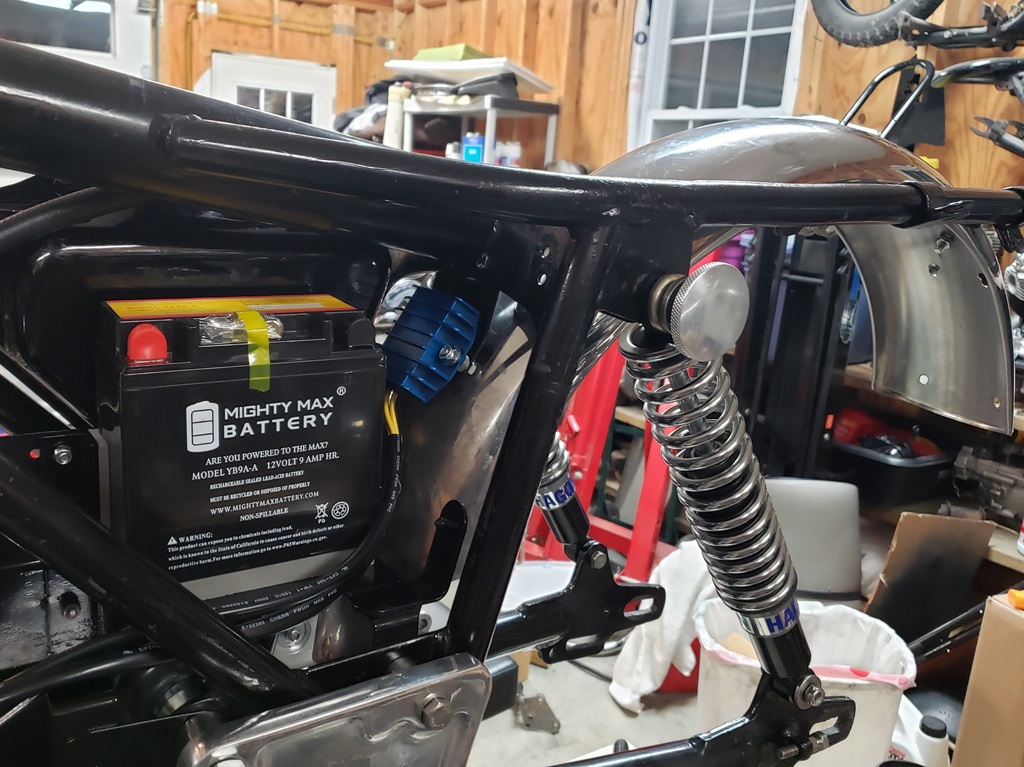
The fender is mounted but will need to be tweaked once the rear wheel goes on. You can see that the Tri-Spark regulator mounted as well as the battery is in-place.
Still doing R&D. Ordered a couple of types of straps for the battery. The Velcro strap I usually use is fine, just looking for a better solution. To put the battery in, you put the left end in first and the rotate it into place and install the strap. It cannot move left-right (front/back) and is sitting on thick foam.
September 16, 2024 This was the Good, the Bad, and back to the Good day! Woke up at 6:30m feeling strong for a change and my arm/shoulder was barely hurting. Immediate ran into customer IT problems. Got those solved at 2:15pm and realized that I had a PT appointment at 2:45! Made dash, got there just on time. Still feeling strong so that was all going fine until he added one my thing for me knee forgetting about my shoulder and me forgetting about it too. Without thing I reached up for a bar and wham - hurt arm/shoulder real bad again! OK, iced down, left and headed for the grocery store.
Finally started on the bike at 5pm. First thing was to check the speedo drive I was trying to recover - no way. OK, get out a new one. They are made by EMGO and in general, are made better than the originals- their body is certainly stronger and that is especially good for a Norton as the stupid adapter causes the body to warp if the spindle it tightened too much! One problem with them is that the window inside between the two gears is never properly finished an most of the time chips of metal will bind the gears. The one I got from stock was catching on about every 4th revolution. So, popped the back off, found the chip, use an X-Acto knife to remove what would have eventually come off, and put it back together. Connected the speedo cable for a test and the cable was hanging even though it looked new! It somehow had a lot of grit and grease in it. Once thoroughly cleaned with WD40, lightly oiled and reassembled it was smooth. OK, finally time for the rear wheel. That went on just fine. I was thinking this is going too good except I kept hurting my shoulder. One last thing for today - inspect the chain and if OK, install it. Wow! that was probably the dirtiest chain I ever cleaned and that hurt my shoulder a LOT getting it clean. Once clean-ish I was surprised that it is in good condition so I installed it, and used it to sight the rear wheel straight. Once the primary is on a that chain is adjusted I can do the final rear chain adjustment by just counting the adjuster turns.
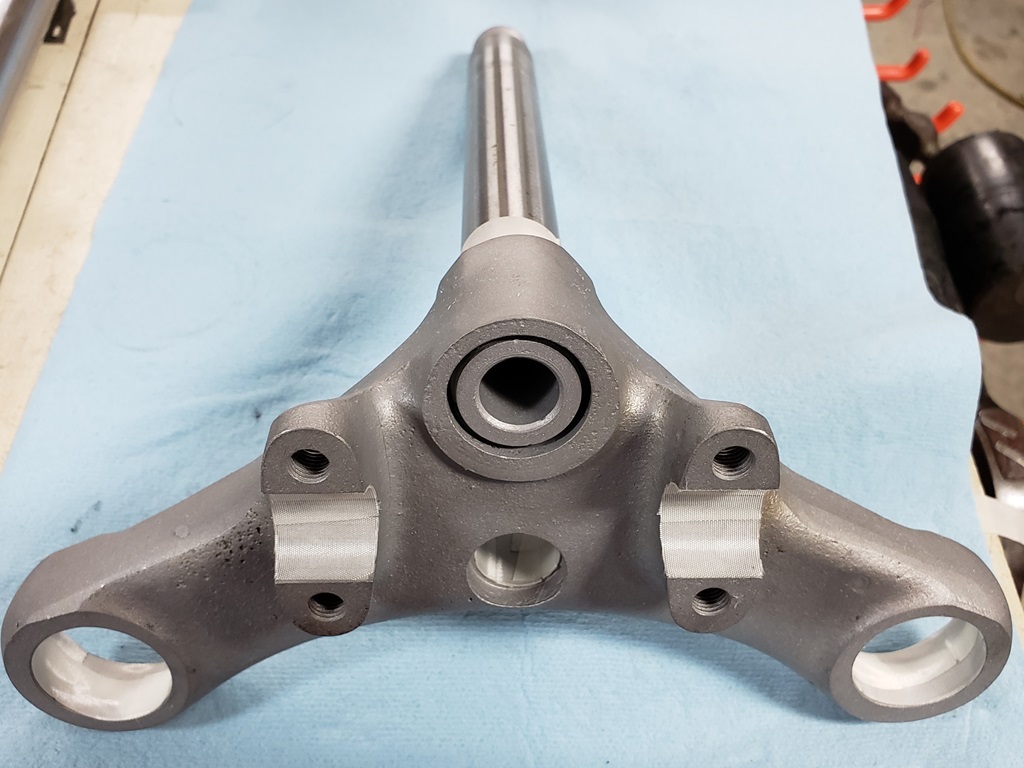
September 18, 2024 My stepson and youngest grandson came by yesterday. My stepson also had a hurt arm, but my grandson was very helpful. We got the back of the bikes locked down and I had him taking apart the front end. In keeping with the rest of the bike, every not and bolt was at less that one foot pound!!! Since the gaiters needed to be replaced and I wanted to inspect the fork tubes, sliders, and internals. I had him take all that off leaving the fork tubes in the triple tree. We then checked to the fork tubes to be parallel and in the same plane - they were not. We tried every trick I knew to correct that and they were way off. so thinking one or both fork tubes was bent, we took the rest of the front end apart. the tubes are not bent and were new when installed. They have some very minor scuffing from not running true.
Today, I cleaned up and inspected all parts. Everything is fine except the alignment problem. On a Norton, there is no adjustment like on a Triumph or BSA, the bottom of the triple tree much be accurate for the tubes to be right and it is not malleable so not fixable. At first I thought it might be a nick or the fact that when painted the inside was not masked. Got rid of the paint and carefully checked for burrs - none found. the first video below shows the problem. Also, the tubes are wider at the top than the bottom by .024".
I had a used replacement in stock I bought a while back, but in testing it was parallel but still not in the same plane it was about half as bad, so second one for the recycle bin. I must have forgotten to push record on that one so no video.
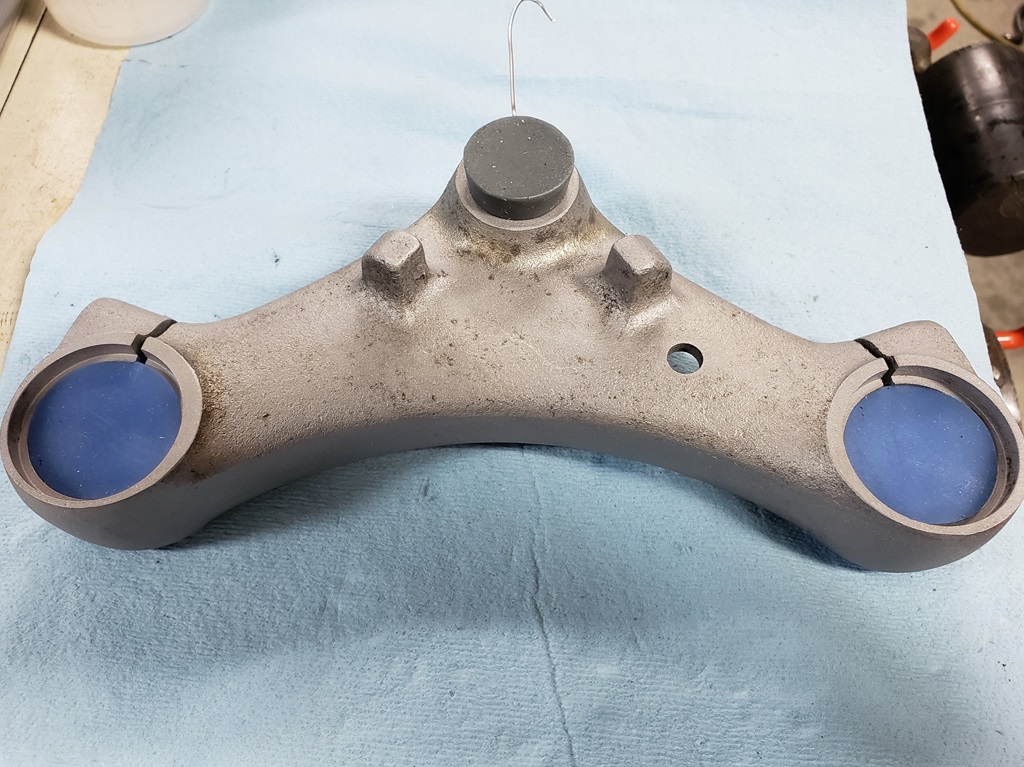
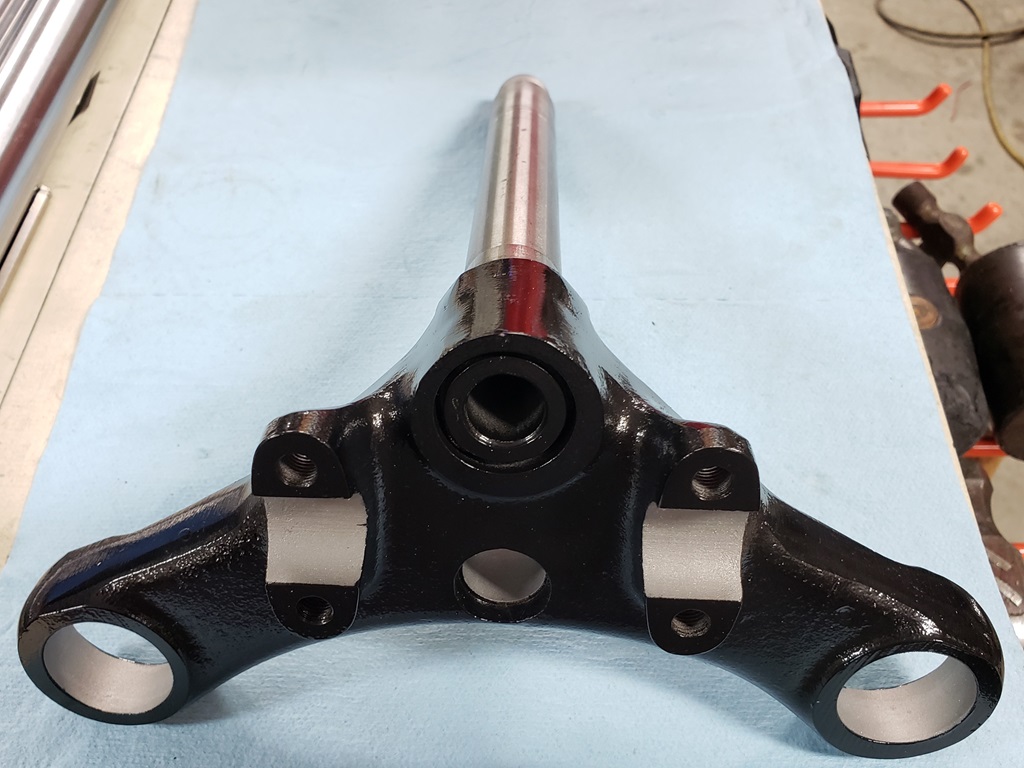
So, on the hunt for more, I found two 850 complete triple trees that go with basket cases someday to be built. The second and third videos show the test on them - perfect and the tubes are perfectly parallel. I talked to the owner and we're going with 850. Both are ugly and I detest the silver paint next to chrome, silver, hard chrome, and so on. I normally powder coat my triple trees black and the owner agreed so that's what I'll do.
The other issue is that the fork stop is messed up - I haven't decided what to do about that yet.
the brake disk is boxes and leaving for TrueDisk tomorrow.
Forgot to mute the TV - real professional!
September 19, 2024 Yet another weird day - especially weird because it wasn't this bike's fault! On September 9th I mentioned how hard the brake plate was to blast and that I checked everything and there was nothing wrong with my sand blaster - wrong! Today while blasting the top part of the triple tree it was taking forever - they normally blast very quickly. After working on it for about an hour (should take 15 minutes) and still not being done I took the gun apart again to change the jets, seals, and nozzle with a new ceramic one. A while back, I used it too long with a steel nozzle and without changing the jet. Both were eaten away on the side. What I didn't realize what that the housing also had an eaten away spot and the nozzle seal was not able to do it's job! So, I had that part - replaced it, the jet, and seals and installed the ceramic nozzle - back to its old self.
The hard part of powder coating the top half is that a lot of masking must be done with high-temp narrow tape. In the first picture, you can see it ready to be coated and then baked - all the inside holes and the part the handlebars touch are masked.
Now the next weird thing today. Got the powder applied and hung the top part in the oven as usual. In theory, the oven should be per-heated but it's way too hard to put big things in without getting burned,and I can barely do it at all right now with this arm. OK, turn over to 450, set timer for 20 minutes and when it dings, check the part temp. The powder I use wants to get to 375F and then bake at that temp for 20 minutes. The casting are so thick, it takes a while to get there so I keep checking and then set for 20 minutes when at temp. First problem - the built-in timer has quite working. I was working on getting the bottom of the triple tree blasted and wondered why the ding had not happened. At this point it was probably 25 minutes - not a big deal, but I checked the part temp and I was only at 300F. OK, check again after a while, 359F. What the devil! Checked the temp of the actual hearing elements, the top on was 359F and the bottom was 525F. So, either the pre-heat had shut down or the top element is out. Log story short, it took about an hour to get to 375F even though the oven was set to 450F the whole time. It didn't hurt anything just took way too long. OK, the bottom is much easier to mask as I have a set of high temp plugs I sized just for the job long ago. So, I took the top out of the oven while still hot, got a minor burn in the process and left the oven on. The second picture shows the bottom ready to be coated and baked. After the bottom's bake time I just turned off the oven and will take the part out tomorrow. Even though the oven was pre-heated, the bottom took 45 minutes to get to 375F. The third shows the top unmasked once it was cooled off. So, it's fix or replace time on my oven but I have used it for a LONG time.
BTW, in the pictures you'll see dark spots like I didn't get them clean. Those are inclusions in the castings and won't affect the coating at all.
While all this was going on I found a later type head steady I had already power coated and that's partially installed. Still need to install the rubber bumpers and plates.
September 23, 2024 I got hurt pretty bad on Friday helping load a motorcycle. Nine new wounds, the worst two being the two small toes on my already bad left foot. I keep finding more things wrong - today something is wrong with the outside of my right high ankle - can barely walk. I hoped to get back on this today, but can't put a shoe on my left foot and the right ankle problem is a big problem. So, on hold for a while more.
September 29, 2024 I'm still a mess! My arm is getting better, and seven of the wounds I mentioned are under control. The right leg pain ended up being two things! Gout – had pills for that. Yeast infection got pills for that on Thursday and it's now under control. Sounding, OK? Nope, toes are a mess and I'm now having in-home wound care three times a week, and yesterday I got an over-hydrated blister on my right leg so there's a new 2-inch hole. To as insult to injury, today I finally got a surgical shoe on my left foot - took twenty minutes. OK, slip on my right shoe and head to the shop. Nope! Used a long shoehorn, slipped and banged it against me left shin – half-dollar sized hole!
I finally did make it to the shop! I had some things to get to send people and got them cleaned up. Then I started on several parts that needed to be plated or powder coated for this bike. Those are all prepared and I'll re-plate in the house while sitting around. Then I studied the steering stop problem. Difficult to see in the pictures but it is an original stop that was installed crooked by the factory. The timing side has a small amount of wear that probably would be OK since it is actually worn to where it should be. It is a bit rough though. The drive side is well worn. I'm going to try to stick weld the timing side first as that's minor so I can't really mess it up. If that goes OK, I'll do the other side. In the process I need to get it straight where it matters.
September 30, 2024 I fought the steering stop, and I won!
On the timing side I was having trouble starting the arc so like a good American male, I kept turning the power up. Finally looked at the stick package and realized I was way too high. Turned it down and laid down a nice bead. OK bunch of filing to be sure I was happy and to be sure the lower triple tree landed properly on the stop - really good. About wore me out hand filing up high.
OK, time for the bad side. Of course, got a puddle rather than a bead. If at first you don't succeed, try, try, again filing in-between. Finally thought it was going to be perfect but with a lot to file off. Then a void opened up 🙁. Several attempts to fill that and finally had to "V" it out and redo it. The drive side is not perfection, but it is fine. I stuck the triple tree together temporarily and measured the turn each way. They were 1/4" different, So, I checked two more bikes and they were the same as this one so I'm pretty sure I'm good.
I will stick the tank on with the original handlebars and check it, but we are changing to semi-western bars and I'm sure they will be fine
October 1, 2024 Goo! Goo! Goo! when will is stop!
When I took the triple tree out from my test I notices a lot of goo on the stem. I stuck my finger in the bottom bearing and found two things. Goo, and the bearing spacer moved around easily. Neither of those are right. So, even though the bearings were smooth, they had to come out. I've never taken beating out with the bike on a table - generally, I prepare the frame, install the bearings, attached the Certification Label, and set it aside until the power unit is ready. Obviously, this was not going to happen and somehow a one-armed man must get it done.
To get the bearings out, normally, you go from the top, force the bearing spacer a little to the side, stick in a drift that just catches on the inner race of the bottom bearing and drive it out. Then the spacer is out too and you can drift out the top bearing. Of course, the bearings must not be reused since you drive against the inner race. Fortunately, they are very common bearings and only cost about $4.00.
The good and bad is that the spacer was loose. I used a long steel bar to drive out the top first as I could hold the bar with my bad hand/arm down low and drove out the top bearing. Then I retrieved the spacer and put in a drift just long enough. I was able then to drive it out one-armed from the top. Both bearings came out easily - that's abnormal
OK, time to investigate:
- First Picture:
- Notice the two sealed bearings. They are relatively new, but the seal from the top bearing was lying on the bottom bearing. The bearing was not going to stay smooth for long.
- Notice the spacer and bearings covered in grease - that just holds water and causes rust.
- Notice the towel, that is one wipe inside the bottom bearing location!
- Second Picture:
- This is looking up into the bottom bearing location after a great deal of cleaning with WD40 and a brass brush. Still rusty - have to resolve that.
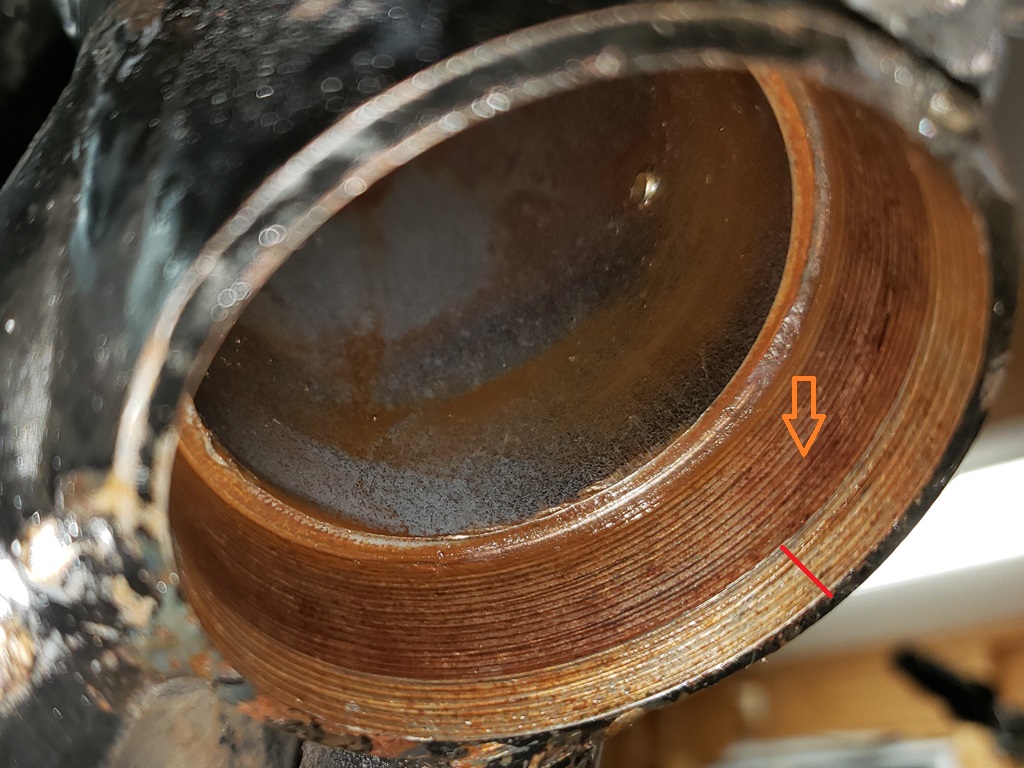
- The red line shows where the diameter of the opening is larger than the rest - this is abnormal, but won;t hurt anything.
- The orange arrow points to the "threads" that are abnormal. they aren't actually threads but some sort of cutter was used to open up the bearing area. The top has the same. I've never seen this. The bearings are still snug enough so it will be fine, but I can't imagine why someone did that except that installed int eh bearings is tough if you don't have a solution. I do and I can even use it with one arm! the third pictures shows them being pulled in during another build. That is a 3/4" bolt with 3/4" fender one top and bottom. When I run out of thread, I switch to two washers on top and two on the bottom. The washers are slightly smaller than the OD of the bearings so they press on the outer races and are able to pull the bearings fully into place and there's no chance of the bearings entering crooked.
- Think everything is good now? Nope - why was the spacer loose:
- Were the bearings not seated? Maybe, but doubtful.
- Is the spacer the right length - unlikely since I can see file marks.
- Is the spacer at least perfectly vertical on the surface plate? The end without the filing is. The other is off about 3 degrees. Now what? I could easily make it right but then it would be even shorter. So, I went on a search for a used tube. I know I have at least three since I have three bikes apart. I could find none, but some of the bins with front end parts are too heavy for me to lift right now. OK, now what? Maybe I have one in stock - nope! So, now what? Your guess is as good as mine! Easy enough to order, but I have nothing else to order right now so the shipping would be tremendous. I'll take a look at eBay and have anther look tomorrow in the shop.
October 2, 2024 I went on a search again for the steering spacer tubes I must have - didn't find any. Then I went to my basement where I have three Norton frames - all the steering bearings and spacers have been removed so I certainly have them somewhere! I finally gave up and placed and AN order long before I wanted to - only 15 items. I also ordered some Naval jelly to get the rust out of the steering bearing areas - a brush and WD40 is not getting it done and the Naval Jelly will remove it and leave a phosphated surface to keep it from coming back
.
Then I masked the certification label and sprayed the repair and missing paint on the headstock. I looks OK, but since the frame is painted so poorly, not perfect. At least the repair won't rust. I took a bunch of pictures but being all black, there's nothing that really shows in them.
So, while I wait for the spacers to arrive, I'll put the primary back together and get started on the wiring.
Because I'm apparently not slowed down enough, I got a blister the other day on my right leg from being swollen. I'm getting home wound care three times a week. On Monday she wrapped that area even though I though it a bad idea. Well, the silver dollar sized blister turned into as 5" x 2" blister that the skin came off of today. Now, my right foot and leg are wrapped. So, to go to the shop, I need a surgical shoe on the left foot and a flip-flop on the right! I simply cannot sit around any more - driving me crazy so I'm going to keep trying t press ahead on this bike. After all, I have about 32 more in the queue! I just checked - I started my projects spreadsheet in early 2017 and it has 72 entries now and 40 of them are done. It sometimes feels like I'm accomplishing nothing, but of those 40, lots were complete builds, some were exports to other counties, several were engine and/or gearbox builds so I have been busy!
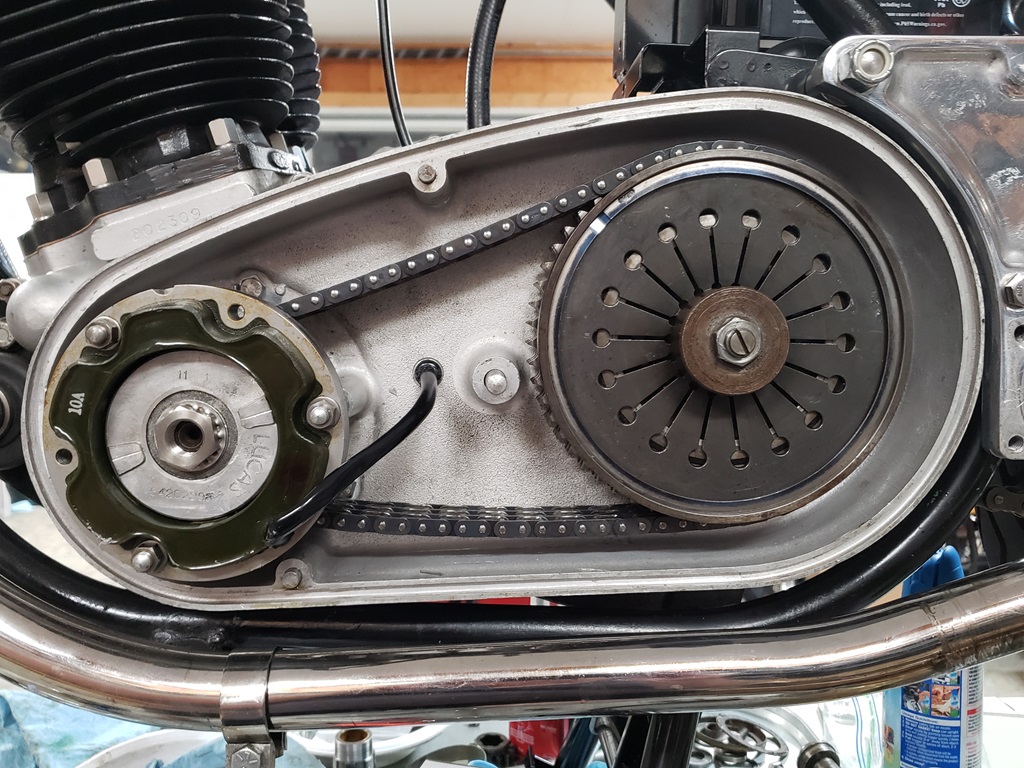
October 3, 2024 Lots of medical today but I did get started on the primary. The inner primary had one of my peeves. Gobs of silicone! While counterintuitive, the Norton primary, if done right does not leak. Every time I found on whit sealer to stop leaks, that leaked and once all that is cleaned up, they do not leak unless the cover is warped. It too a long time to get all that out of the slot and then to completely clean it. Once that was done, the inner primary went on with the gasket and without the locking tabs so the distance between the back of it and the center support could be measured. Once I knew that the size of the needed spacer I found one. Then I investigated the main seal - here again, all rubber, but more importantly not fully installed so the crank key was rubbing on it. The seal has now been changed to the correct metal/rubber seal. Then I stuck on the crank sprocket and clutch basket to check the alignment - the clutch basket was rubbing ob the inner chaincase.
So, I put the spacers on that were there when I took it apart and I now need to check the alignment but I ran out of steam. There were a LOT of little steps in all this, but I'm to tired to document them all and they are fine.
October 4, 2024 This is my 2nd roughest day of each year. Twelve years ago today was my wife's 69th birthday and the last time I got to speak to her. A few days later I relented and allowed them to turn off life support.
I got the primary back together today, but still need to verify that the timing marks are right - that's something I always check/correct so there's no doubt later that the timing is correct. Since the rear end of the bike is locked down to the table, I can't turn the engine with the rear wheel so I'll probably wait on that.
I received the R&D project I've been working on due to this bike and the one before it so I spent some time working on that. Look here.
October 5, 2024 It is so much fun when a 2 hour job takes 8! Part of that is the mess I'm in, but on my best day, the primary that should have taken 2 hours MAX took at least 6!
I mentioned the incorrect rotor shimming when I took the primary apart and the outer primary cover being WAY over tightened. In the first picture you can see the aftermath of that.
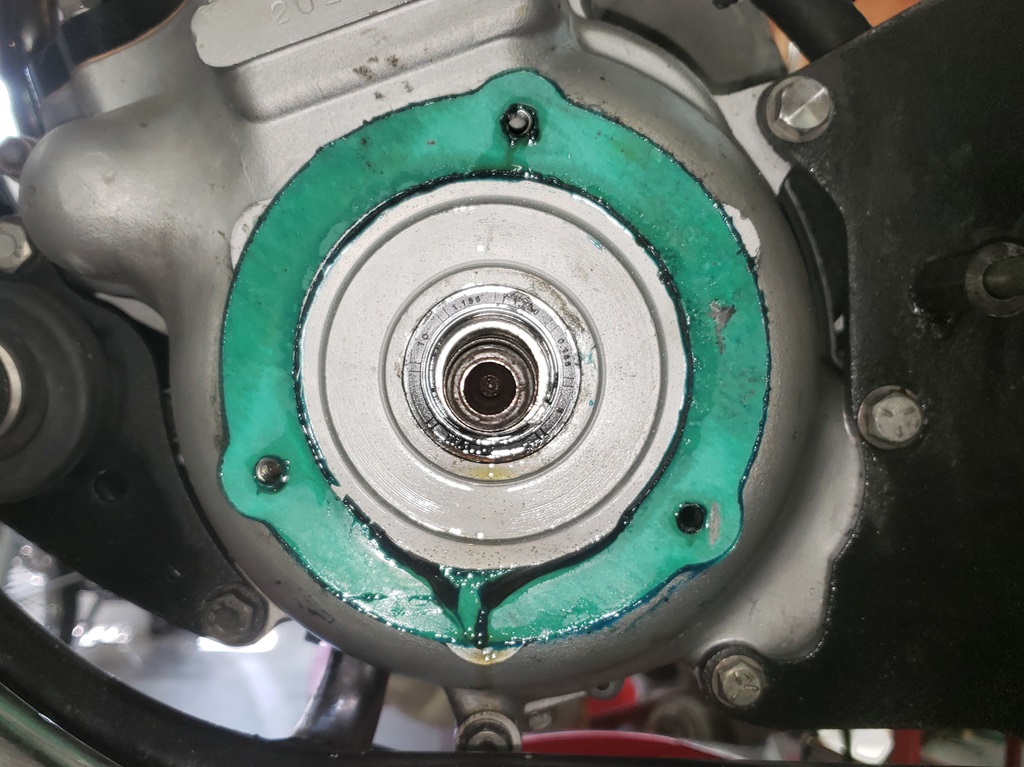
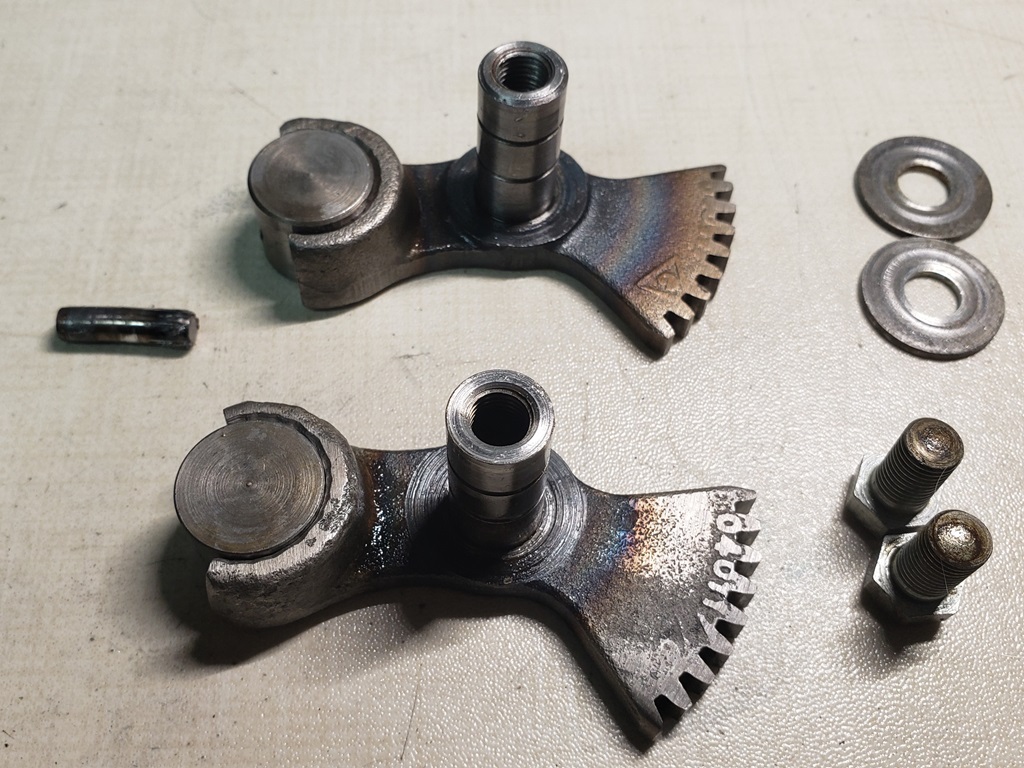
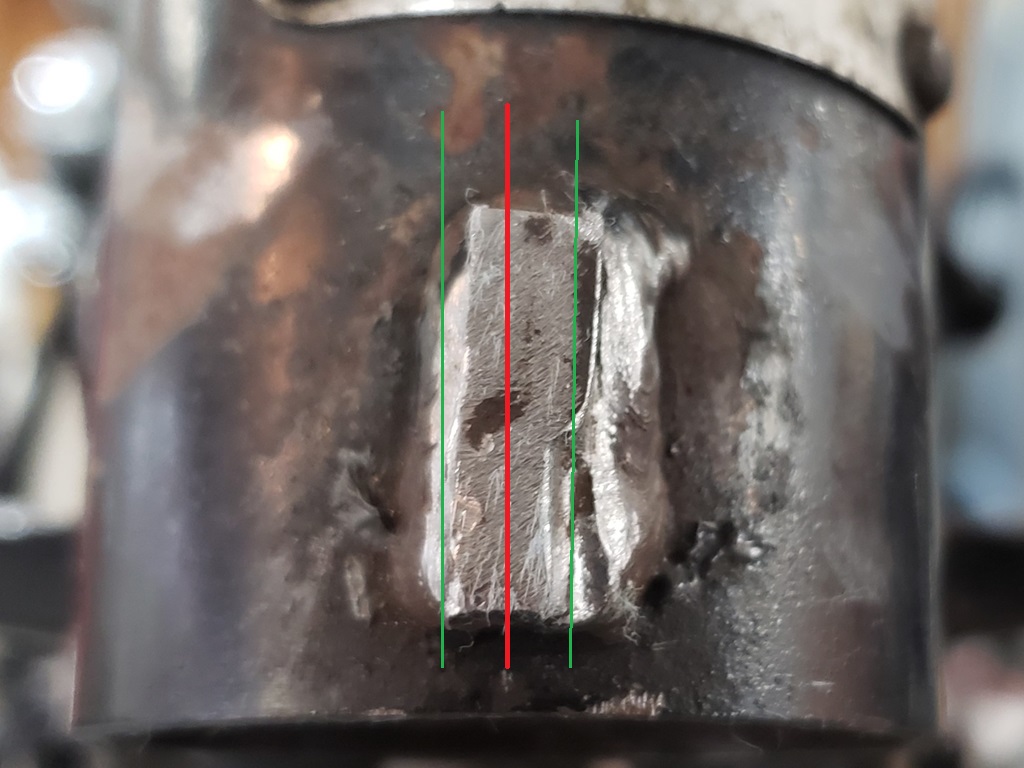
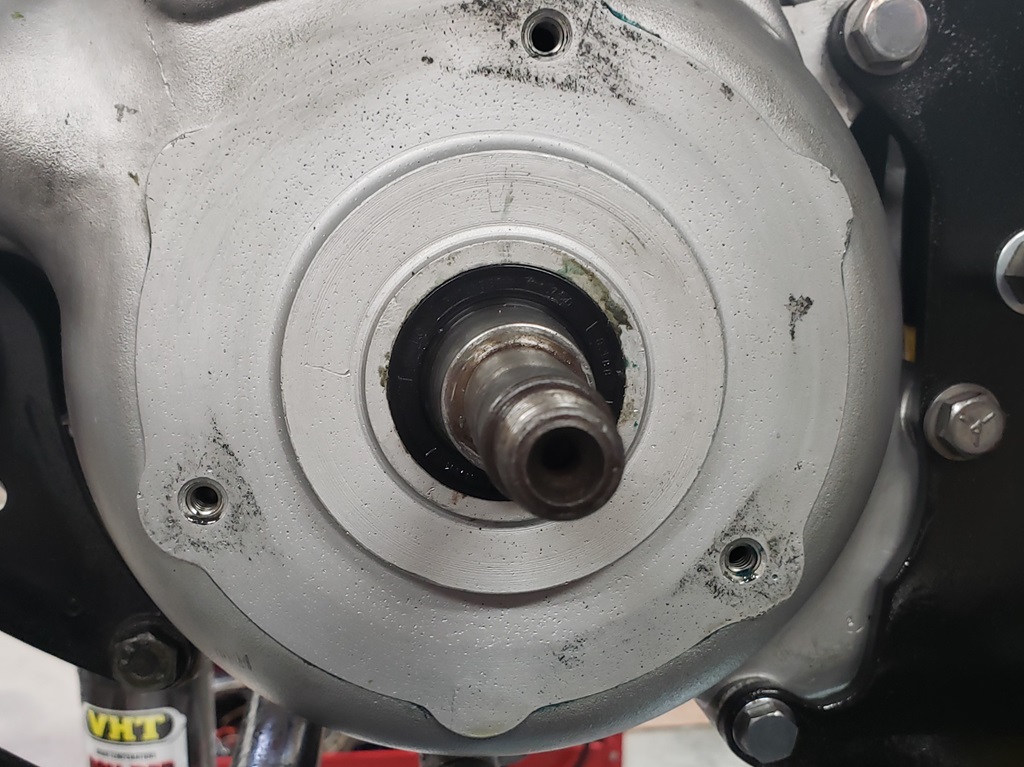
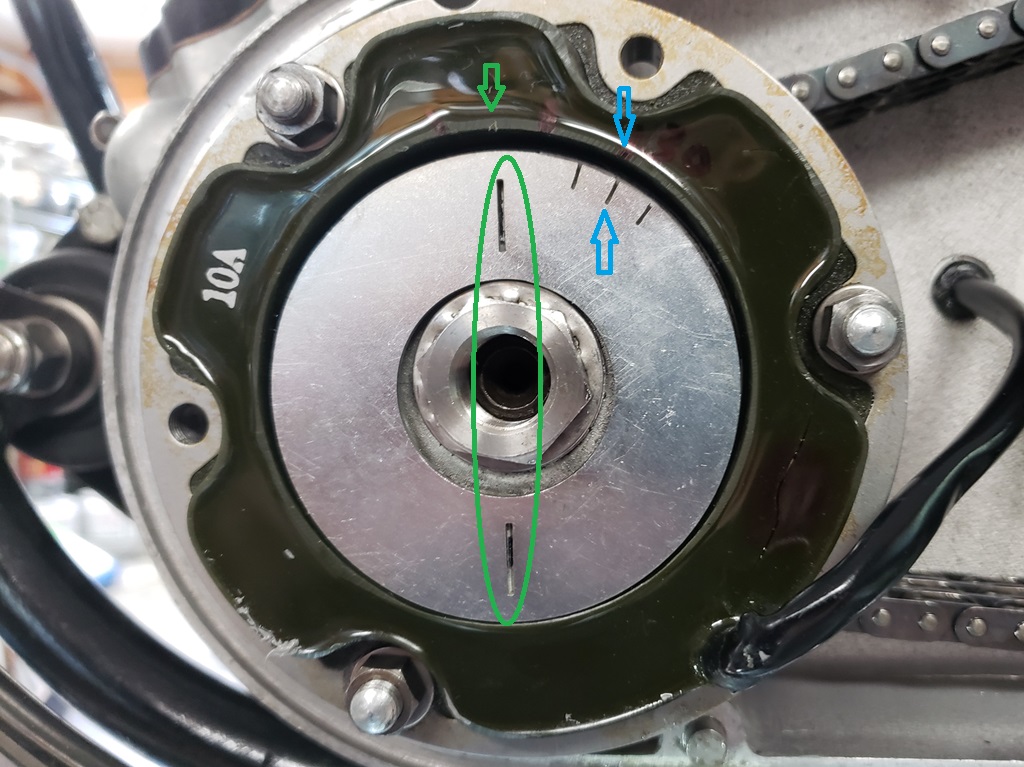
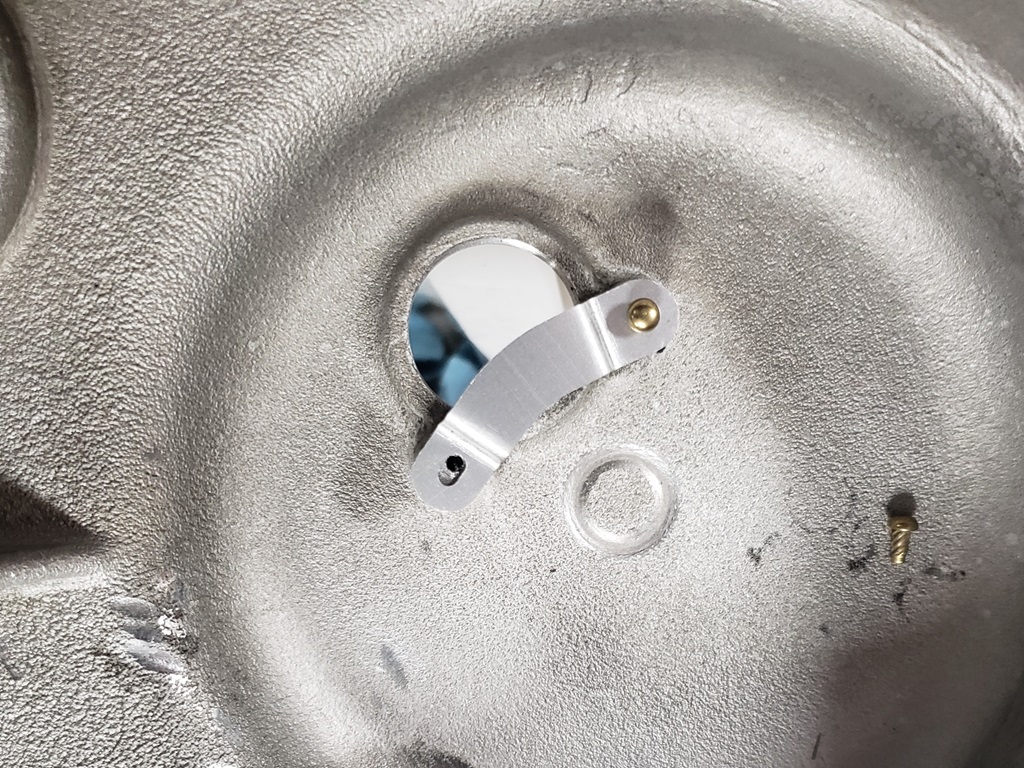
The orange circle shows where the rotor nut was rubbing on the inside of the cover. You can clearly see where the raised timing marks from the rotor were hitting the degree scale. And the red circle shows where the degree scale was broken. Of course, the rotor timing mark was partly worn away too so I had to deepen it.
In the second picture the green arrow points to the mark I made on the stator that aligns with TDC and the tool used to check the degree wheel. The green oval shows the slots in the tool aligned with the rotor timing marks. The blue arrows show the 30-degree slot in the tool and the stator mark I made to align with it. The process is to put the cover on and see how the 30-degree mark aligns with the degree scale. The original degree scale was off by 5 degrees! But I had to change it anyway.
The third picture shows the new degree scale half-way installed. The holes were both round and did not align with the cover. It turned out that with the one hammer drive screw partly in and the other end taped, the degree scale was perfectly aligned so I had to extend the hole on the other side like shown. After that I put both hammer drive screw all the way in.
I then turned the engine until the rotor timing mark was on my stator 30-degree mark and the fourth picture show the perfect alignment.
With that done it was time to adjust the primary chain which went fine, install the big O-ring and close it up. That all went fine so I added the oil. That's when I noticed my bonehead mistake. The center nut that holds the cover on has a special nice washer that goes behind it. The washer I grabbed from the bench was neither nice or special but worked fine. Still, me being me, I had to change it. So, asking my bad arm to push on the cover real hard, I took off the nut, replaced the washer, and tightened the nut back up. I would like to say that nothing leaked but that would be a lie - I lost about an ounce I the process, so I added that back checking with the level screw. Anyway, after cleaning up it's good now.
October 6, 2024 I wasn't feeling it today. Got some shop cleanup done and fixed (I hope) the tail light fairing, but that's it.
October 7, 2024 My AN order arrived so back to the front forks.
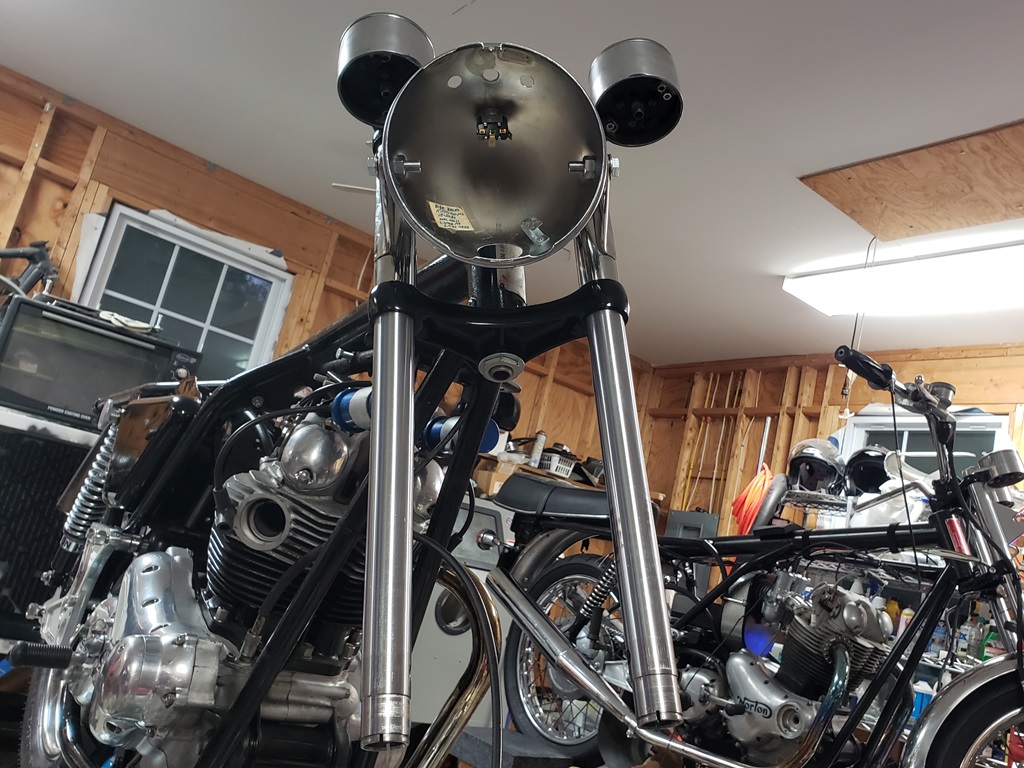
Putting the front forks together on a Norton is fiddly because all the parts shown in the picture must go together at once and that's a lot of things to hold onto! For instance, if the headlight shell is not install in the fork ears when the bottom of the triple tree is tightened, you'll never be able to move the fork ears into place. Today was more than fiddly - I had to hold it all up into place with my right arm where is was very unhappy to go! Anyway, it's there and it is PERFECTLY aligned - yippie! The picture appears that they are spread, but that is an optical illusion. Also, that's just a test headlight shell. Putting the rest of the forks together is easy, but my arm/shoulder were screaming once I got to this point, so more tomorrow.
October 8, 2024 Yearly bad day #1 - today, 12 years ago is when I allowed my wife's life support to be turned off. To make today extra special, I had two customer It problems that I worked on from 7am until just after 7pm so I didn't get to work on the forks today. ☹️
October 10, 2024 The saga continues! Put the timing side fork together in about 15 minutes with no drama. Three hours of drama later, the drive side is still not together. I hopefully have it straightened out now but ran out of steam. When I took it apart that sides was very difficult and looking at the top bushing you can see where it was beaten into the slider. They are supposed to be a tight slip fit. When I got it all ready to go together, the bottom bushing worked fine in the slider before I pushed in the top bushing and seal. The bushing would not just push in so I tapped it in - then the slider would not move! I took it apart a bunch of times looking for the burr or damage that was causing it. Nothing was visible so I worked on the slider/bushing interface for a LONG time and it finally goes in correctly. Of course I then had to re-wash it all and once I did that I gave up for today. Tomorrow if it doesn't go together right I'll install one that goes to a different bike - I
can't keep spending 3-4 hours just to try to fix nonsense like this when I have good used parts.
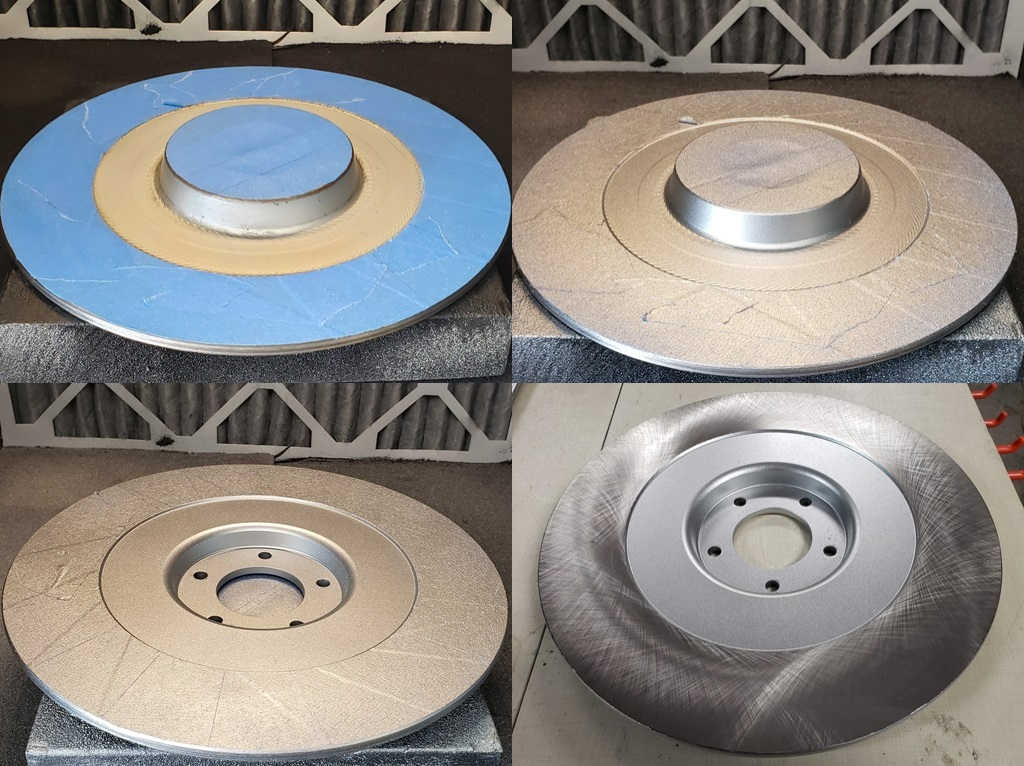
October 11, 2024 Finally something positive! The drive side slider is now installed and works fine. Both sides are a little stiff, but that's normal with new bushings. The front wheel is ready to go on once I install the disk. I wish I had stopped other things when the disk got back and got it ready. The grinding is perfects, as usual, but I need to mask and paint the center - I'm doing the masking as soon as I publish this and the painting only takes a few minutes especially since this one is almost good enough just to put on as is.
October 12, 2024 the first collage shows the back side of the disk masked (the front side was too). Then the back side painted. Then the front side painted. And then several hours later, the masking removed. That all when fine.
While the disk paint was drying I started on the wiring. When I wire a bike I start by getting the taillight and rear turn signals ready. This bike has a non-standard, filthy, taillight so I took it apart to clean and inspect. The second collage on the left shows how badly bent the after-market bottom bracket is. It's hard to see in the other picture, but it is well bent too. The second one I could beat into shape but I have more those that are in good condition except for paint so I blasted one of them and will power coat it tomorrow.
It's no wonder that the taillight fairing was broken - everything needs to be forced into place. Of course, I won't do that but I'm not sure I can straighten that chrome part so I'm not sure what I'll do about that. At the bottom edge of the left side of the bottom collage you can see the chrome license prlate holder. The chrome is OK but it too is quit bent - I'll try to straighten it.
I did clean/restore the turn signals and I added a ground to each. I sometimes do that by grounding the stem where it mounts, but I'm out of the big eyelets I need to do that so I went the harder/more elegant way and added an internal ground wire to each. One turn signal is original Lucas and the other is modern Lucas.
October 19, 2024 Last Sunday I went to the ER with my right leg infected with MRSA. I was admitted and came home Tuesday. Leg and especially foot still swollen but the antibiotics seem to be working. Today I was finally able to just get a shoe on my right foot, so time for some light motorcycle work.
I forgot that I had not cleaned the front wheel or checked its bearings. Of course the bearings were bad and the wheel was dirty. Once I got the bearings out, I cleaned what I could with WD40 and then 409 and the hose. I would have power washed it but the power washer would not start (sitting since last year) and I wasn't up to figuring that out. It came out OK. So then I put in the new sealed bearing and tried to install the rotor. The rotor nuts are supposed to be tightened to 20 ft lbs. One nut spun at 15 ft lbs. Checking the others, two more spun before 20 ft lbs. So, back off with the rotor and out with the studs. The nuts are stainless and the threads on the studs gave up. Thankfully, it not the threads in the hub! I will replace all five studs - don't need more problems - rotors are hard to get on and off because they are a very tight fit. I will also use the correct Zinc nuts.
October 20, 2024 Replaced the rotor studs without problem and installed the rotor. That went fine. OK, time to put the front fender on loosely as it's much easier with the wheel off and loosely as it's best to tighten the whole front end before the fender. So, began a four hour struggle.
First it needed to be cleaned, That took a while. It almost drove me crazy to install it - has a dent that was partly beat out, the stays are bent, and all the painted parts need to be painted, but this isn't a restore so I tried to install. First issue is that the 5/16" x 18 bolts that secure the stays to the sliders were way too short stainless bolts. I notice when I took them out that they came out hard, I didn't realize that the slider threads were bad. I didn't relish the idea installing HeliCoils in place and I only have a 5/16" UNF helicoil set so I would have to order a 5/16" UNC set. On a whim, I chased the threads and used longer bolts and they were fine. Rather than making them normally tight, I used lock washers to keep them from coming loose. OK, one problem down. Next the 1/4" UNC threads in the sliders for the fender bridge were not great either. So, same procedure on them but next problem I had the right length screws for the timing side but they are too long for the drive side so I have to order some. Final fender problem: Neither stay would reach the sliders. I don;t know if the fender is wrong, the stay are wrong or then bend in the stays are causing this, but I ended up putting washers between the spacers and fender to space the stays out a little and then was able to bolt the stays to the sliders. To make a long story shorter - the front fender is mounted fine but I highly recommend replacing it and the stays the next time it must be removed for some reason - they are not worth restoring!
OK, finally installed the front wheel. That went fine, of course, it's just there - no caliper and not tightened into place or holding up the front end - all things I thought I would accomplish today.
October 21, 2024 Did a bunch of things that went fine. The speedo/tack and top fork bolts are now installed and the bike is on the center stand and front wheel - rear wheel in the air as it should be.
Since the front brake hose is ugly and damaged and since we are changing the handlebars, I wanted to put the handlebars, master cylinder and caliper on so I could measure for the new brake line. The first picture shows what I found in the master cylinder and the second what I found in the caliper. Generally, after several years, the fluid should be discolored but not rusty, gritty, and thick! I thought it would be a simple task! The caliper is now apart and cleaned - damned difficult to get apart. Surprisingly, it has stainless steel pistons and they will be OK with a little polishing. Of course the caliper is aluminum. So, there is nothing in the caliper to rust except possibly the big plug at the front - have to check that. This means that the master cylinder is the cause so it must come apart and most likely means that the piston is a rusty mess.
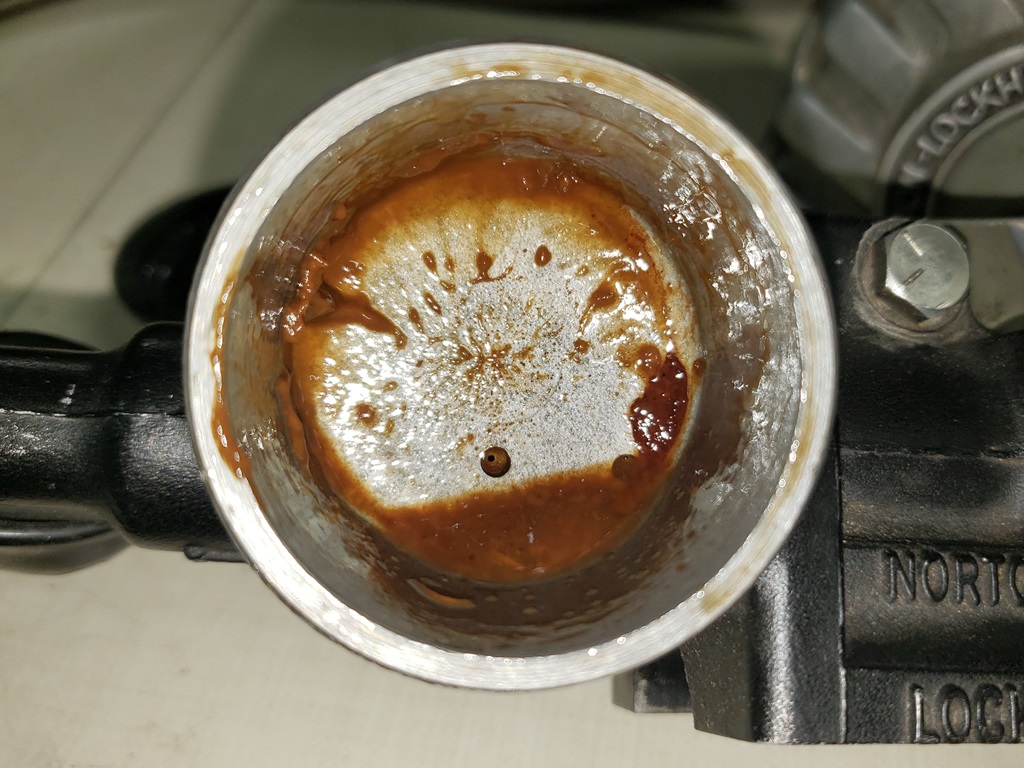
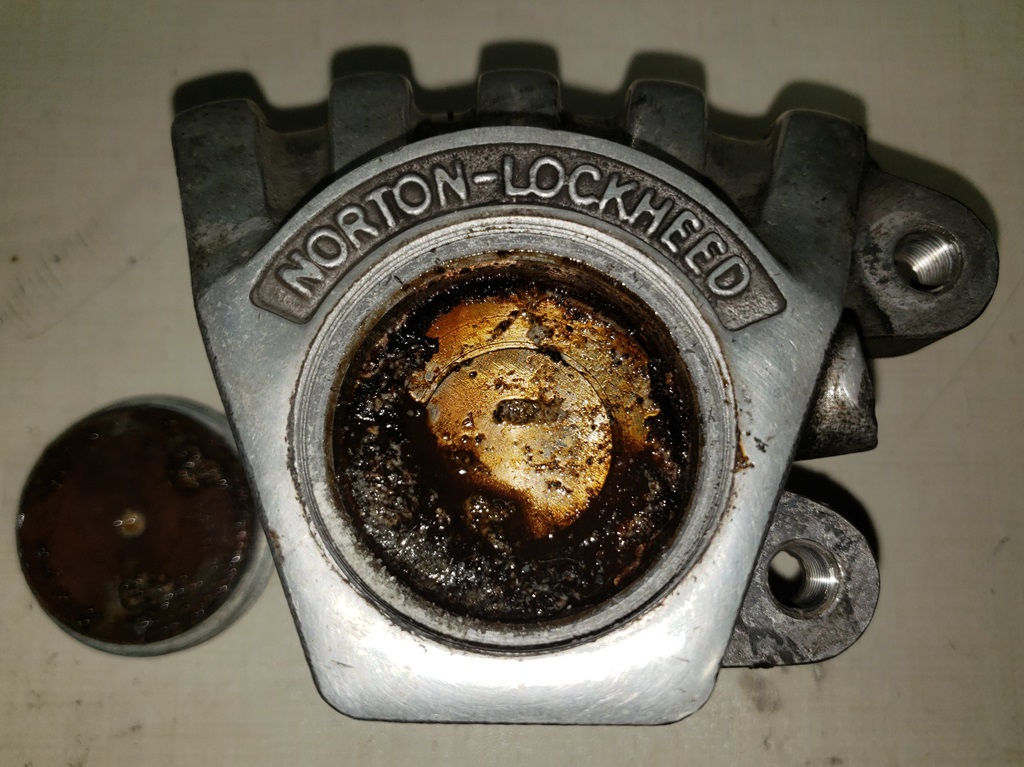
October 22, 2024 After a lot of cleaning, the caliper is fine and I even got the plug to look pretty good. One piston cleaned up to look almost new with a lot of cleaning, scraping, and polishing. The other doesn't look as good but it will function correctly. So, installed new seals, pre-filled the caliper and installed. Norton calipers are very hard to bleed - especially to get the air out of the inner side. My pre-filling means that the caliper contains no air - it's a VERY messy process but worth it to not fight the bleeding. Both puck have a lot of material left so I cleaned them, scraped off the road grime and sanded the surface with 320 grit - with the reground disk and clean pucks, they should break-in quickly.
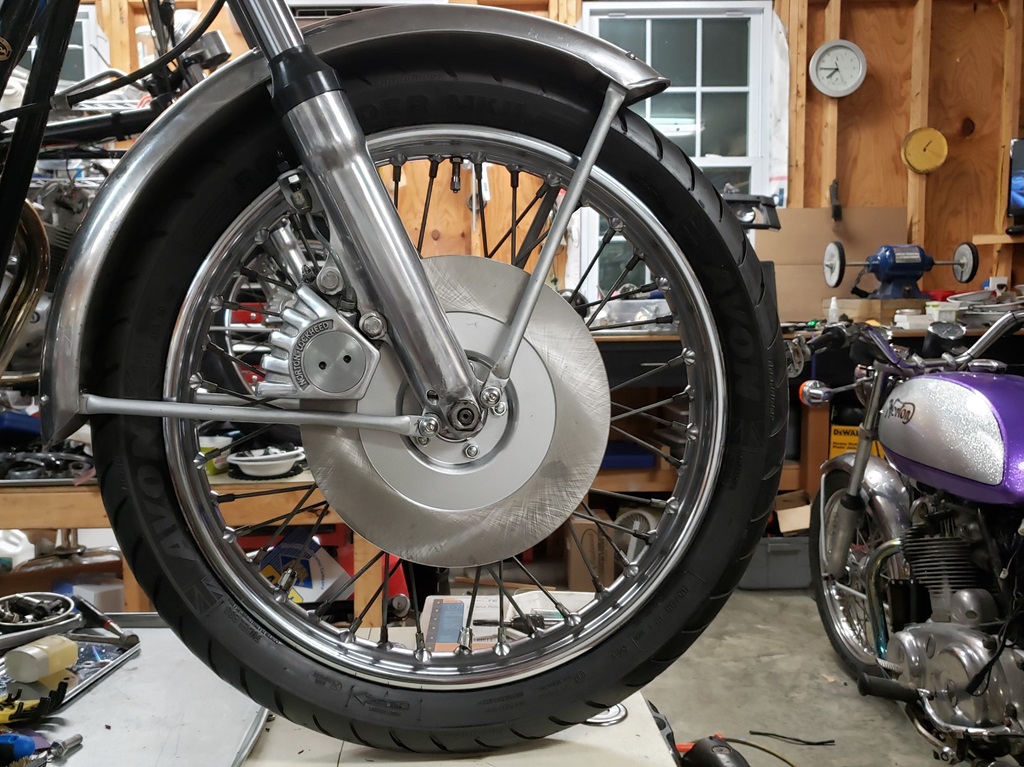
October 23, 2024 Wound care this afternoon. Leg is healing pretty well.
Did several small things. Filled the new oil filter with oil and went to put it on. Oops, a standard filter won't work since there is some sort of adapter on the mount -Grrrrrrrrrrrrrr!
Took the master cylinder apart and it had plenty of goo. I cleaned up the piston and I think it will work. I have the other components to rebuild it.
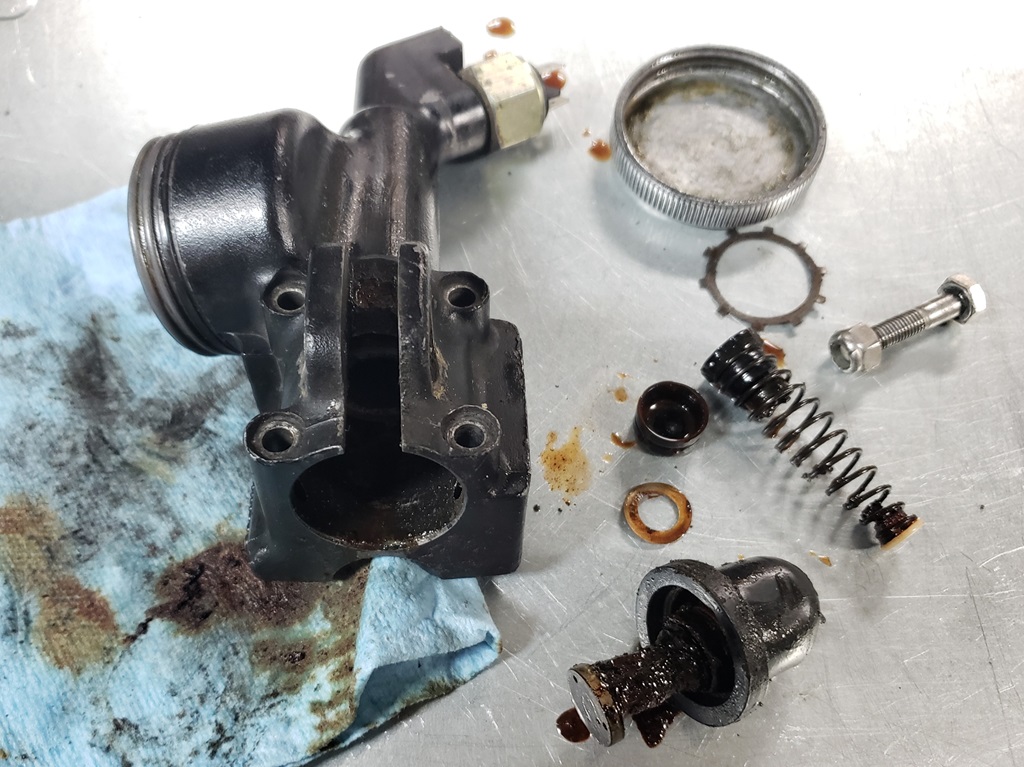
October 23, 2024 Took a chance: I little heat, a piece of rubber, and channel locks and the oil filter adapter came off. So, a standard Norton oil filter is now installed. Then moved on to "Master Cylinder Hell". After cleaning the master cylinder up very well, there were still two ridges of runt in the chamber. So, I started the search for other master cylinders. Found three. The first one looked promising until I realized that it has the RGM sleeve kit in it and I'm not into that. The next two came from basket cases that were well rusted and the pistons would not move. Finally go the pistons out and one was worse and one was better - not good, better. I tried everything other than scraping which would definitely turn them into junk. I finally started soaking all three in Evapo-O-Rust. They are getting better but are not there yet. It's really confusing since they are made of aluminum so the rust is mixed with something else. It reminds me of calcium deposits. I am hoping to get
them usable since a new master cylinder costs quite a bit.
October 26, 2024 I had company/help the last couple of days. Got distracted and lost the October 24 write-up and was too tired yesterday. Master cylinder hell continues. I've been soaking the three master cylinders in Evaporust for two days. The majority of the rust is gone but all three have a ring that looks like rust but it more like a calcium deposit. I ordered a set of brass tubing brushes and I ordered a 5/8" flexible hone. Hopefully the brushes with get the ridge out but if not, I'll try the hone on one of them. It's not only this bike that is a concern - after this, I have a 750 and a 850 to build and that's where the other master cylinders came from. I've been checking an most used Norton master cylinder on eBay are being sold for near or more than new - no way I'm doing that! I'm also talking to a guy about some horse trading for a used one.
Yesterday my AN and Zoro orders arrived so I went about straightening/repairing/coating the taillight parts I talked about on October 12th. Every part was bent or misaligned! I also modified it to use threaded spacers rather than plain spacers and long screws which are very hard to work with.
Once that was done I tried to put it on - no way! The reason everything was bent is the 850 fender half-ass modified for the 71/72 tail light (see July 28th). Today, I systematically went through it all. The middle fender mount (also Tri-Spark regulator mount) and the bottom two slots for the bottom fender mount screws are not compatible. I removed the center mount, loosened the two bottom mount nuts, and moved everything around so I could get almost all the fasteners installed without stressing things. the rear loop that goes over the read frame loop was bent wrong so the fender was not being held against the frame - fixed that. Then the timing side middle screw for the taillight fairing was close to going in but the hole needed filing. With those fixed, I was able to tighten everything into place as shown in the picture except that one screw missing in the
picture (see the inset). It misses by a lot. Tomorrow, it will all come back apart so I can file that hole for clearance. Once all that is done, I'll modify the center mount to work with this fender and still work with a proper fender.
The 71/72 taillight is annoying enough as it must come off to connect/disconnect the wires. I'm thinking about extending all the wires into a harness that goes forward to the main harness so the taillight can go on/off without drama - that's the way that type of taillight is done on Triumph. This taillight uses the fairing as a part of the mount. On the later one, the fairing is simply a cover so wiring at the taillight is simple.
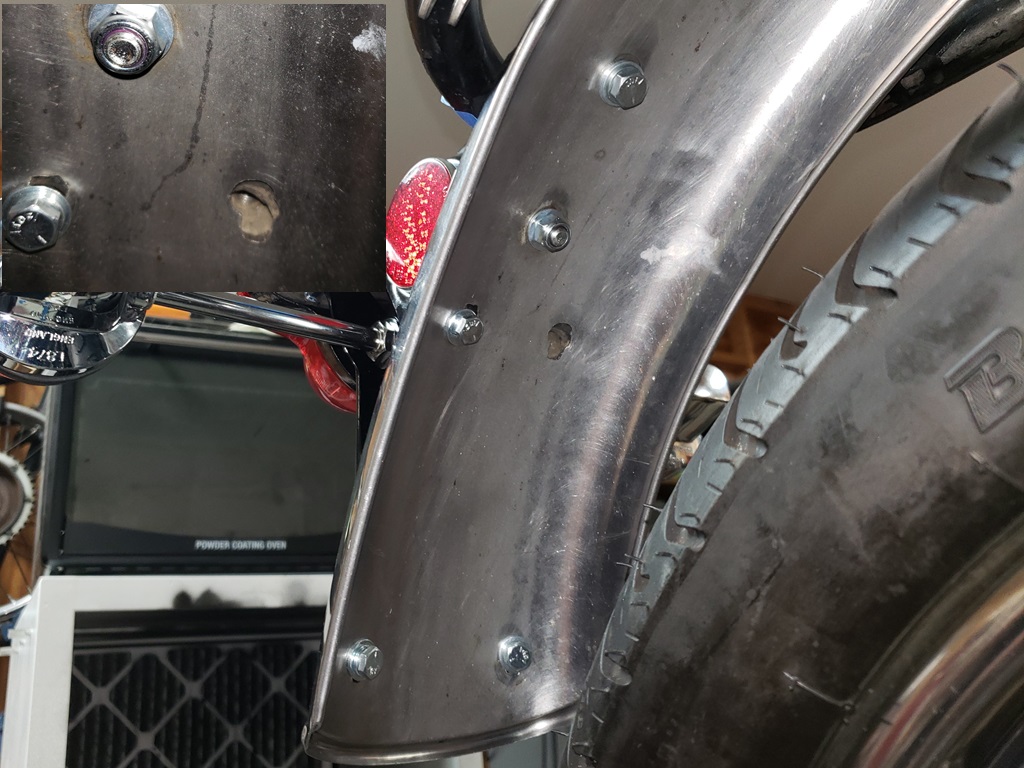
October 27, 2024 The tools I ordered from Amazon that were supposed to arrive today didn't. So, no progress on the master cylinder. It took a whole football game, but the taillight, rear turn signals, and rear fender are now properly aligned and installed. Of course the taillight must come back off to connect the wires but at least it is possible to start all the bolts with fingers now so that won;t be hard. Part of the reason it took a whole game was that my arm is getting worse. It was unusable at first and then continually got better, but now it's going back the other way. I'm still rehabilitating it, but I suspect that I'm overusing it.
October 28, 2024 The tools arrived after 8pm last night. The 5/8" brass brush did a little, but the 3/4" brass brush removed the problem ridges. Of the three, the one form this bike is the worst. It has some pitting in the working area. The one from the 750 I'll build next has less, but still has pitting. The one from the 850 I'll build next looks fine but the outside is the ugliest of the three. I also made a deal on another used on for $100 that is supposedly working and has a new rebuild. I will verify that it's good and if so use it since it will take much less time and is only a bit more expensive than the ones I have and the rebuild kit for one of them. I forgot to mention yesterday that I had started wiring.
October 30, 2024 I've had company/help the last couple of days, and my arm/shoulder have gotten worse. I am working on several things at once, including wiring. Started on the handlebar consoles last night - they are ugly and the lighting side has poor connections so I will fix those things. I also checked the charging monitor in the headlight shell - it was not working due to a broken wire and also I tested the device itself and it is not working at all - probably shorted out due to the broken wire.
This is one of those days. Went to wound care and then the grocery store and pharmacy. Once I got in the phone started ringing with Norton and Triumph people asking bike questions or questions about how I'm doing. That went on until 7:30 pm so I never got anything does on this bike!
October 31, 2024 Received a M/C body in the mail today. It looks perfect inside. The outside was very recently painted and was still sticky. I think DupliColor enamel was used and that never hardens. So, I blasted and powder coated it - came out great. I also restored the turn-signal side handlebar console. I can't help myself - besides making them work properly, I make them look almost new. have an order into McMaster-Carr that was supposed to arrive today. It contains two chrome washers I need to installed the turn signals and headlight shell. the turn signals that came with this bike for the front are incorrect as the threads are not long enough but I had one used set and I'll use these for the rear of another bike. The majority of the wires are run now. Once the headlight shell as well as the handlebar consoles I can continue wiring.
November 1, 2024 No drama today! The headlight shell and front turn signals are installed, the master cylinder is ready to install, and both handlebar switch consoles are ready to install.
I normally finish all wiring on the table but may take the bike down to finish - I'm having real trouble getting my arm even shoulder high, much less higher. I may put the loose things (foot rests, exhaust, etc.) on, take it down and put it on my air operated lift so I can do each step at a comfortable height for my arm - haven't decided yet. The lift is generally harder to use since there is no place to lay things but right now, it might be better to use the table as a work surface and the lift for the bike.
November 2, 2024 Big plans today:
- Put everything back together except the seat, tank, and luggage racks.
- Wire the oil pressure switch
- Wire the Rear Brake switch
- Install and statically time the Tri-Spark ignition
With those things done I can take it down from the table. I almost got 1. done :-), not the others :-(.
The timing side when fine. Installed the exhaust and footrest without issue. The drive side was a different matter! Both the foot rest and rear brake pedal are ugly and bent. So much so that there was no adjustment for the rear brake switch. I have a jig to straighten foot rests and brake pedals that are bent inward, but these were bent upwards and the brake pedal was also twisted. Unfortunately, I sold all my ugly but straight of both of them to a guy so I set about trying to straighten these one armed. I was able to make them usable, but neither is right. I started today at 1pm and quit at 7:30pm and most of that time was fighting with the drive side of the bike. At least it's together now. I still want to do 2., 3., and 4. before taking it down but may anyway and just put it on my lift and use the table as a workspace.
November 3, 2024 I must have done something and karma is after me! Today went well, got the shop re-arranged, the lift setup, the bike down from the table and on the lift - that all went smoothly. Then I installed the handlebars I chose for the bike, and installed the controls and switch consoles. When I had the last custom front brake stainless hose made, I got two of them. The extra once fit perfectly.
Then karma decided I didn't deserved a fully smooth day! With the handlebars ready except the grips, I figured I should make sure that the bar end mirrors would fit. Of course not! The bars I chose are about twice as thick steel ad normal and the hole ID is too small. OK, I had a set of similar bars - installed them, karma again. Their bends would be fine for riding position, but the bends don;t work with a Norton master cylinder. So, I checked my new stock and I have two new bars that should be fine but by then I was tired.
November 4, 2024 First Monday of the month for IT customers - tied up a lot with IT problems. Did install the handlebars, controls, and switch consoles and prepared and test fitted the bard-end mirrors. Also installed the clutch cable and verified that the stainless front brake hose will work. Getting closer - need to bleed the front brake and do the rest of the wiring and a few other things.
November 5, 2024 Finished plumbing the front brake and bled it. Also made the harness for the brake switch.
November 6, 2024 Good/bad news. I just got home from wound care - they discharged me as officially my right leg is healed. Of course the skin is very thin and weak so I have to be extra careful. It's really nice to not have my leg wrapped foot to knee and to be able to take a shower without a shower sleeve on it. The bad news is my knees are so bad today, that I barely made the appointment. I see the ortho surgeon on Friday - I hope that won't just be more talk. I'm going to put my feet up for a while and see if my knees (especially the left) calm down. If so, I'll head to the shop.
November 7, 2024 Didn't feel like doing anything when I got home from the doctor, but took some steroids and a nap - that got me going. I finished all the branch wiring (rear brake switch, Tri-Spark ignition, coils, oil pressure switch, etc.) except the horn.
I'm deviating slightly from my normal rear brake switch wiring. I usually splice the brown wire into the brown wire from the front to back of the bike and the white wire into one of the white wires from the master switch to headlight shell. This time, no splices and they will be connect in the headlight shell. It's electrically the same and since the flasher is going in the headlight shell, there no need for a white wire to go towards the back and server the flashers and rear brake switch. This once again simplifies the wiring and keeps me from having to take the harness off and put it on multiple times before wrapping. There will still be red wire and brown/blue wire splices, as they make sense.
November 8, 2024 Got gel injections in both knees today. Not at all what I expected. 2.5" needle stuck between the bones and a large amount of clear liquid injected. He says it will about four weeks before it helps. I expected it to be padding between the bones but he says is really a lubricant much like motor oil.
Finished cleaning, testing and wiring the coils and wiring the Tri-Spark ignition so I could statically time it and run the self-test.
When I took the bike off the table, I made a dummy move. To statically time the engine you have to put it at full advance and them follow a procedure for setting the Tri-Spark rotor and stator. That's simple to do on the center stand as you can easily turn the engine using the rear wheel. Since I didn't do that I had to turn the engine with the kickstart which is on the other side of the bike from the timing marks. Being one-armed did not help, but with several tries I got it on the mark using a mirror. From there, it was easy enough to set it. Of course I will still strobe time it once running, but this will let it start.
I wish I were operating at "full strength"! If I'm able to put in the hours tomorrow, it will be wired and all wiring tested. If the last two weeks are any indication, I won't.
November 12, 2024 I haven't updated for a few days. The "gel" shots made my knees very stiff and I simply have not felt good - yesterday I was even using my O2 concentrator while I worked on this bike - first time in a couple of years.
I have been getting a little done each day on the wiring and finally today, I wrapped the harness. Now it can go on the back for good. I still have many connections to make but most of them are at the taillight and in the headlight shell.
My arm/shoulder have quit improving so I'm seeing a shoulder specialist tomorrow afternoon. I'm seeing my podiatrist on Thursday and will get a shot in my foot. That will help a LOT with standing trying to work. I have to hid from his subordinate doctor who is my wound care doctor. I was discharged from wound care last week and have three new wounds now. The smallest bumps on my legs that most would not even realize that they did cause me to lose skin.
November 13 2024 The shoulder specialist was a wasted trip. I won't have an MRI and he won't do anything without one - didn't even examine me. So, unless I fix it myself, I guess I'll live this way.
Put the harness on the bike and finished the master switch mounting. that came out nice. Now it's just terminating things.
What would a day working on a bike be without another wound? Since last Wednesday, I managed seven so I'm averaging one per day! This one actually hurt for a while. BTW, that arm, before today had eight healing wounds. Yes, I will cover it! No, it's not a big deal.
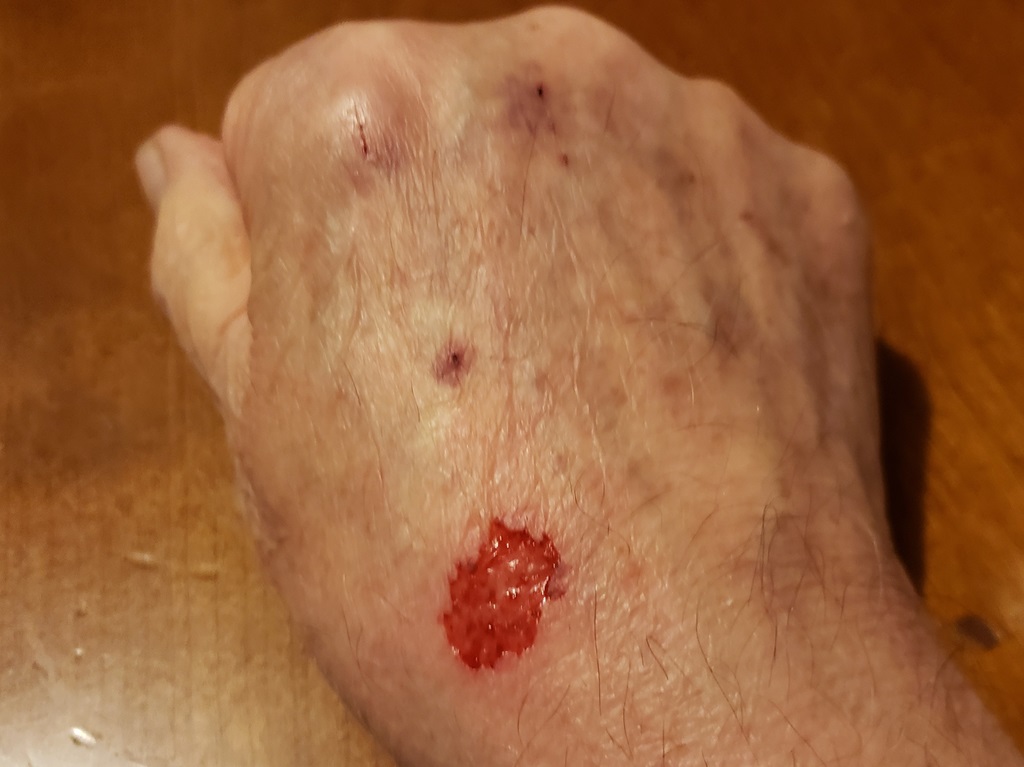
November 14, 2024 For weeks I've been seeing the wound care doctor in my podiatrist's office instead of my podiatrist so I've had no steroid shots in my foot. That changed today. Lately when people ask me how I am I've been saying "good for a 90-year-old". Of course, I'm 74. The steroids kicked in at about 4:30PM - until around Sunday afternoon, I won't be a 90-year-old!
In the picture you can see the battery area finished. I was all smiles and started terminating connections. When I got to the horn, it went to hell.
I check each circuit under power as I terminate. Before I wrapped the harness yesterday, I did a continuity test on all circuits (I thought). All the terminations in the headlight shell are done last and I use jumpers to tests the circuits. Once the horn was terminated, I added the a jumper to the Purple/Black wire in the headlight shell that I could use to touch the battery negative to test the horn'connections. When I touched it, crickets. Rechecked the jumpers and still crickets. So I jumped directly to the horn from the battery and the horn moaned. So, I thought that the battery needed charging - even with the charger connected the horn still just moaned. I checked the current to the horn and it was 6.5 amps - not good! So, I tried a small horn like I normally use and it sounded loudly and drew only 1.1 amps - good! Then I tried all the original tests and crickets! A bunch more checking and I'm embarrassed to say that I missed a ground splice and must remove the hardness, unwrap it and correct the
mistake. It's not hard, just time consuming, but what is a pain is that the connections on the horn I will use now are in a different place so while unwrapped I'll have to modify the horn wires.
I can't believe that I went though the trouble of mounting the horn the bike came with without testing it - that's not like me :-(
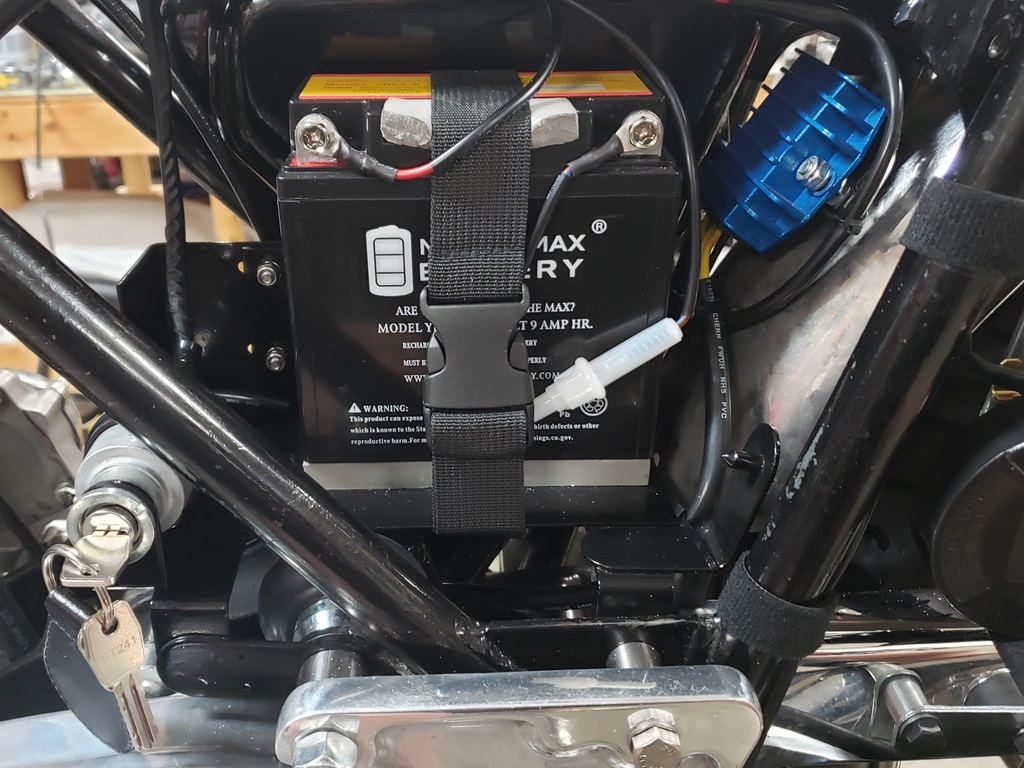
November 15, 2024 Saw a new shoulder specialist recommended by my podiatrist today who actually examined me. He thinks I have at least a major rotator cuff tear. He mentioned MRI and I refused. So, he said no problem, I can see his coworker who will use ultra sound to get a equal or better look at it all. The first appointment I could get for that is Dec 5 but at least I may get some help!
Figured out the new horn mounting, unwrapped the harness, found and fixed the problem. Tomorrow I can get back to where I was!
November 16, 2024 The harness is back on the bike and I'm terminating away. Didn't get as much done as planned - I was very popular on the phone today! The steroid shot is already wearing off so I'll probably be back to operating as a 90-year-old tomorrow ☹
November 17, 2024 Popular again today and Superman Mode is terminated, I'm back to 90-year-old mode. I did make progress. Only the rear brake, oil pressure switches and headlight shell to go.
I like the look of the 71/72 taillight better than the later one, but they are a PITA to wire one-armed! You really need three hands so I lashed it to the back of the frame tube upside done to make all the connections and then turned it over to install.
November 20, 2024 After a few fits and starts the wiring is done and tested except the headlight beam unit - can't remember where I put it and was too tired to keep looking for it today.
November 21, 2024 Today, two doctor visits, one dentist visit, one IT problem, a LARGE AN order arrived and lots of orders to fill - progress on this bike - none ☹ However, this week's Superman mode kicked in at around 5pm so hopefully tomorrow will be better.
November 22, 2024 I know I'm broken record but wow, this bike is a nightmare! Found the headlight beam unit and was disappointed. It's halogen (H4) which is brighter than the standard bulbs but not brighter than LEDs, and has no provision for a pilot light. Since most states require a white light to the front while riding, this one will have to have the headlight on all the time. There's nothing terrible about that but I don't like it. If I had a good used good beam unit, I would have replaced it. The second disappointment was that bare wires were sticking out of the H4 connector. I didn't have one to replace it with so I spent a LONG time getting each connector out, un-crimping the wires, putting new wires in, and soldering them. With that done, I finished tidying up the headlight shell wiring, finished testing it all, and closed up the headlight.
Since the carb is off and the tank is off, I took the opportunity to check the valves. Wow! the exhaust vales and the timing side intake valved were all at .015". The drive side intake valve had a huge gap - in the order of .050-.060" - at first I thought it must be a bent pushrod but then I noticed that the adjuster end was way high over the lock nut. It took many turns to get it down to the right adjustment. A Combat engine is supposed to have 0.008" gap for the intake valves and .010" gap for the exhaust valves. This must have been very noisy and the drive side cylinder must not have been running well at all as it would have been being starved of fuel and air. I'm not sure how that rocker stayed in the pushrod cup! No, it didn't come loose, the lock nuts were VERY tight.
November 23, 2024 Very busy day! Checking parts in, filling orders, making quotes, providing phone help - I guess the riding season is over and the "winter" projects have started! Finally put in some time on this bike. The carb is cleaned and the new jets installed. I'm hoping that between that and the valve adjustments that this will be a good running bike. I still have a bunch of little things to do, but I finally feel like I'm almost there.
November 24, 2024 Did a lot of small things today. The bike is almost ready to start. So, I got started on the tank issue. If you go back to my first post here, you can remind yourself of the problem.
The first picture shows the problem, but it is even worse than it appears as I couldn't get a direct camera angle. The picture is looking up through the right mounting hole at the threaded hole in the bottom of the tank that should be centered in the mounting hole - it is WAY off.
The second and third pictures try to capture what the builder did to try to correct that - the bend is the stud is even more than the picture shows!
The fourth picture shows the tank on the bike with no mounting studs or rubbers - it shows that the tank actually fits well.
The last picture shows the wiring and cables between the frame and tank with proper clearance - when I started there was no gap whatever between the tank and frame due to the mounting studs being incorrectly located in the tank.
So now I have to work my magic and find a way to properly mount the front of the tank. I have a plan - let's hope it works out.
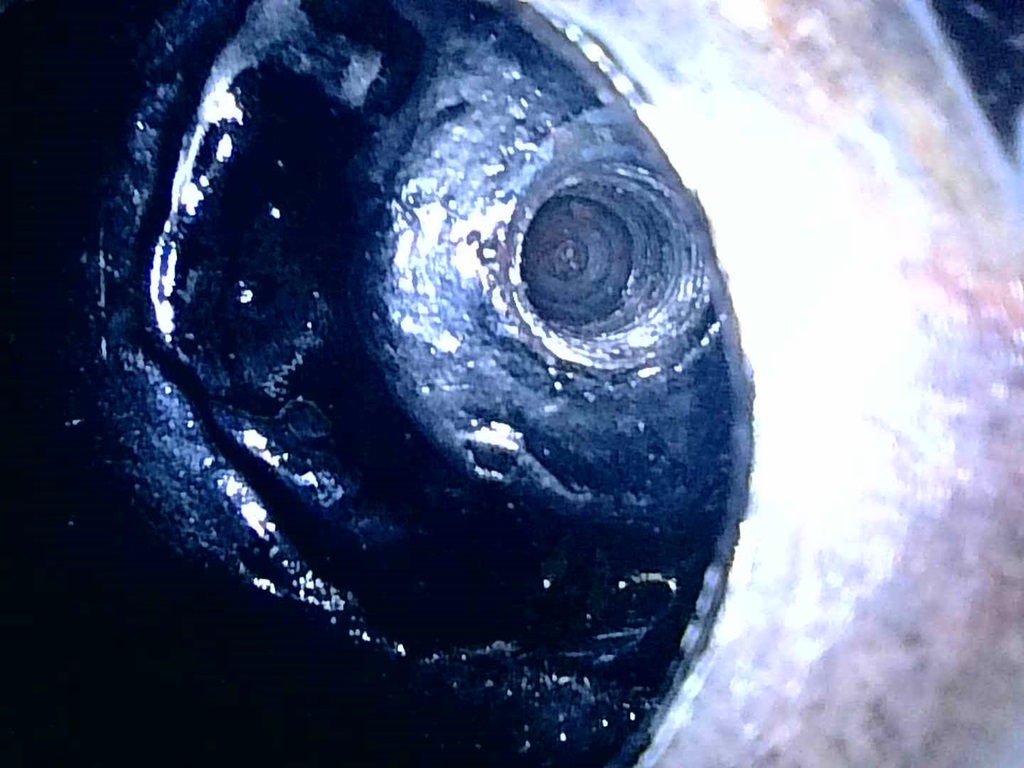
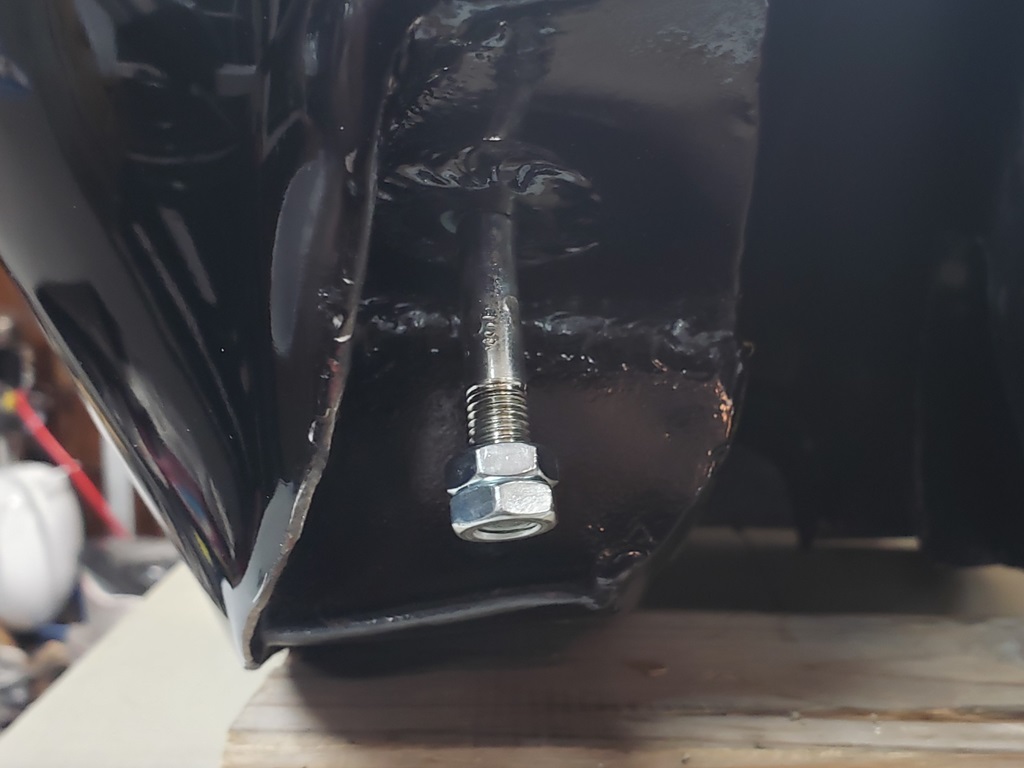
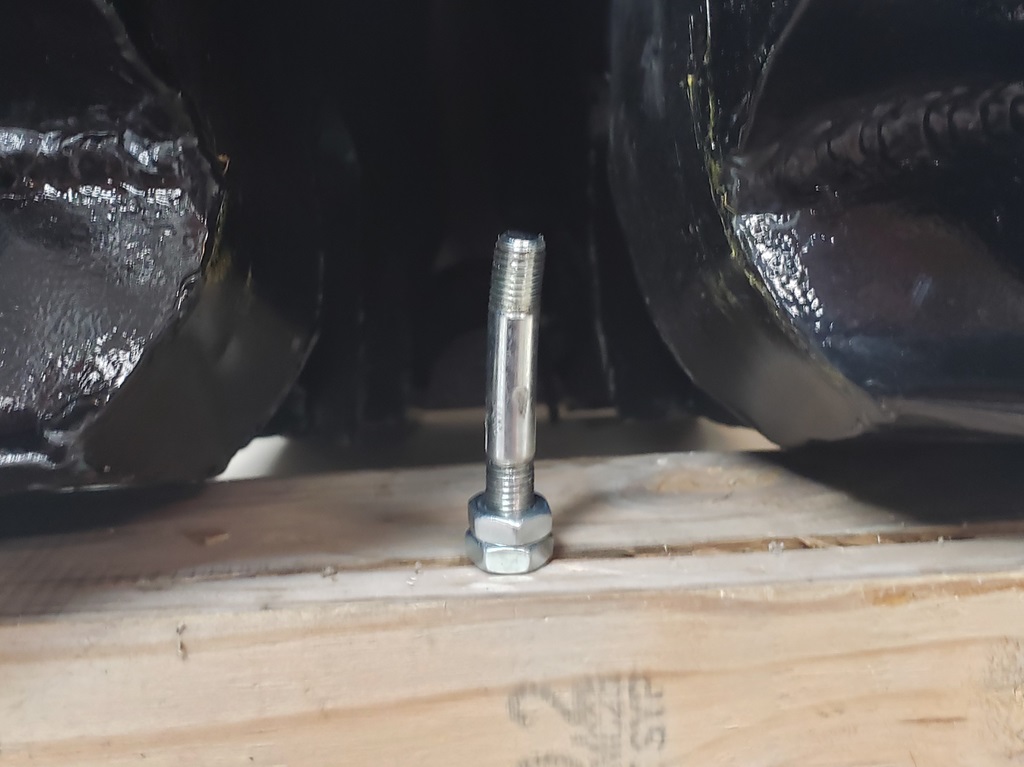
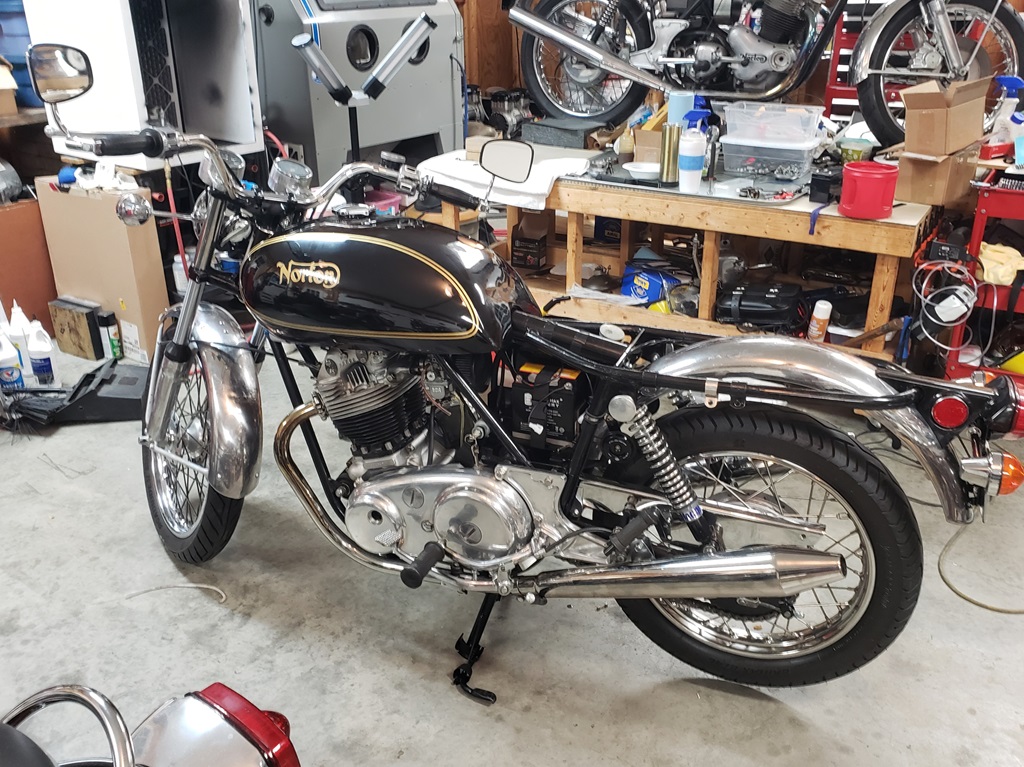
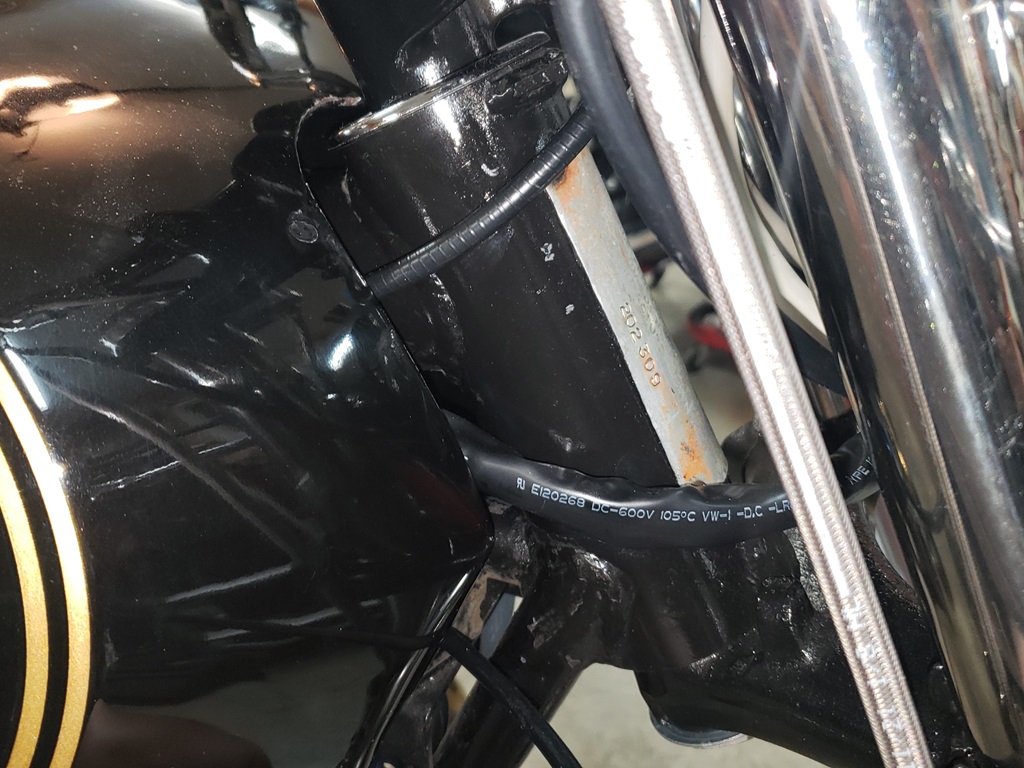
November 25, 2024 It's funny the amount of thought and searching for materials that goes into what ends up as a simple solution to a problem! The timing side front mounting stud location in the gas tank was too far forward and way to far towards the outside of the tank. The first picture shows what I made to fix that. The little plate was drilled for a standard stud and that hole was tapped for that stud. With the stud screwed all the way in, it was brazed to keep it there. then a mounting hole was drilled for a 1/2" UNF bolts to connect the fix to the bottom of the tank.
The second picture shows it installed and adjusted. It gets rotated backwards a little to resolve the too far forward part and the offset corrects the left-right part.
It was put together and tested and came out better than hoped! Then I took it back off so I can re-plate it since the brazing will make it rust unless I do.
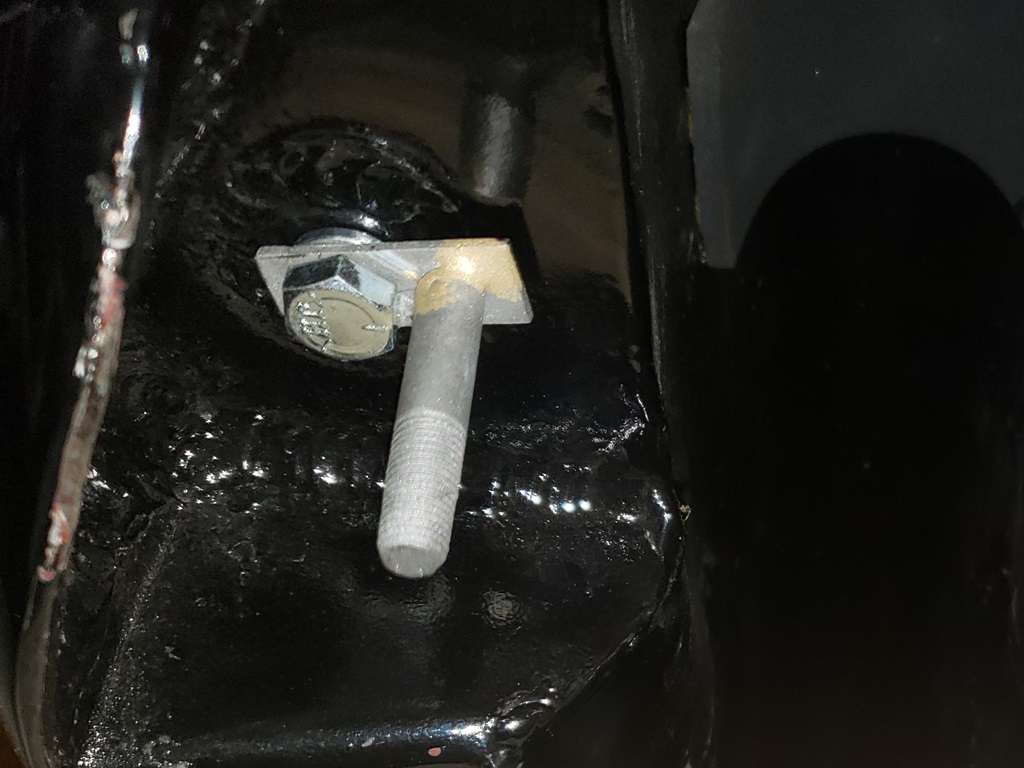
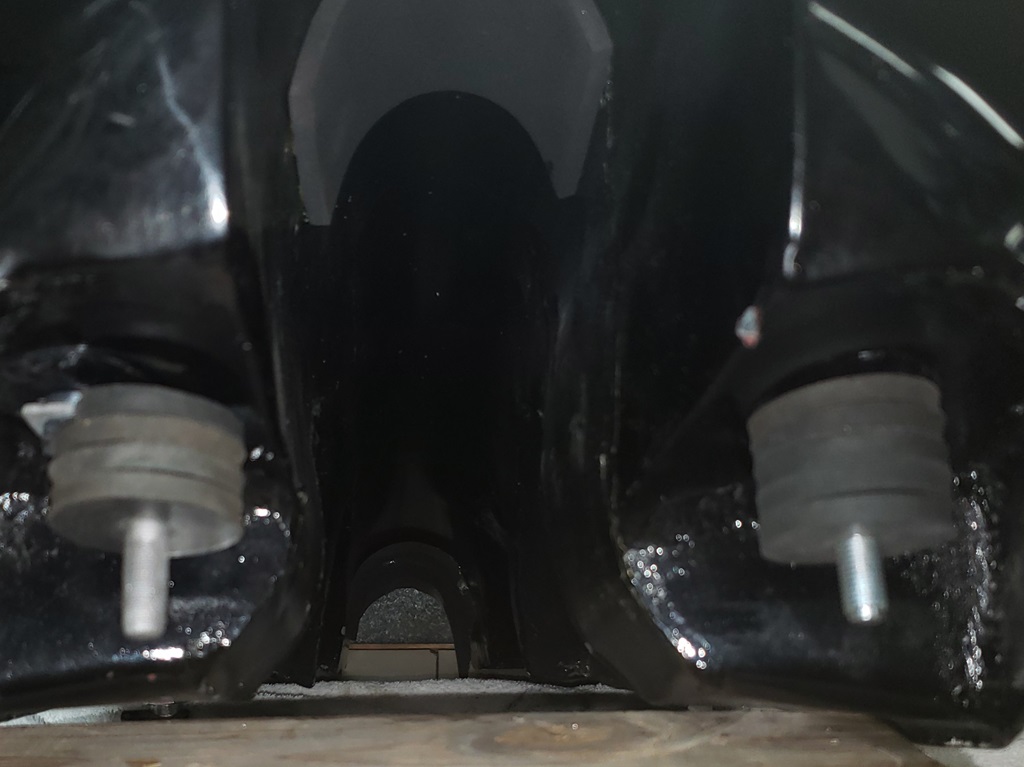
November 26, 2024 More IT problems, more doctor visits, another steroid shot (Yay!), more tank problems!
My tank fix is fine. I would have been perfect If I could have made the offset a little smaller, but then even the OEM tanks do not align in the middle of the mounting ear holes. The next problem is that with the correct number of rubber washers, the inside of the tank was rubbing against the front corner of the mounting ears. Added one more rubber to fix that. Then the timing side mounting buffer was hitting on the front oil tank mount and the outer edge of the gas tank was hitting on the top of the oil tank. The tank had some think rubber strips glued underneath. I removed them and put in the correct Interstate rear rubber. That was still too close to the oil tank. I tried a Roadster rear rubber which is about twice as thick as an Interstate rubber. That might work, but it appears to be too thick. I still haven't decided on exactly what to do but I have several options so I'll keep trying things. Tired of fooling with the tank, I started looking for other things needing doing.
The head steady and rear ISO mounting main bolt were still loose on purpose - finished them. I was able to straighten and install the chrome license plate holder that I talked about back on October 12th. Since the holder has simple 1/4" holes to mount it to the taillight bracket, I used the thinest head screws I could find and then mounted the license plate with three washers between it and the holder. It came out looking good.
Of course I took the bike off the lift without installing the speedometer cable ☹ Maybe the "Superman Mode" that's about to kick in will let me get on my knees tomorrow to install it.
November 27, 2024 Well, it's almost ready. I ended up shorting the timing side rear tank mounting stud so it wouldn't hit the oil tank mount. Then I straightened the badly bent rear mounting strap. OK,, tank on for (I sure hope) the last time. I got all four corners were they didn't hit anything, used the proper front and rear mounting rubber and finally tightened it all down. I had to use jam NyLock nuts because the shortened studs up front due to extra rubber washers and the shorten stud at the back mean that standard NyLock nuts were too tall.
Then it was time to install the fuel line - what a PITA! I shortened two of the hoses to make it line up better but I'm still not fond of it. I couldn't think of a better solution so I went with it. I did check the fuel filter - it is complete clean.
Then I was checking over more things and found that the clutch lever hit the handlebar end mirror. See the red oval in the first picture. I don't like that gap but it is needed for clearance. At lease with my hands, it is not a problem.
So, I plan to start it on Friday and tune/check what I can. If I can find help, I will strobe time it.
November 29, 2024 Hope everyone had a good Thanksgiving. I did, but ended up very tired today. It looks like I will have some help in the next 2-3 days for a few hours, so I'm not going to take the chance of hurting myself starting this bike today. When my stepson comes we will get it started and strobed timed and it will be WAY easier on me. He will probably take it around the block, but it's only 39F today and then next few are supposed to be cold as well so if it does go out it will be short. Using my grandson's tail number, they picked me up some fresh 100LL gas so it will be started on what the owner normally runs and I can adjust the carb on that as well.
I still have all that crazy luggage rack stuff to install - personally, I would recycle it! This bike already had what I call "droopy butt" and it was fixed (stupidly) by cutting off the rear loop and welding it back on and in the process the support fillets were not added. Carrying luggage on the back is a bad idea!!!
December 1, 2024 Started and checks:
- First start, 2nd kick ✔
- Oil returning to tank ✔
- Charging ✔
- Strobe timing ✔
- Adjust idle and air screw ✔
- Top up oil to between "L" and "H" with Castrol GTX Conventional 20W-50 ✔
First ride:
The only issue found that the speedo is not working - it's connected correctly so I need to ask the owner if it worked before. My stepson did the riding - only about two miles (cold out) but he said that everything worked great.
December 17 2024 For a while leading up to December 3rd, I was having trouble breathing. It got so bad the evening of December 3rd that I had to go to the ER. Even using my oxygen machine, I barely made it. I stayed in the hospital until the afternoon of December 13th. Unfortunately, nothing was resolved but I can breathe if I do nothing to exert myself. So, for now, I can do no motorcycle work.
December 31, 2024 Happy New Year!
I'm still recovering but am getting close to getting back in the shop.
I was wondering about the side panels and as I was dialing him, my painter called me! Turns out he was waiting on me and I was waiting on him. I forgot that I was going to send him the Interstate panels from this bike and that he would return the new Roadster panels in the same box. I sent them today.
January 17, 2025 Good Day, Bad Day, Update. The side panels arrived today and as expected they look great.
Back on August 19, 2024 I hurt my shoulder. Between wasting my time on two doctors, finding a good one, being scheduled for a ultrasound, having to reschedule due to being in the hospital, then having to reschedule again due to be in the hospital again, I finally got the ultra sound today, basically five months later. It's not good. I hoped to rehab it myself as I've done in the past, but of the three parts of the rotator cuff, one is OK, one is 100% torn, and the other is about 90% torn. To make matters worse, when I was in the hospital in December, I had almost no use of my right arm and damaged my left rotator cuff getting in and out of bed. The left has two small tears that I can rehab myself. When I see the surgeon on Monday, he will surely say I need surgery on my right shoulder. That's a problem as an anesthesiologist will probably refuse due to my current heart
problem.
Today was a big day! For the first time since Dec 2nd, I worked on motorcycle stuff for over three hours.
The timing side cover installed without trouble. I can't figure out how to install the drive side without taking the tank off - I hoped to never need to do that again and the tank is full of gas so I either have to drain it or get someone to lift it for me!
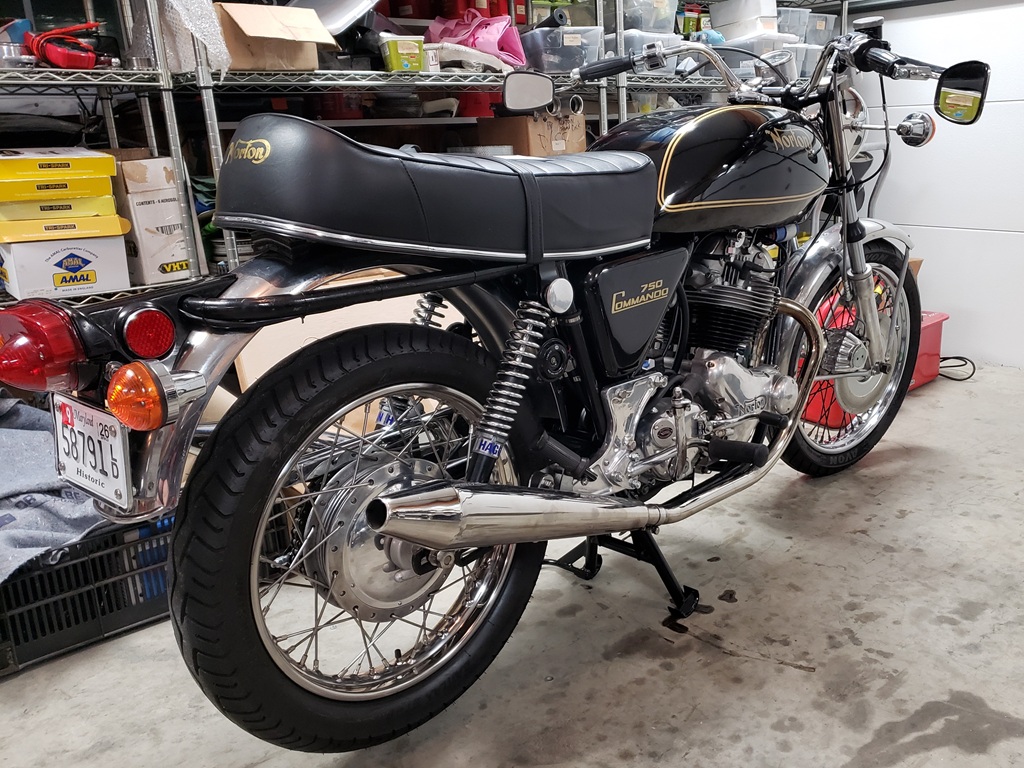
May 5, 2025 I just realized that somehow I lost of lot of this writeup. Between
the last update here, we tested the bike multiple times and then March 22, 2025
we delivered it to the owner north of Baltimore. My stepson rode it and my
grandson and I lead the way in my stepson's truck. The idea was that is
something when wrong, we would have the truck. Everything went well and the bike
perform flawlessly.
|