Home
Motorcycle Home
Triumph Home
Export Home
Norton Info Home
Special Parts
Updated
01/29/26
Master Switch Bracket
Updated
03/08/26
MKIII Rebuild
Updated
03/08/26
Combat 5
Updated
03/03/26
High Mileage Combat
Updated
03/16/26
Roadster 850
Updated
03/05/26
Customer Combat
Partial Rebuild July 24
Delivered 03/22/25
850 Commando
Recommission
Delivered 09/20/24
Customer Combat
Build Oct 23
Shipped 7/13/24
1975 Norton Wiring
Delivered 06/07/24
Blue 69S
Delivered 05/17/24
High Mileage 850
Delivered 03/26/24
Mk3 Engine & Gearbox
Delivered 03/07/23
1973 Customer
BasketCase Build
Delivered 07/15/22
1974 Norton 850
Commando Rebuild
Sold 01/12/21
Updated 06/10/21
Customer Combat
Delivered 09/07/20
First Place Norton 05/18/2025
1972 Norton 750
Commando Rebuild
Completed 05/15/19
First Place Norton 05/16/19
Sold 01/01/20
1972 Norton Wiring
Completed 07/19/18
1974 Norton Wiring
Completed 07/27/20
Customer Combat
and 69S Builds
Closed 10/18/23
|
 | Wednesday, March 18, 2026 |
November 24, 2025 Originally, I wasn't going to document this as I've documented engine/gearbox rebuilds before. But the owner's story tells me that this one might be interesting. Especially since this will be the highest mileage Norton I've ever worked on.
As a part of his introduction, the owner said: "I recently acquired my old college roommate's 72 Norton 750 Interstate with a Combat Engine. It has over 78K miles on it and supposedly has never been opened up except to replace a cracked piston skirt early on in its life. He was stationed in Germany in the 70s and bought and had shipped back this bike from England so he is the original owner. I have known him for over 50 years and his recent bad health has had him put the bike up in 2021 until this August when he gave me the bike. I have gotten it running but there is knocking noise coming from the cylinder head I believe and it pops out of first gear. So I would like to get the engine and transmission rebuilt."
He is planned to bring me the engine and gearbox this weekend. I'm hard at work on Combat 5 and two more heads and MKIII Rebuild but I'm always stuck waiting for parts so this should fit in just fine. The goal it for him to have it back to ride in the spring. Of course, that will be much easier if I don't do any hospital stays!
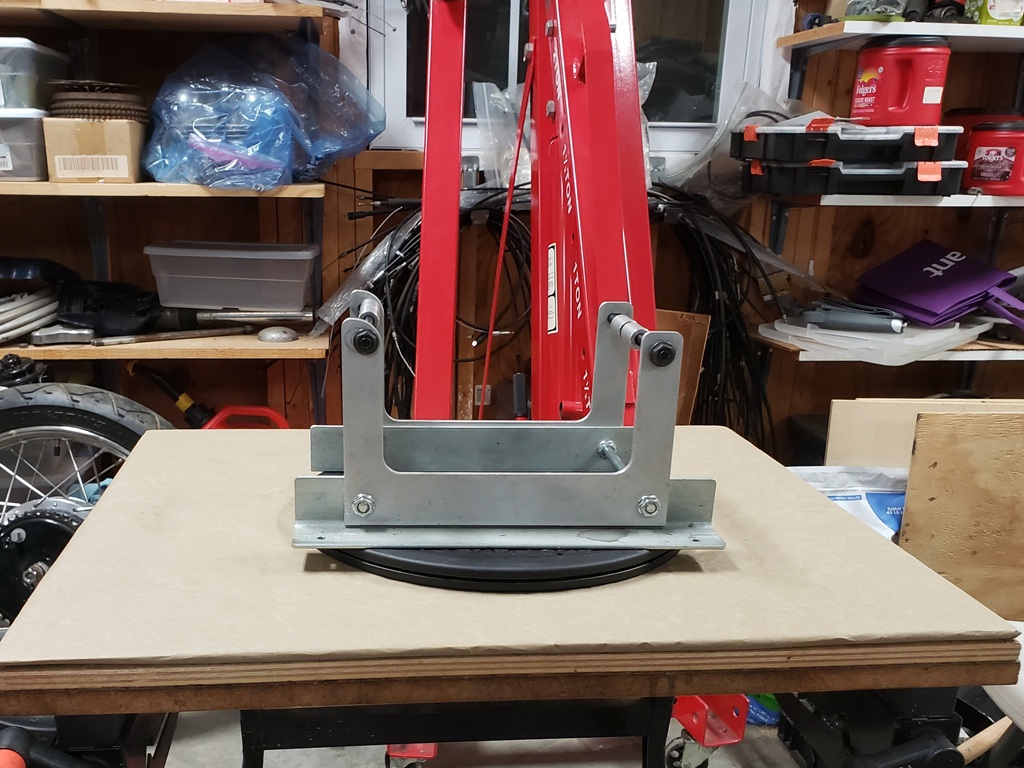
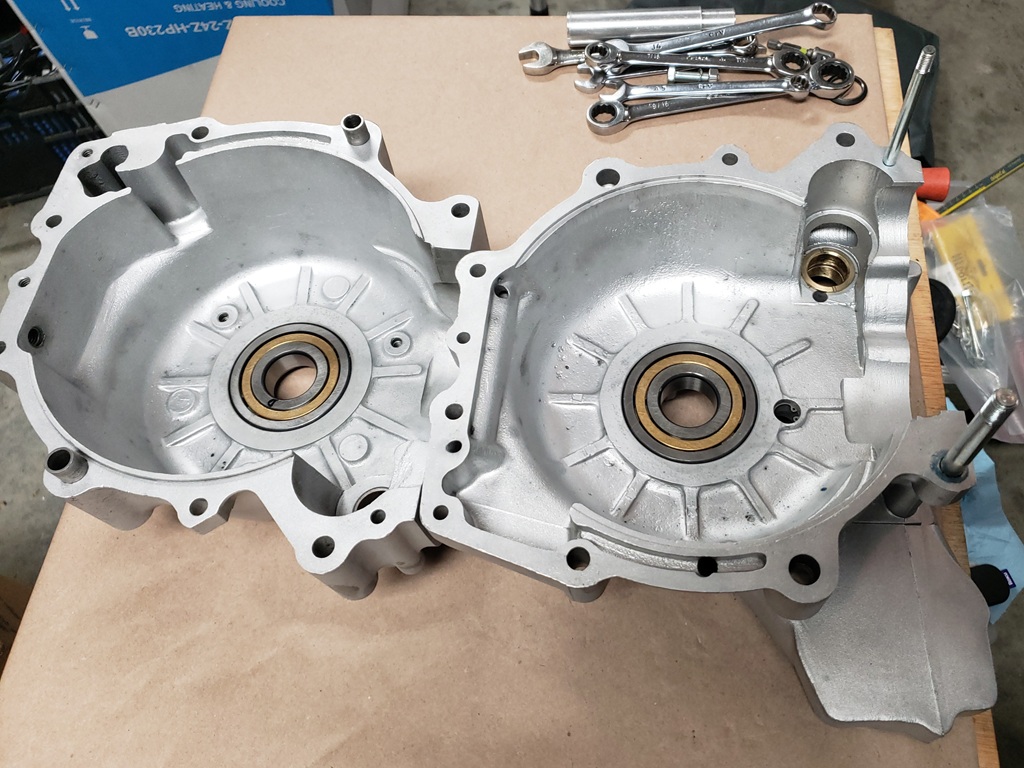
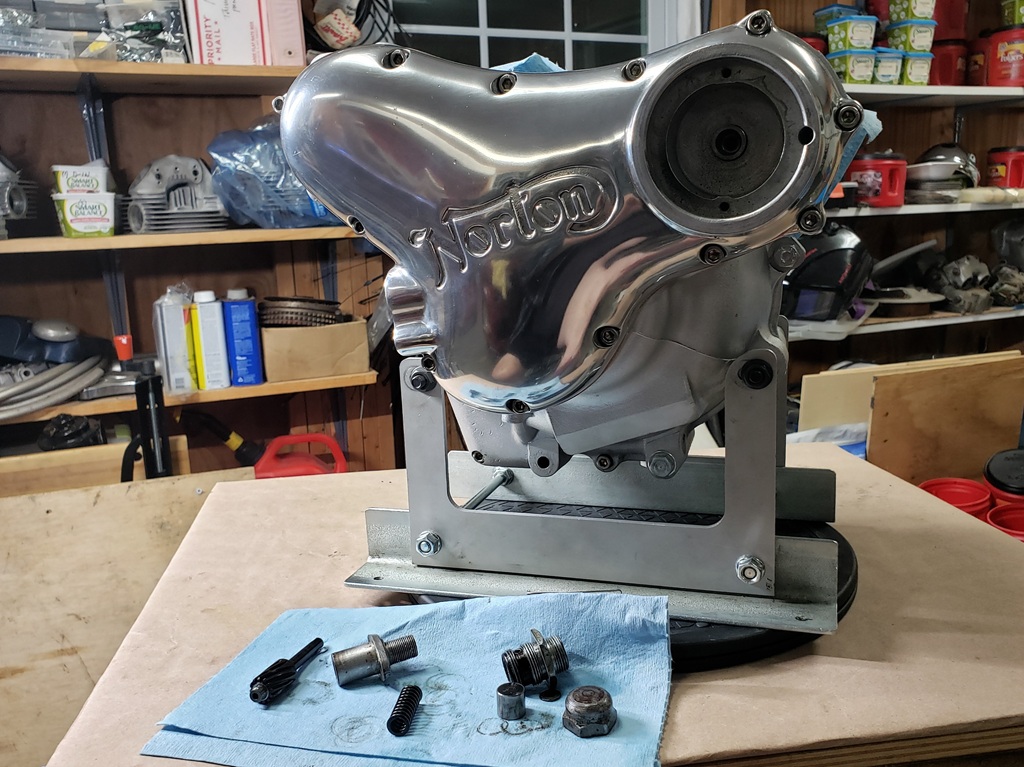
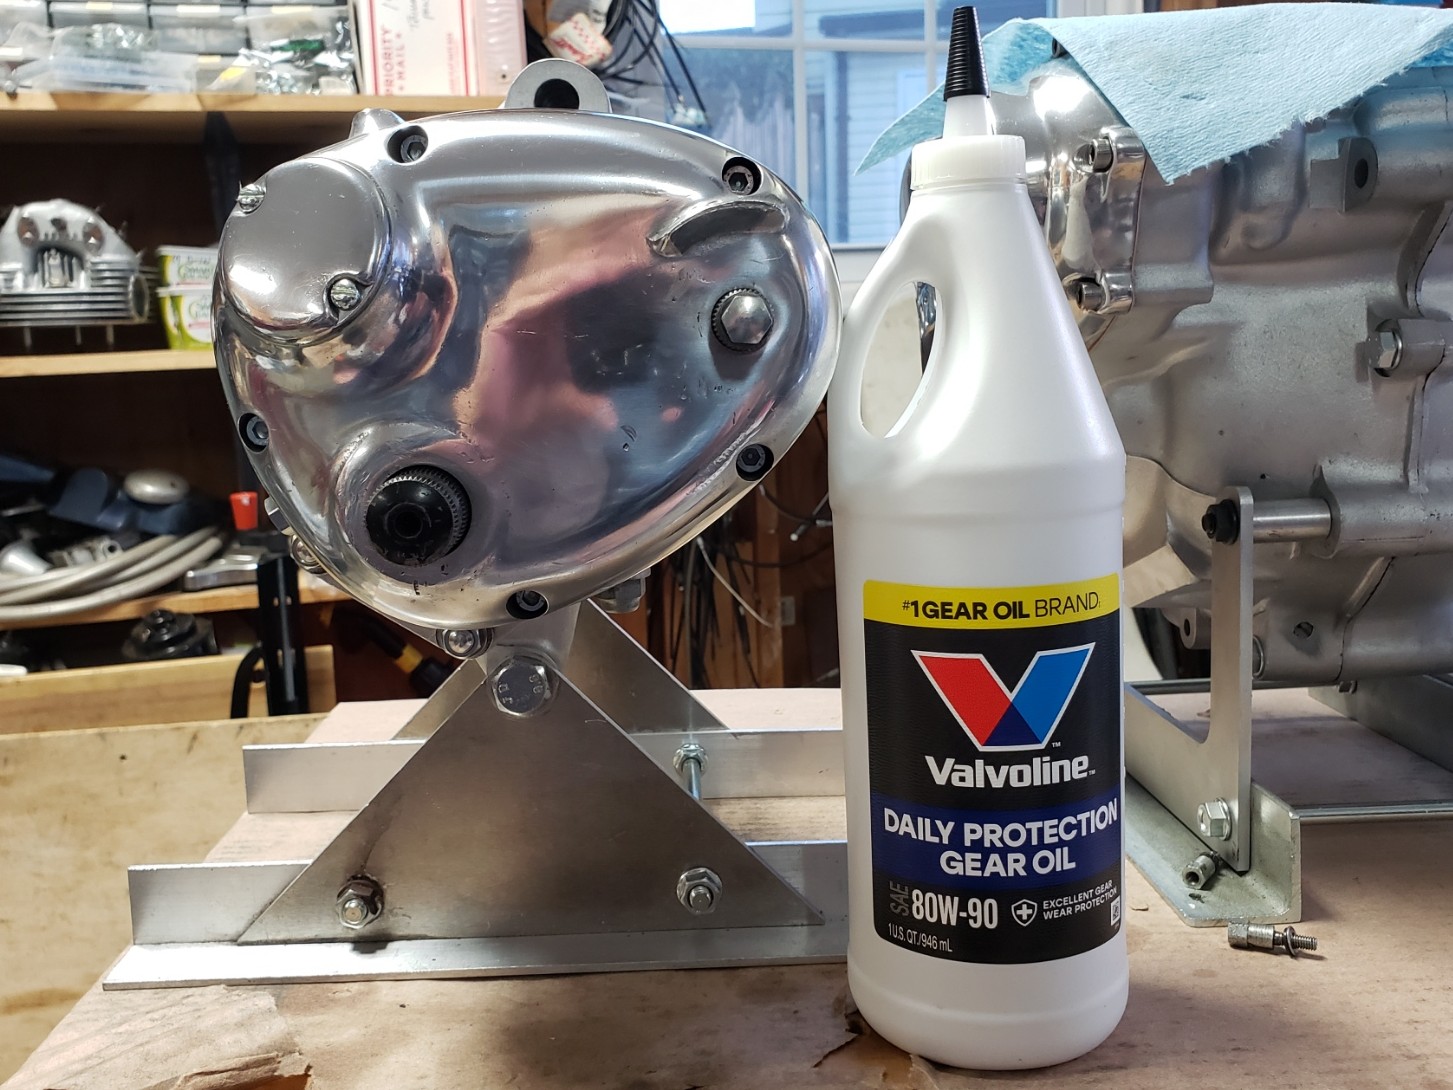
Today, I looked around for a clear flat spot to put his engine on - found none - so I spent a lot of time straightening, putting away, and cleaning and now there's a place!
This will be it's home at least while taking it apart and figuring out what it needs. Then it can go in bins until ready to be assembled and the gearbox can be worked on here. I considered building another of my mobile work tables as it would be more comfortable than working at a Workmate but I need to get some of these projects done!
BTW, the black thing is a heavy duty "Lazy Susan" and the engine stand is a modified version of the stand Andover Norton makes. I have sent them the plans and hopefully once they've sold their current stock they will start making my improved version. With mine, you can get at the bottom bolts and screws and you can get to the sump plug(s). Also, when I ship engines, I mount them in this stand, screw the stand down to wood and that becomes the bottom of the crate - of course, insisting that the receiver take the stand apart and send it back.
December 5, 2025 New plan - he's bringing the engine this Sunday. Issue: leave a flat spot untouched around here and it gets touched! I'll need to do some cleanup to get it back to the picture above :-) Also, guys are coming out of the woodwork - there may be another guy coming tomorrow or Sunday with an engine to rebuild and there's a guy out west considering sending a seized engine to be fixed.
December 7, 2025 The brothers are back! Bike builds run into each other but I knew
the owner of this one was the brother of the owner of another documented bike. That
bike was the previous highest mileage bike! High Mileage 850. That bike is doing well.
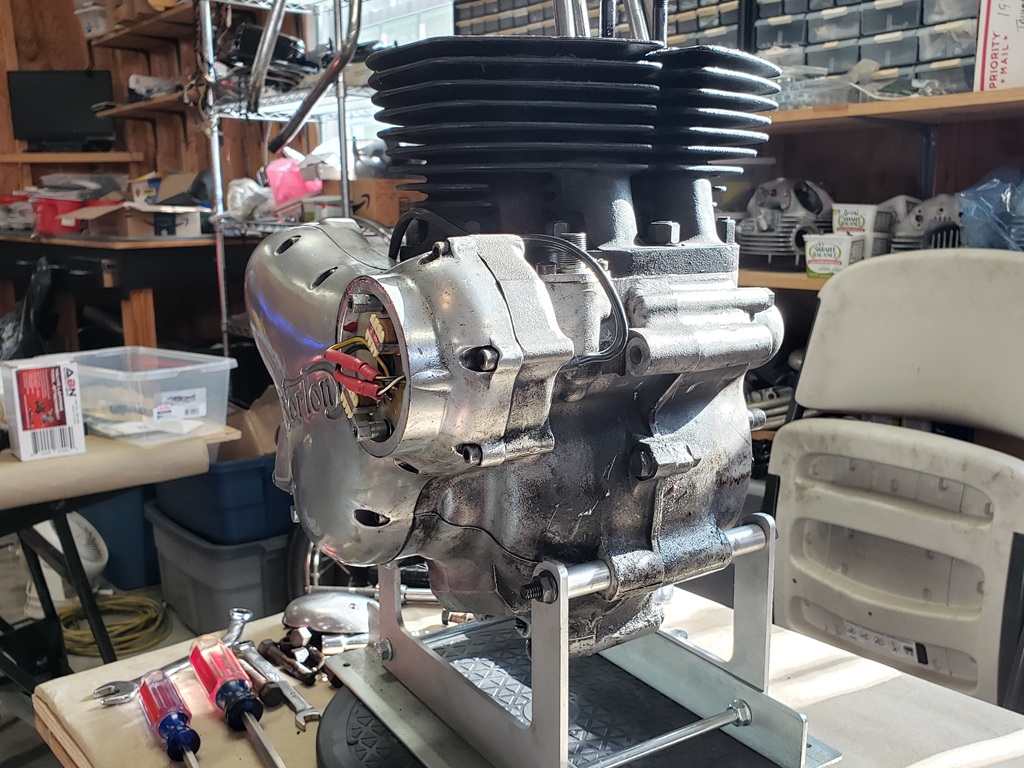
I meant to take a picture before doing anything, but we got to talking and I enforced my rule: "Visit me and you have to work!" It's hard for me, especially with the engine up high, to get the head loose so the brothers and I did it. The bike has at least 78k miles and it's only been apart once when it was almost new for a "broken piston skirt" which probably really was the top of the piston came off - those original Combat pistons had a bad habit of that and this
a VERY low serial number Combat. One bore looks excellent and the other has some marks but you can still see the cross hatching in both! It currently has +0.020" pistons and since they were replaced early-on, they are likely the bad kind.
The owner said that it has a top end noise and I took a cursory look at the head and didn't see anything. He wants my full treatment so we'll see when I get the head apart.
It may be a while before I do much other than get the cylinders off and determine if they need bored as Combat 5
is the priority right now.
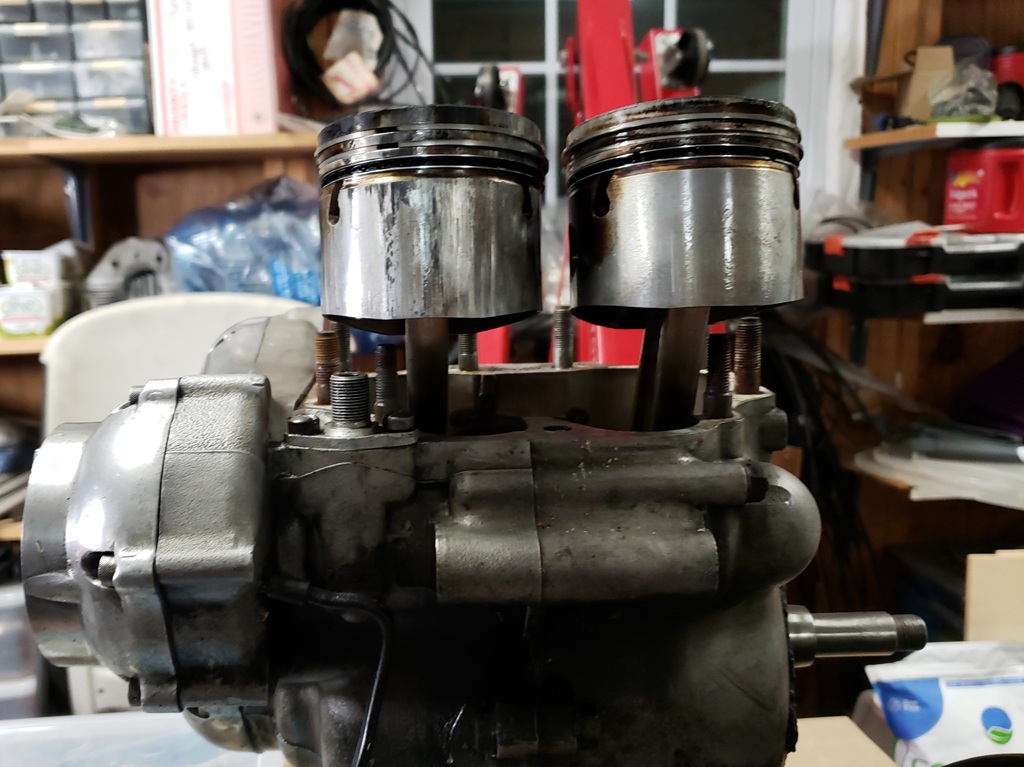
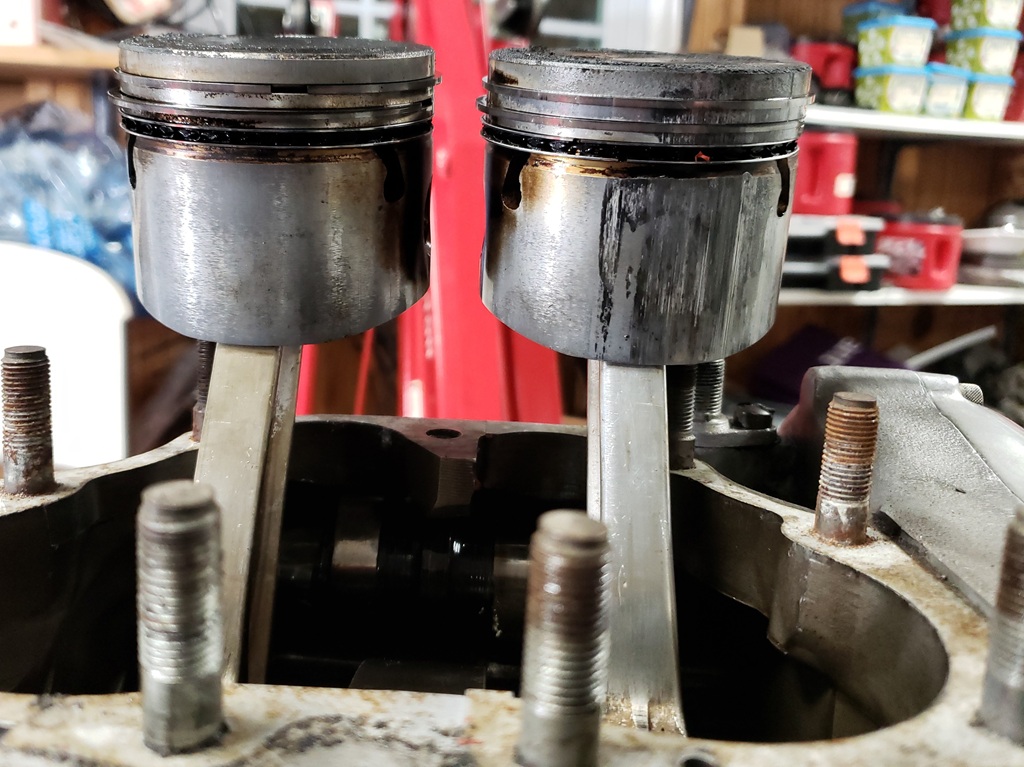
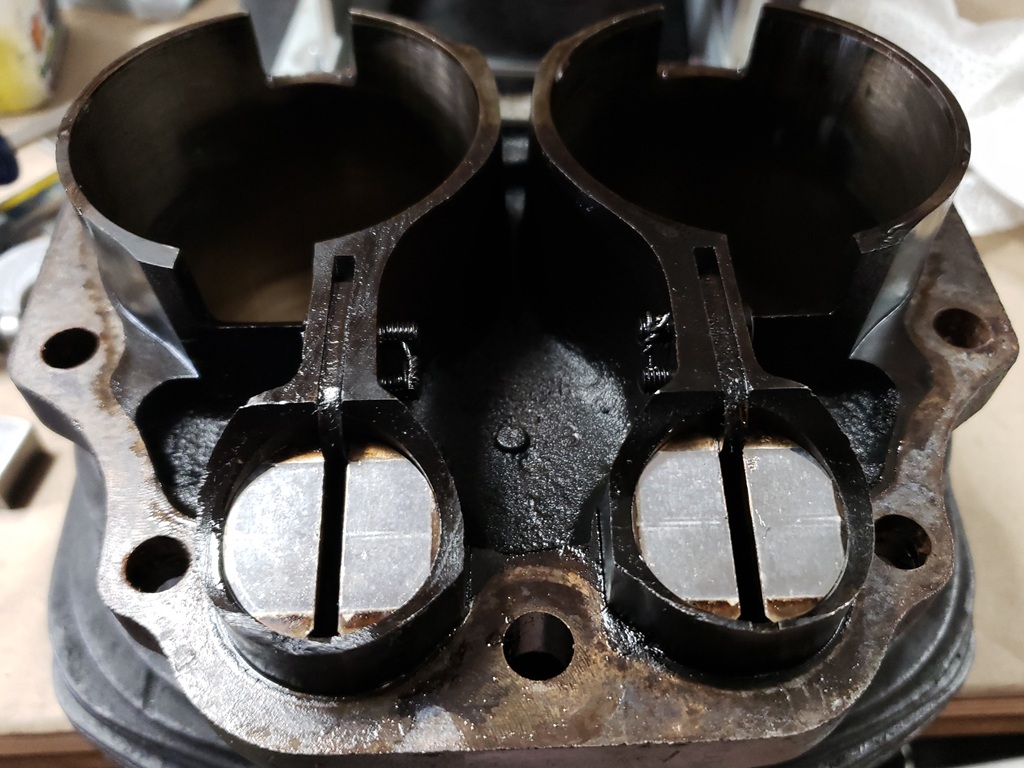
December 10, 2025 Had some time today between coats of pain on Combat 5's cradle. Took the cylinders off, did some inspecting, and found some surprises. All the base nuts were only slightly more than finger tight! It's like this is two engines in one. Notice the timing-side piston in the first two pictures (left in the first, right in the second). That piston is in bad shape. The other piston, is in great shape! So, I measure the taper in the two bores:
- Drive side is only 0.002" - 0.004" is the max so that side could go a long time more.
- Timing side is 0.005" so past allowable
On top of that, the pistons are the original type that tended to lose their tops so they need to be changed anyway. Of course, the only piston size I'm out of
is +.040 for 750 :-(
The third picture shows the shocking part! Those tappets look better than any I've seen in an engine rebuild and the are very smooth in the tunnels. That's good,because they are VERY expensive new and even though I buy used sets whenever I can, the best set if have would take me 3-4 hours to flatten where these only need a 30 minute touch-up. I haven't checked the cam yet but as good as the tappets are, there's a chance that it will run again.
(1 Hr Today)
December 13, 2025 Was working on getting the rest of the engine apart when the owner called to see if he could bring the gearbox by. When he got here, I invoked my shop rule - visit and you work! We got it all apart except for splitting the crank - very helpful! There continues to be amazing things:
- Many things loose but some tighter than expected.
- The intermediate gear shaft in the timing chest does not wiggle but easily pulls out of the crankcase. It should be OK as is, but once the cases and timing cover are clean, I will put it in with some shaft mount Loctite and I'll put the timing cover on and leave it overnight.
- The oil pump appears to have never been serviced, or at least the screws never staked. When I turned it and looked in the return port, it looked like the gear was not turning. Took the pump apart and it turned out that the was a broken piece of metal in the return port that did not come out of the pump. The port
was no completely blocked so the pump worked. I'm almost positive it left the factory that way! Once of the return gears was slightly hitting that piece of
metal so I'll change that gear.. It's mate looks fine.
- The inner race on one main bearing is not tight on the crank. It's an easy slip fit and should be a much tighter fit. When I put it back together, if that's still the case I'll use bearing set Loctite on it. It's not bad enough to need anything more.
- The big end shells look great - very hard to believe 78k+ miles. Of course I'll install a new set.
- The big end journals have light marks that cannot be felt. I have not checked them with a micrometer yet , but I'm guessing they only need a quick polish.
- The conrods look fine. A little polish and a slight nick or two to remove.
(6 Hours today, but had help so only counting 3. Running total, 4 Hours)
December 14, 2025 This engine keeps amazing me! Measured the big-end journals today. Both measure 1.7500 in all directions. The factory size is 1.7504-1.7509 and if ovality or scoring is over .0015" then it must be ground. These have 0" ovality and are well within .0015" of original. So, this crank does not need to be ground. I used some 1000 grit paper and WD40 to polish up the journals - they are good.
Then I inspected the cam. The lobes look great. There is some minor scoring on the
timing side journal that runs in the bushing and I need to study that more but off
hand - I think this cam can go back in. I always change the timing-side bushings
to the MK3 style - especially on 73/73 engines because the inner thrust washer tab
can break off and run through the engine and there is no outer thrust washer. The
MK3 type corrects both issues. Once I have those bushings in, I'll recheck the
cam journal.
Inside a Command crankshaft is a sludge trap. Prior to having oil filters, a lot of sludge would be caught in there. Often there is little to none if an oil filter is installed and the oil is kept changed. Of course, there's no way to know without splitting the crankshaft. The per-MK3 crankshafts, have a big location pin that goes through the flywheel and both cheeks, and it has two bolts at the top that are a tight fit - between them the crankshaft is aligned side-to-side. There are four more bolts or studs that simply provide clamping force. Once all the nuts are off, wiggle, wiggle wiggle and the crank comes apart - usually. Sometimes the
top two bolts/studs are too tight and need to be drifted out. On this crank, one of those was hard to drift out, and the other was almost impossible! I never had
so much trouble getting a Commando crankshaft apart. Once out, I could see a slight bend in that bolt and a burr on the cheek. Originally the top two and middle two
were bolts and the bottom two were studs. They will all be replaced with the later studs.
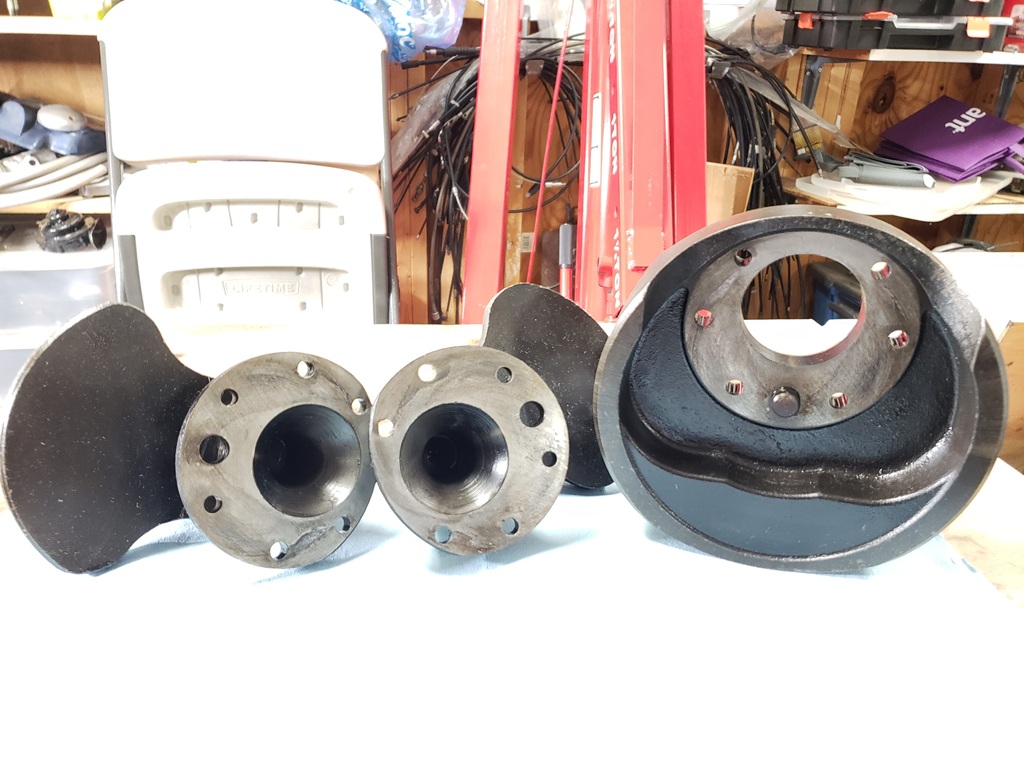
In the first picture you can see no sludge. The only thing I did at that point was spray some WD40 and wipe them out - shockingly clean!
Then I checked the oil holes in the journals as I often find issues there. On the timing side, one hole was not fully drilled so there was only a pinhole to the inside - the right size drill was used but they didn't go deep enough. The other hole in that journal, thankfully, was done properly. The other journal had one not fully drilled but not as bad. Anyway, they are properly open now.
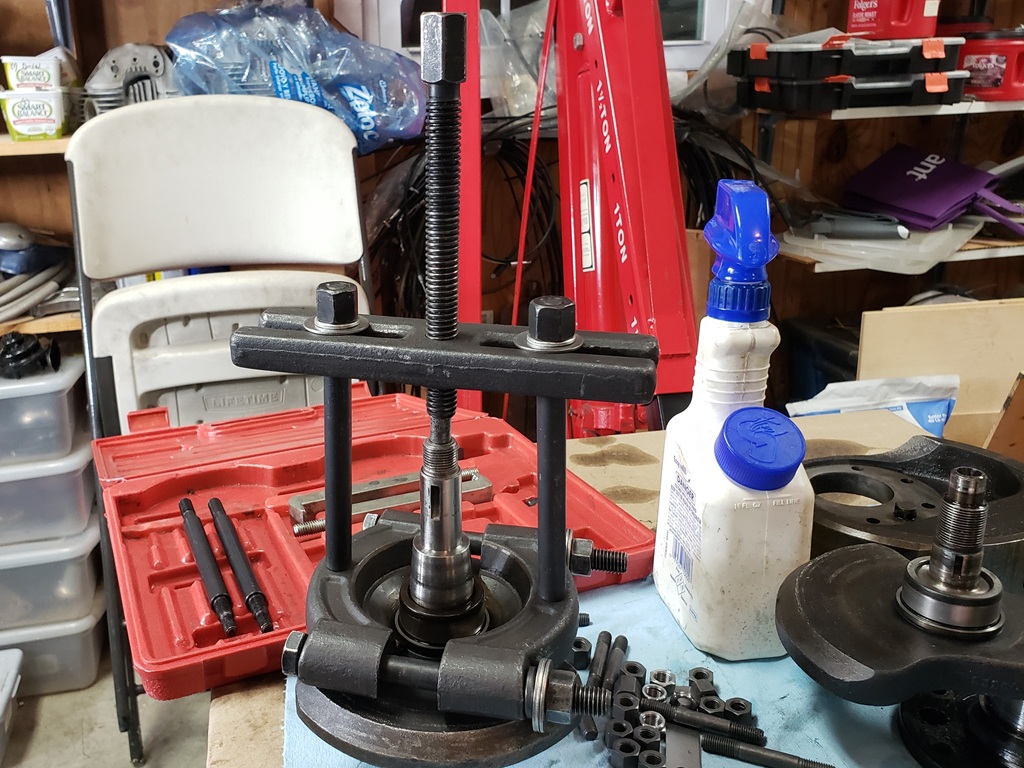
Then I looked into the main bearing inner race on the drive side - the one that was loose. It would pull off 1/8" but no more os I setup the puller in the second picture and it came off easily. I can't tell for sure why it was able to turn on the crank, but I'm sure the new on will be good with bearing set Loctite. I pulled the race form the timing said and it came off with a lot of heat and difficulty as it normal.
(5 Hours today. Running total, 9 Hours)
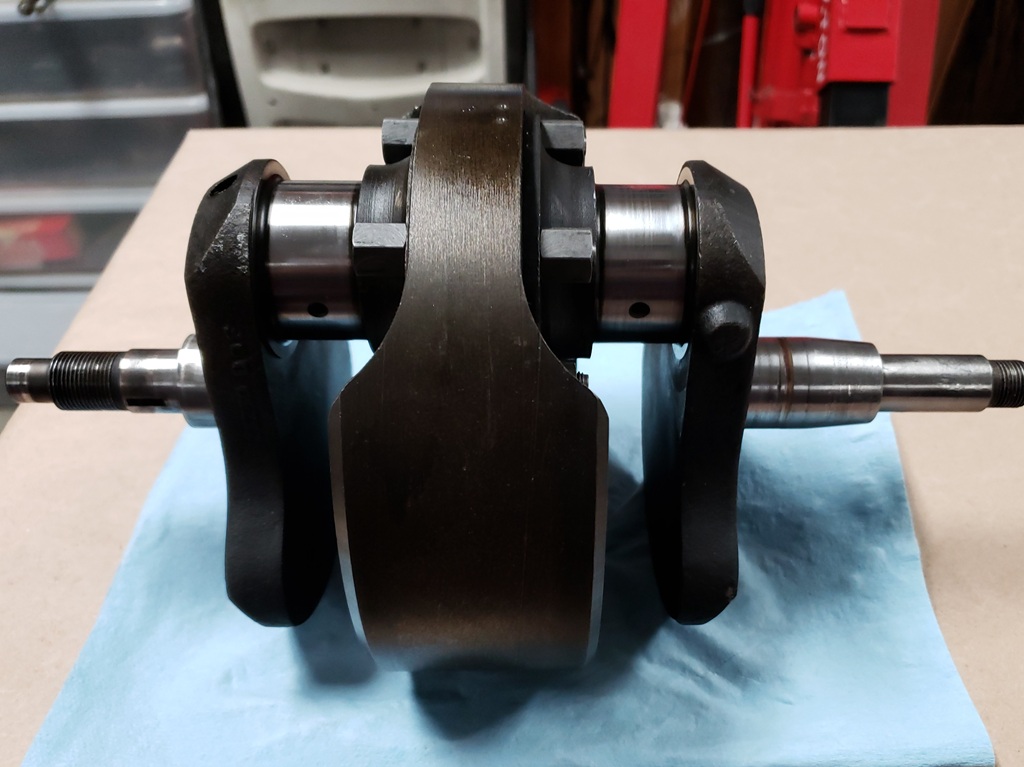
December 16, 2025 See the first picture - the crankshaft is clean and back together. Had one issue. A while back, I bought all the individual studs and nuts from RGM Norton as they cost about half of the kit from Andover Norton. Everything seems high quality and correct. However, the two bolts for the top which are longer than the other four and slightly larger diameter were wrong. The length is correct but they are the same diameter as the other four so they were a loose fit in the top holes. Fortunately, I had two from Andover Norton that were correct!
After the crank was back together I started on the crankcases. They need the sealing compound removed, the bearings removed, a good washing, and then the beautification process. The second picture shows the goop that was last used to seal the cases and the third shows it mostly removed. Still have to do the other side - took forever!
(3 Hours today. Running total, 12 Hours)
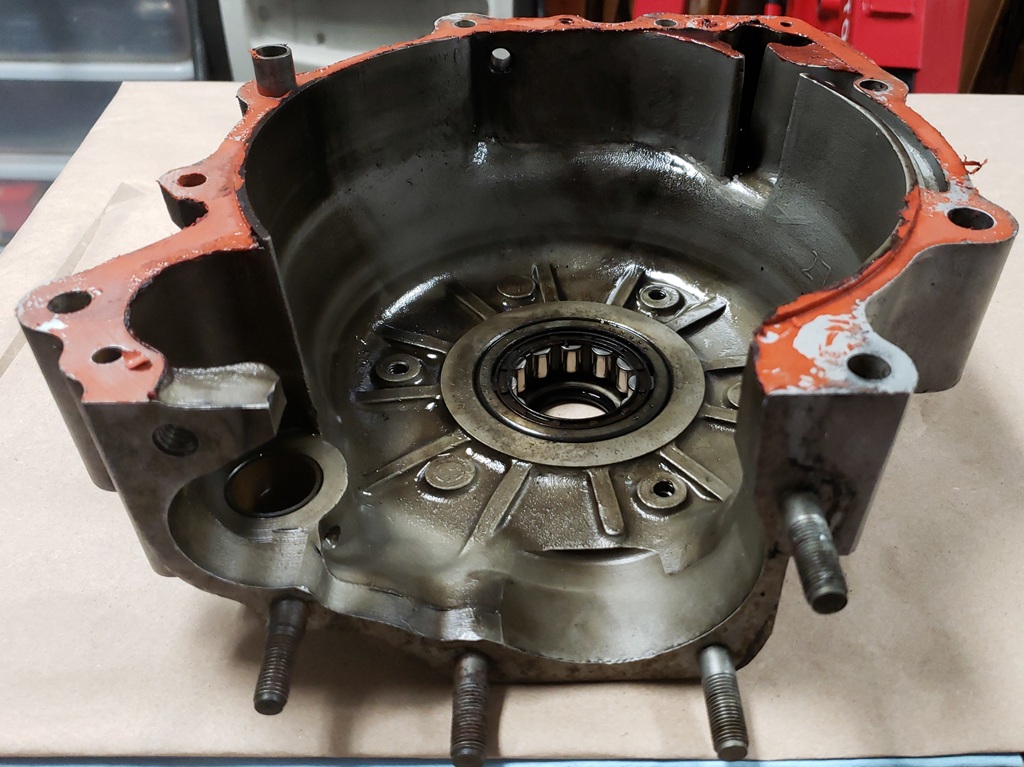
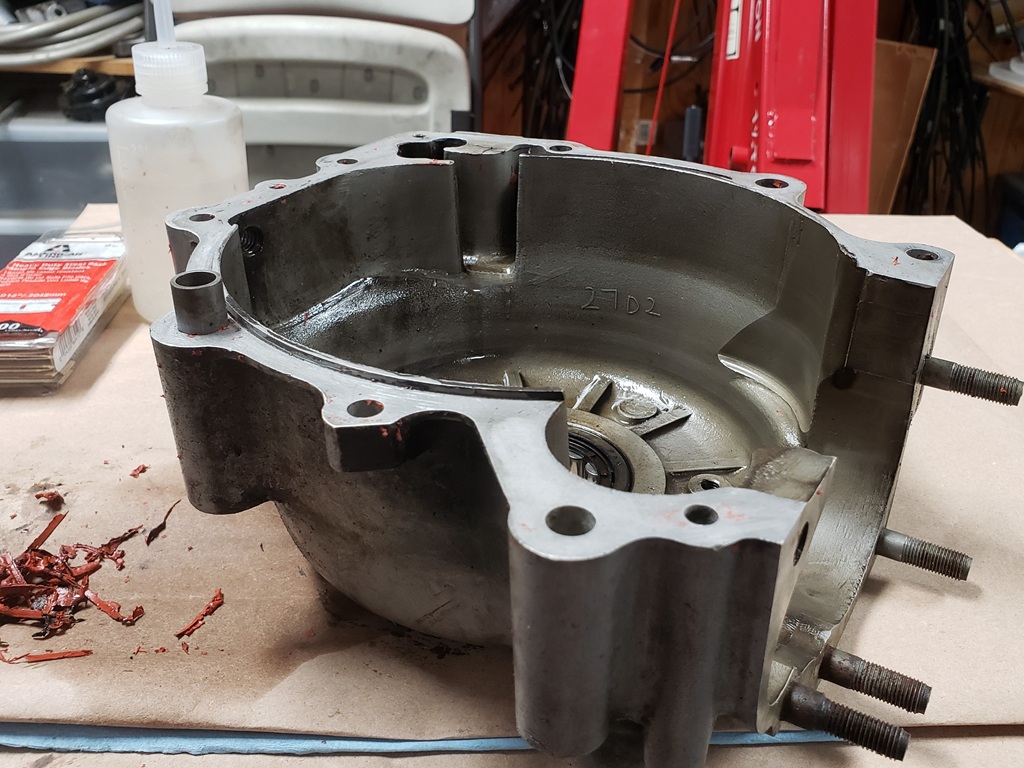
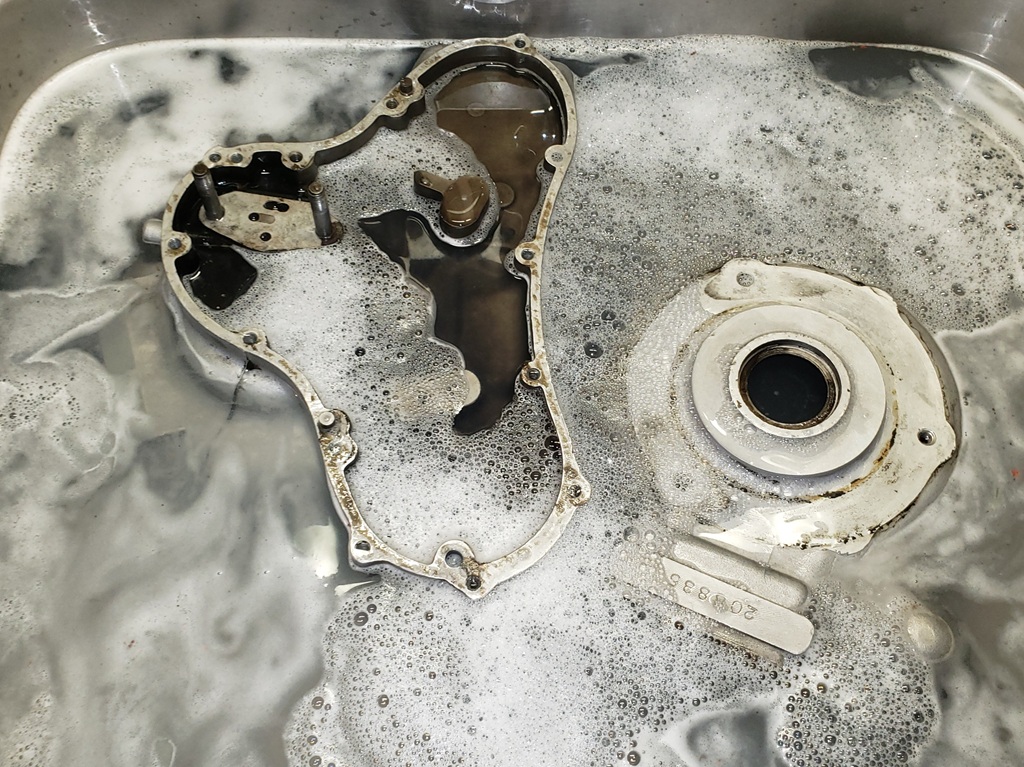
December 19 2025 Can someone please tell me why people think they need to glue engines together! I spent a long time getting the gaskets and goop off the two surfaces in the pictures and then worked on getting enough road grime off that I can bring them in the house to clean them before blasting in the kitchen sink.
(2 Hours today. Running total, 14 Hours)
December 26, 2025 It was cold outside so I couldn't work on the Combat 5 frame outside. So, I stripped these cases and it was time for them to take a nice bath in the kitchen sink! If you have a woman in your life show them this - they could do worse than you!
(1 Hour today. Running total, 15 Hours)
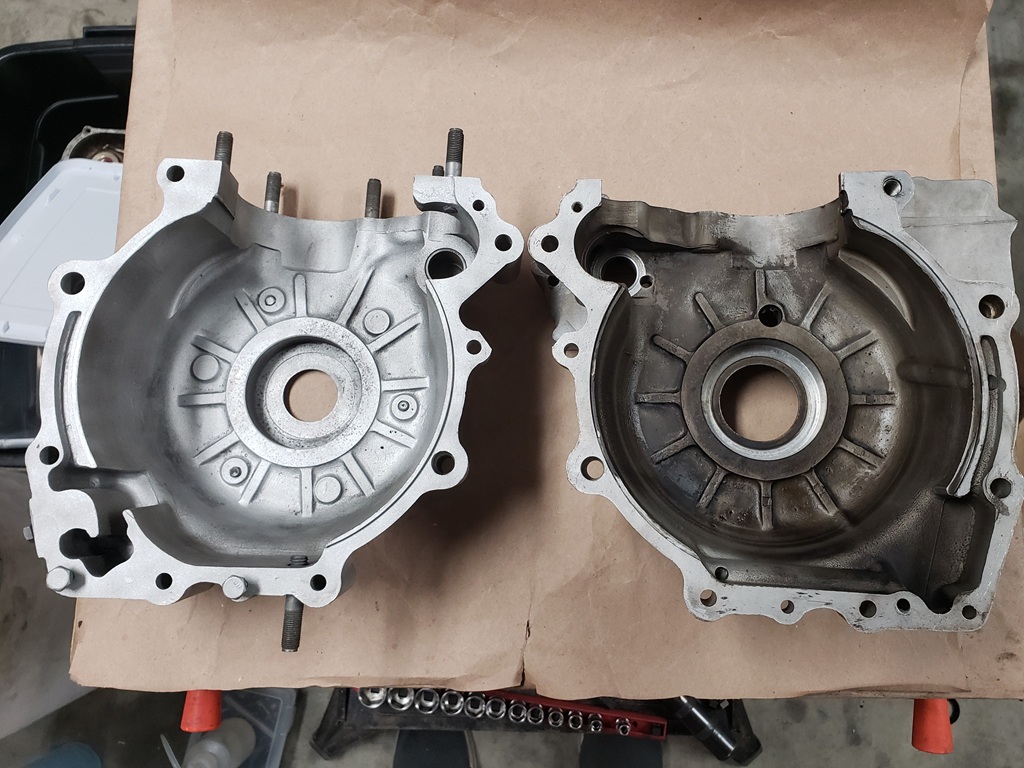
December 27, 2027 After a bunch of scrubbing in the sink the cases were still annoyingly dirty. So I went at them with WD40, denatured alcohol and a brass brush. On the
right of the picture is the results of that. On the left is after blasting with glass abrasive. The case half on the left came out acceptably clean, but not as
nice as expected. Both halves, but especially the drive side are porous and stained. When done they will look better as this is only the first phase. Normally, I
only see porous cases on 850s and then usually on 74 or 75 850s.
(2 Hours today. Running total, 17 Hours)
December 30, 2025 I've accomplished almost nothing the last three days on bikes. Closing out the year and the physical inventory I'm in the middle of, and ordering parts. Also, for some reason, I'm out of steam. Not sick, just worn out. Hopefully, this will pass soon. I went to PT today, and did all exercises, but was out of breath most of the time and cut some reps short - that's not me :-(
December 31, 2025 Can barely walk today due to my left foot, knee, and hip. That hasn't happened before after PT. I not as run down today.

January 18, 2026 Change of plan. My plan has been to work on this on a fill-in basis while working on Combat 5. I've been in hell the last two weeks with IT customer problems and I've gotten very rundown. Don't know if that's why, but my pacemaker is not working right and my heart is trying to do what its not supposed to be able to do. It's off and on running very fast and irregular. I see the specialist tomorrow. To add insult to injury, my left elbow developed an internal infection so now I have no usable arms.
This brings mortality to mind. Combat 5 is being built for a customer, but this engine and gearbox belongs to a customer so it seems it should be a higher priority even though it came later.
Once I'm able, I'll work on this. I did receive the piston set and I am trying to find someone to bore for me. Everything else is relatively easy.
January 22, 2026 First, updates. Antibiotics have started fixing the infection in my arm. Saw the arrhythmia doctor on Tuesday and shocker, he agreed with everything
I said. Expected a confrontation but it turned out to be a decent visit. In April 2025 I get an pacemaker that I still don't think I needed. Form months it worked
fine but my heart function was not improving (was before the pacemaker). In the last couple of months my heart function has been getting worse, and I could tell
that from being starved for air a lot of the time and being worn out. Then I got an alert that the pacemaker was having trouble so I went back to my old routine
of doing my own ECG at least twice a day along with BP and Oximeter checks. All were telling me trouble so I insisted on a doctor visit – they thought next month
was good enough – I wasn't sure I would live until next month.
OK, it became clear to me that my heart was doing the supposedly impossible and trying to run on its own. As a part of getting the pacemaker installed, the nerves the heart uses to run are cut so in theory, your heart can do nothing that the pacemaker doesn't say to do. Well, my heart started fighting back and I could see it on my ECG.
When I saw the doctor, I explained what I was seeing and he confirmed it. Then he did more tests to see what to do. It turns out that my natural signals are coming so often and from so many directions that he doesn't believe he can stop them with more surgery, so now I'm on low does of a class of drugs I'm allergic to see if it will stop it. Those natural signals are uncoordinated and happening randomly and are about 20% of the total signals. Each one make my heart contract early, late, or not all depending on the interference with the pacemaker signals.
OK, enough old man talk!
I've been looking for someone to bore the cylinders and got two glowing recommendations for Richter Machining. I spoke with him today and am very happy with what he had to say.
I got a steroid shot this morning so I had the power to do something starting at about 5pm. Got the cylinder ready to ship (studs out, tappets out, etc.) and got them mounted in the special cylinder shipping rig I made. The rig fits in a a certain 1' cube cardboard box and lines all of the box in wood. It could go in that box, but the cardboard has been used twice so I'll get a new box tomorrow. Of course it comes out very heavy so expensive to ship but there no doubt that the cylinders cannot be hurt by shippers.
(1 Hour today. Running total, 18 Hours)
January 23, 2026 It was like pulling teeth, but the cylinders are packed and the instruction to unpack and repack are written and in the box. It is leaving in tomorrow's
mail.
Felt like 100 pounds to me but ended up being just over 34 pounds. The ground shipping cost was $67.68. He will charge $200 but the cylinder will come back
ready to re-install the tappets and then install on the engine so $200 is good. Most charge $80/hole but don't paint and bake them.
(2 Hours today. Running total, 20 Hours)
January 24, 2026 When I got the steroid shot I again complained that they don't last long enough
so he gave me a different one. Generally they have worn off by Saturday morning - I'm still in Superman mode, not as strong, but able to do things. Put in a lot of time cleaning up so I wouldn't get hurt moving around the shop and then back
to this.
Today, I did the timing side crankcase, which was very dirty, but it came out looking exactly as expected easily like normal. So, I redid the drive side. It came out a little better (I put in new glass abrasive for the timing side). In the end, it will look fine as very little of the drive side shows when in the frame and he primary is installed.
I think the issue is a slightly different alloy mix at the foundry. They are a matching pair but that matching I'm sure happened long after the sides were cast. For
one thing, a quick glance and you would think the drive side is a 1974 850 case it is so porous in places. The timing side it more porous than is usually for 1972
cases but no where near as porous as the drive side. Also, the color is slightly different between the sides. I'm sure once I've finished with the final
bead blasting and cleaning the will look the same if you don't look too hard. I've done lots of Norton, Triumph, and BSA cases and while these started out
nowhere near as bad as some, the drive side has been a real challenge.
We're supposed to have big snow starting tonight. I'm too tired or I would go do the next step now. If I can safely get to the shop tomorrow, I'll try to finish the cases. I most definitely cannot shovel snow and I don't dare walk in it carrying crankcase halves so we'll see.
(3 Hours today. Running total, 23 Hours)
January 28, 2026 The snow came, the snow made a big mess. Had to cancel doctor appointments because the State plowed me in. I finally got someone to dig out my
driveway but my car has a foot of snow across the windshield - a drift. After the snow, it was sleet and everything is crusted in ice.
January 31, 2026 Finally some progress! My heart and pacemaker are cooperating better and I'm not out of breath all the time. I have the engine cases ready
for
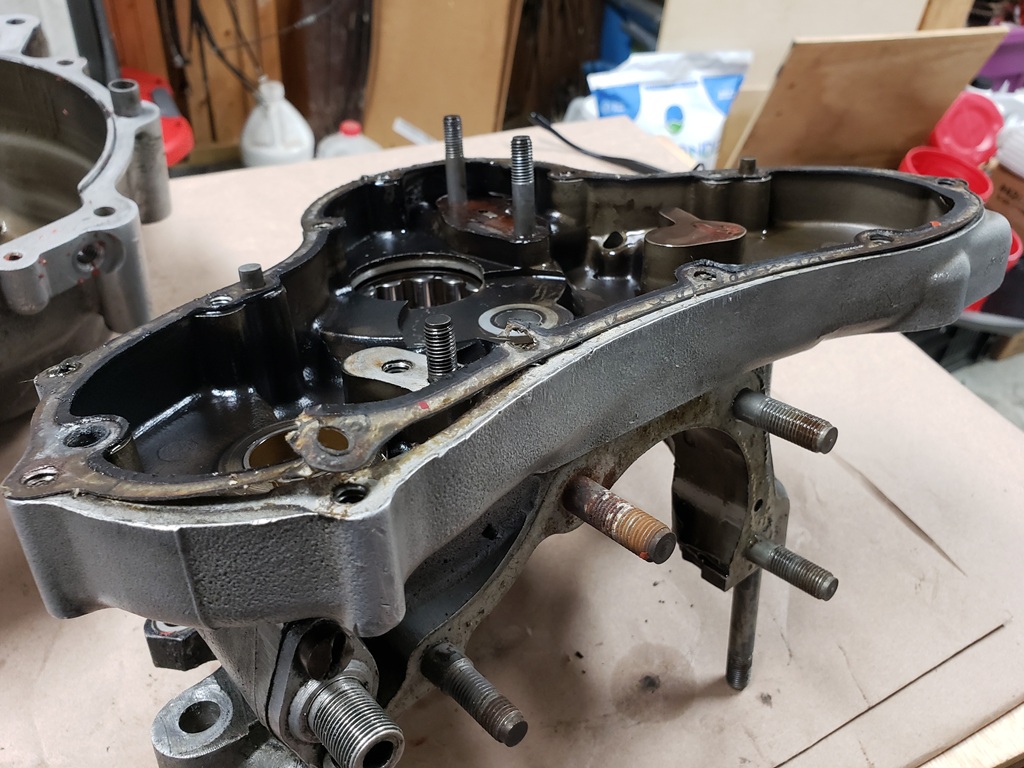
the next step but got to thinking that it is silly change the media to do them, then change the media back to do the gearbox. So, i took the gearbox apart and
inspected along the way. Found some weird things, some good things, and some bad things.
Weird: When I drained the oil it was the consistency of gear oil, but the color of rust. I fully expected to find a rusty mess when I took it apart but there is
no rust. So, I have no idea what the fluid was, I just know it's not right.
Good:
- The mainshaft is straight and in good condition.
- The layshaft is straight and in good condition as far as I can tell right now.
See the bad for a possible problem.
- All the gears except the mainshaft 1st gear look great.
- The outer cover components (gearshift) appear to be in good shape - won't
be
sure until final testing.
- The kickstart shaft looks good, but see the bad. It does not have the crack
many do.
- There is no crack between the sleeve gear and layshaft bearings.
Bad:
- Once the outer cover and kickstart spring were off, I checked the endplay on the kickstart shaft. With the layshaft roller bearing upgrade you should have round
.006 and similar with a ball bearing. This gearbox has .080" - the most I've ever seen. No wonder it slipped out of first!
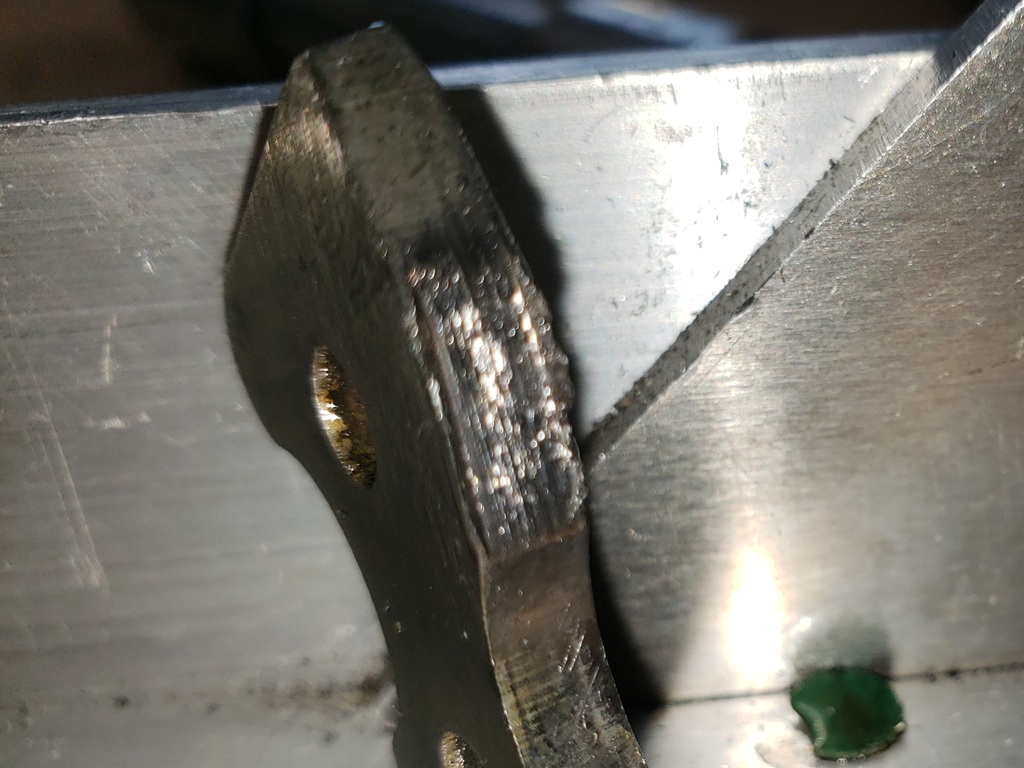
- See the first picture. That is the clutch operating lever. That is where it rides against the roller. The roller looks fine but that mess is weird. It was VERY difficult
to get it out do to the burrs and it was very difficult to operator. A least that lever needs to be changed, and maybe the roller and the ball - more investigating
required.
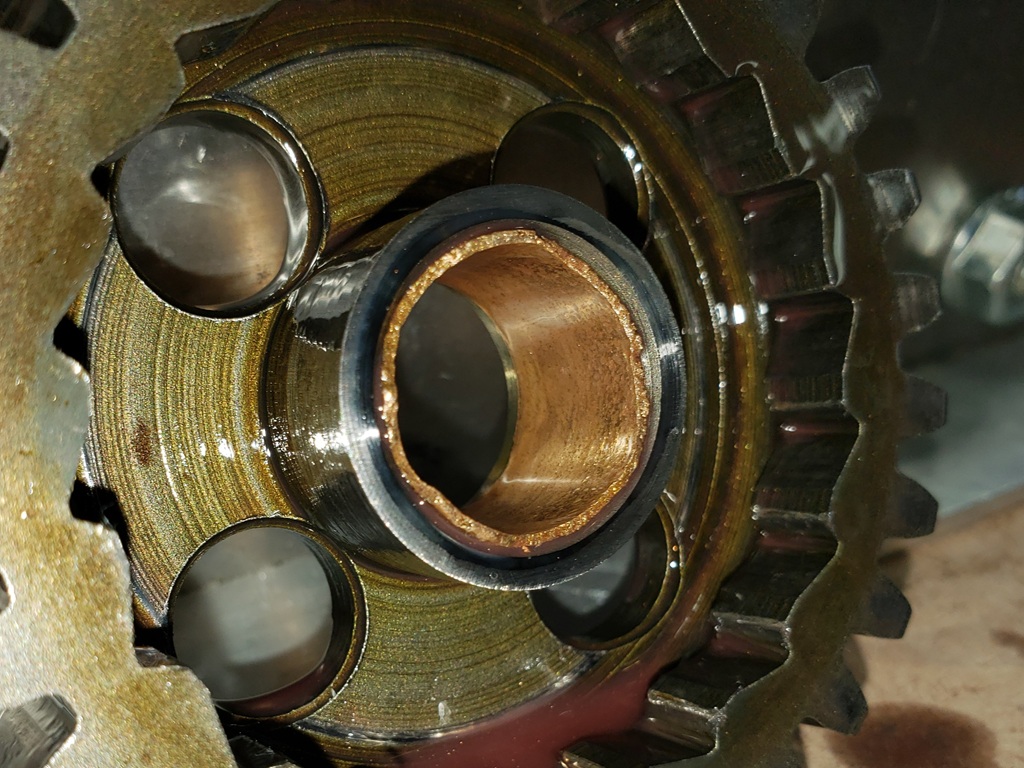
- See the second picture. That is the layshaft 1st gear. Both ends of the bushing are chewed up. There are a lot of filings inside the kickstart shaft and there was a clump between the inner and outer covers. The gear itself looks good. I need to compare the kickstart with another one - I think the internal bushing is damaged
which is why there was so much endplay. The layshaft had a ball bearing but not the original bad one.
- All three bearings are bad and the sleeve bearing is VERY bad and it is a shielded bearing on both sides - not good!
- See the third picture. The picture doesn't show it well, but the kickstart pawl is badly worn.
Assuming I still feel OK tomorrow, the plan is to get the gearbox shell and inner cover to the same condition as the crankcases and maybe finished. Standing at the blast cabinet takes a lot out of me these days :-(
(4 Hours today. Running total, 27 Hours)
February 1, 2026 The gearbox shell and inner cover are in the same condition as the crankcase. Hopefully tomorrow I can do the final steps. Not sure though - woke up today with my left are fighting me. Several movements hurt a lot. Hopefully it's a passing thing or the elbow doctor I'm seeing Tuesday can do something about it.
(2 Hours today. Running total, 29 Hours)
February 2, 2026 Scrubbed the gearbox shell and inner cover then filled all threaded holes in them and the crankcases halves. Cleaned out the blast cabinet and put in #8 glass beads. The gearbox shell and inner cover came out great. Then I did the drive side of the crankcase which also came out great but my left arm was hurting really bad so I quit there. Once I get the timing side done, I'll remove all screws/studs from all threaded holes and the parts will get their final scrub.
(2 Hours today. Running total, 31 Hours)
February 4, 2026 Yesterday I saw the orthopedic surgeon about my elbow. Of course, it seems fine so nothing to do. He gave me an order for PT of both shoulders and the elbow. This afternoon, it is swollen again a little painful. I'm my podiatrist in the morning - I"ll try to get those two collaborating.
February 5, 2026 Got my steroid short this morning along with antibiotics for my elbow. Superman mode kicked in at about 5:30 this afternoon so I finished the bead blasting of the timing side crankcase and removed the timing side camshaft bushing. The drive-side is good. The camshaft lobes are fine but the timing side section that rides in the bushing is undersized by .0015" and has some small scoring so I'm not good with running it again. The bushing is also worn but I always change them to the MK3 style as that gives a thrust surface on both sides.
The big problem is that the Hepolite 2S cams have been out of stock for quite a while and Wassell doesn't have an ETA. The last Combat I build I used a 2S from MAP Cycle Enterprises but that was just over $400 delivered. Today, with tariffs one from AN would be about $800 delivered! I have a Hepolite 4S in stock. The 2S gives a lot of power at high RPM, the 4S gives more than stock at high RPM, but it is more like stock for street riding. Normally, Combats normally have a 19T front sprocket to make the bike "feel" powerful at low RPM. This bike has a 21T front sprocket and they are more common on 850s. So, at low RPMs it is sluggish but will easily make 105 MPH with a normal sized rider and probably 110 mph with a smaller rider laid down on the tank. So, I need to discuss with the owner!
(2 Hours today. Running total, 33 Hours)
February 7, 2026 Yesterday my elbow started swelling and hurting again. Surprising since I had a steroid shot on Thursday. Anyway, I decided to rest it. This morning it was really swollen and hurting so I started another round of antibiotics. It took all day on and off but the crankcases, gearbox shell, and gearbox inner shell are scrubbed and free of glass beads.
The engine is still stuck on the cam and I'm out of some gearbox bushings so I'm ordering them.
(2 Hours today. Running total, 35 Hours)
February 8, 2026 My elbow is a real mess today so nothing real done. Did agree with the owner to use the 4S camshaft and did place an order with AN for the needed gearbox parts. As soon as my elbow lets me, I can put the bottom end together.
February 10, 2026 Medical day. I saw a new orthopedic surgeon about my knee. He agreed that it is not stable and being as nice as he could, that the guy who replaced it did a bad job of fitting the "pad" in between. The other parts of the replacement look fine. Then I saw my GP about my elbow. She drained it and sent a sample off the lab. She got quite a lot of fluid out which made it feel better right away. She also prescribed a second antibiotic so now I'm taking two.
February 11, 2026 To me, one of the best mechanical improvement you can make to a pre-MK3 Combat is to replace the timing side cam bushing with the two that are used for the MK3. This is especially true for 1972/3 as the cam thrust bushing in the inside of the case has a tab that can break of and destroy the engine and the other side thrust is just the thin edge of the bushing with the cam sprocket running against it. With any mileage, that outer edge is worn away as it was in this engine.
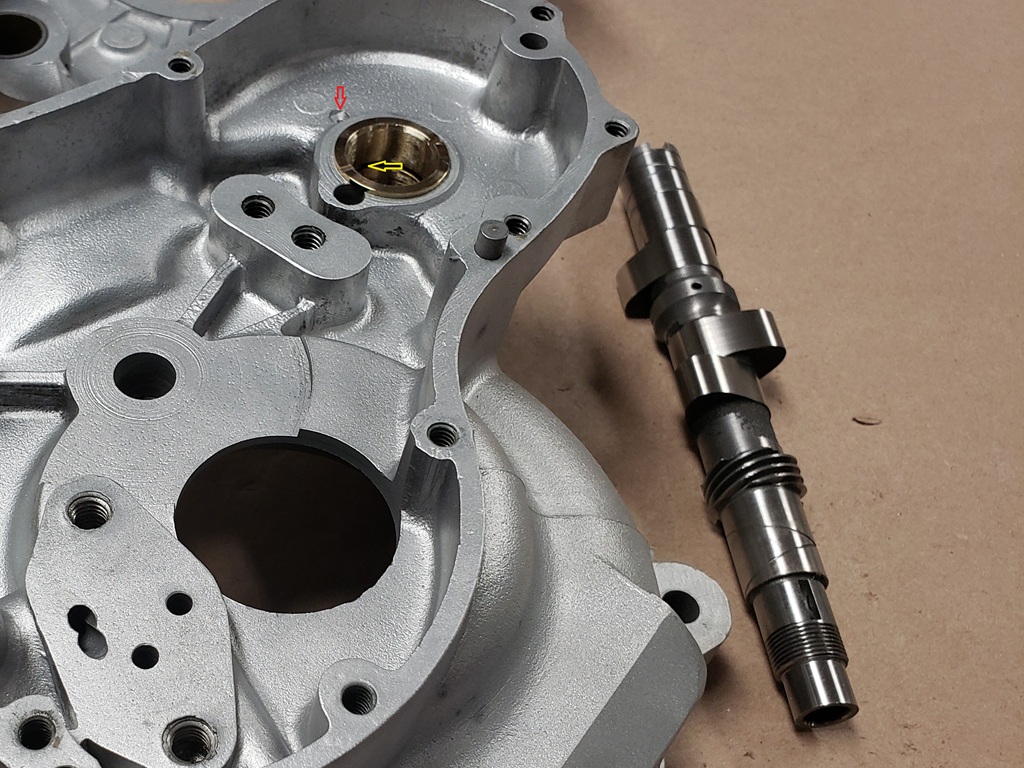
Although the bushings from AN fit the cam perfectly, once installed the cam generally won't go in! To install them you heat the case to at least 200F and tap them in. As the case cools, it, and the bushings shrink. If the bushings went in the case perfectly inline with the bushing on the drive side, it's just a matter of some reaming to get the cam in and turning freely. However, the case is almost never that perfect so it takes a little to a lot of work to get them aligned and to size. This one fought me hard. Then once in, I inspected the oil hole(red arrow in the picture). That hole is supposed to go dead center between the two bushings (Yellows arrow in the picture). This one was factory drilled crooked. That was OK with the original bushing as it was drilled after being installed. So, I ended up drilling that hole to open it in the slot between bushings. This of course, left a burr on the bushings I had to get off so the cam would go in again!
Tomorrow is another three doctor day so I'm not sure what I'll get done. The next step is to put the conrods on the crank and then assemble the crankcases, crank, and cam.
(3 Hours today. Running total, 38 Hours)
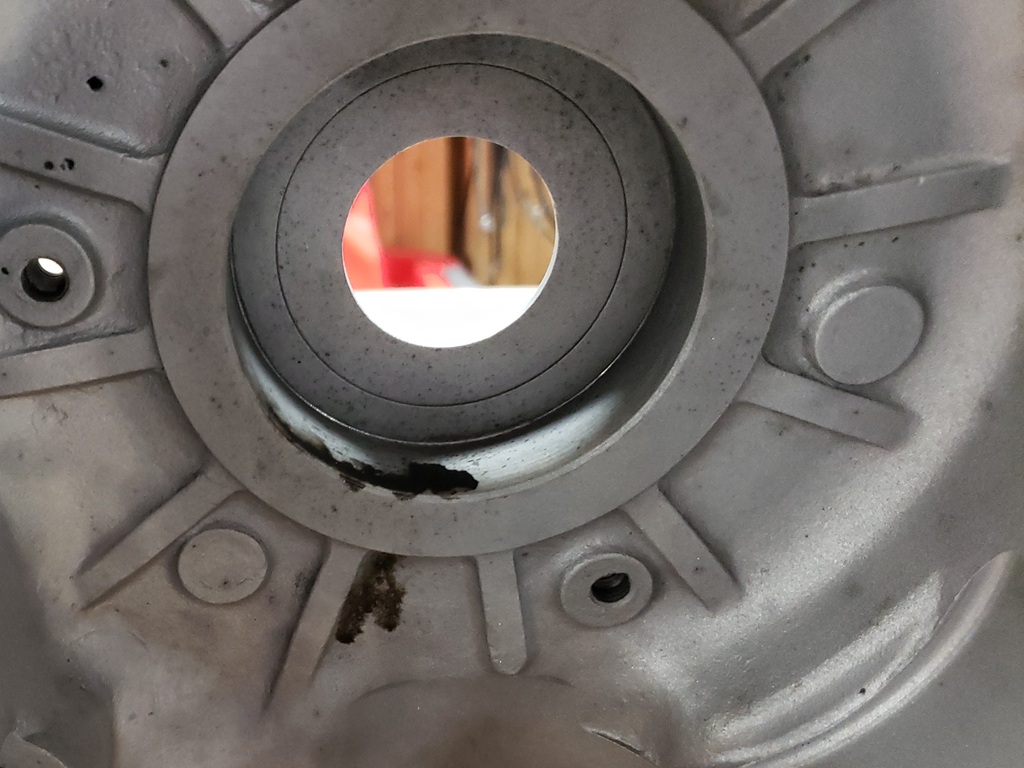
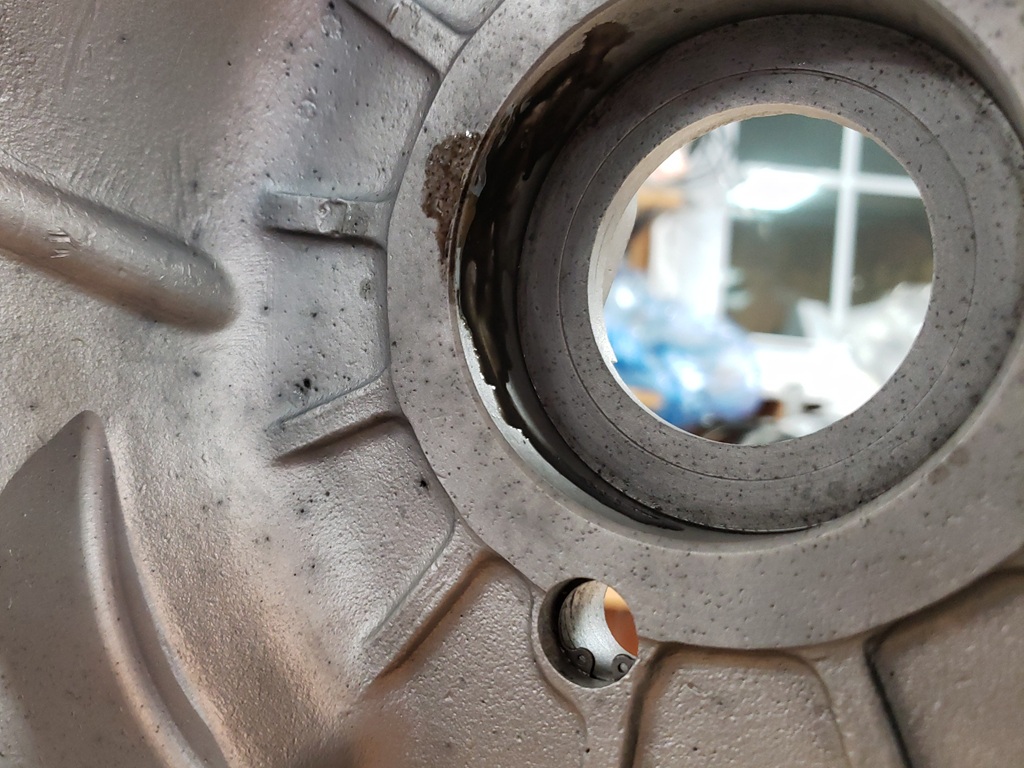
February 12, 2026 Many people heat cases in an oven to install bearings and bushings. I use a propane torch for a few reasons. The first two pictures show the important reason. The first is the drive side and the second is the timing side. The black oil you see seeps out of the porous metal. If heated to temp in an oven that oil gets everywhere and it hard to clean up. Generally, it's not this bad on 750s, 850s, especially 1974/75 are much worse than this. It's OK - not a big deal, but what you see is me heating, stopping to clean and repeat many times until I was to about 200F. Then when I get to about 225F, I do a final clean and drop the bearing outer races in. It is critical that they simply drop in - no tapping!!! These went in perfectly. Then I use denatured alcohol to clean up what I can of the staining inside the case from oil seeping
out of the various holes you can see. Another reason is that installing the cam bushings and getting them aligned (see yesterday) is a PITA and I don't want them getting loose while working on the main bearings and I certainly don't wants to deal with over 200F cases while working on them. Using a torch keeps the heat more localized and as long as you stay in the 200F-250F range it will hurt nothing.
The third picture is the outer races installed with their matching inner races in them. Everything was too hot to move so next I will move them out of the way, cleanup and install the conrods, then install the inner races on the crankshaft and then the bottom end can go together. You'll notice that the top front and rear studs are installed as well as the location dowels. Those studs are inexpensive and I install all studs with blue locktite everywhere in the engine and gearbox. This makes sure that unscrewing nuts dose not unscrew the studs and tightens the threads in the aluminum. Since it is blue Loctite, it does not require heat to remove them
(2 Hours today. Running total, 40 Hours)
February 13, 2026 Spend a lit of time, accomplished little to nothing!
Weird main bearing (06-4118) problems today I've never seen before. Yesterday I heated the cases and dropped in the new FAG bearing outer races from AN. The to make sure I didn'1t mix up the inner races with the out races, I dropped them in the outer races.
Today with everything cooled off I tried to take the timing side inner race out of the out race to install it on the crankshaft. It turned smoothly but tighter than usual. With a lot of effort, I got the inner race out. Even though I checked it before installing I figured it was somehow defective so I tried the drive side inner race in the timing side, and it also would not go in without force. That convinced me that the bearing was bad from the factory so I heated the case and dropped the bearing out and installed another new one - same issue! They are from the same batch made in India but I've never had a problem with FAG bearings before, and the drive side has no trouble from the same batch. The damned things cost over $120 with tariffs and I have only one more in stock to try. It makes me think that somehow the aluminum is compressing the outer race but that seems like a silly thought.
OK, next problem. The drive side bearing that came in the engine was quite rough and the inner race spun on the crankshaft. It wouldn't rock but you could turn it on the crankshaft. OK, Loctite bearing fit should do it.
1st try: Read the instructions put the bearing fit on the leading edge, heated the race normally and it went on half-way and stuck hard. After a lot of effort with a bearing puller got it off and cleaned up the race and crankshaft.
2nd try: Put a thin smear on the crank shaft, heated the race and it dropped on fine. Let it cool and the race would still turn on the crankshaft. OK with a GREAT deal of effort, got inner race off and all cleaned up again.
3rd try: Same things but more bearing fit and re-read the instructions - takes time to setup after cooling off! Full curing is about 12 hours. Will check it tomorrow. If this doesn't work will be looking for a crankshaft. This is the Loctite high-temp, high-strength number 620.
(5 Hours today. Part I should have done better so 3 hours. Running total, 43 Hours)
February 14, 2026 Well, that was quite a detour, but it's all fixed now. The Loctite fixed the loose inner race. The main bearing was a much harder problem. After removing the second bearing I put in I went to measuring the first two, the new one from stock (all the same FAG batch number) and the hole in the crankcase. The removed bearings were as expected except the 1st one inner race was still a little tight but was easy to put in an out of the outer race. I wasn't about to try a third bearing without root cause of the problem - they cost me over $120!
I measured the case hole very carefully and finally found a "bump" in one spot. So, I looked at the bearing that came out of that hole and found a depression in the outer race. I think the bearing was dropped in the factory and installed anyway. Over time, the aluminum of the case formed itself to the depression. So I carefully reduced the "bump", reheated the case and dropped in my last new bearing. It dropped in fine and once cool, the inner race went in without problem. So, I put the crankshaft without rods in the case with a little assembly lube on the bearings, torqued the cases and checked the crank - just as smooth as it should be. So, now I can take it back apart, put the rods on, the sealer on the case halves, the camshaft and crankshaft back in and finally finish that part. I'll go ahead and to the timing chest - the cylinders are no back yet from being bored :-(
(4 Hours today. Running total, 47 Hours)
February 15, 2026. I got all ready to put the crankcases together and then realized: "Dummy, it ain't gonna run without conrods!" I had completely forgotten that little step! OK, lets clean them up, inspect, polish and lick our calf over! The conrods are in good shape but they were mostly the color of coffee. Took forever to get the stains off, and them polished. As usual they had some tiny nicks to dress out. It turns out that they have been off the crank before. They had a huge amount of Loctite on the bolts - so much that it had to be all chipped/brushed off the get the bolts out for the cleaning and polishing. Anyway, they turned out nice. Of course I installed new shells and used new nuts.
(4 Hours today. Running total, 51 Hours)
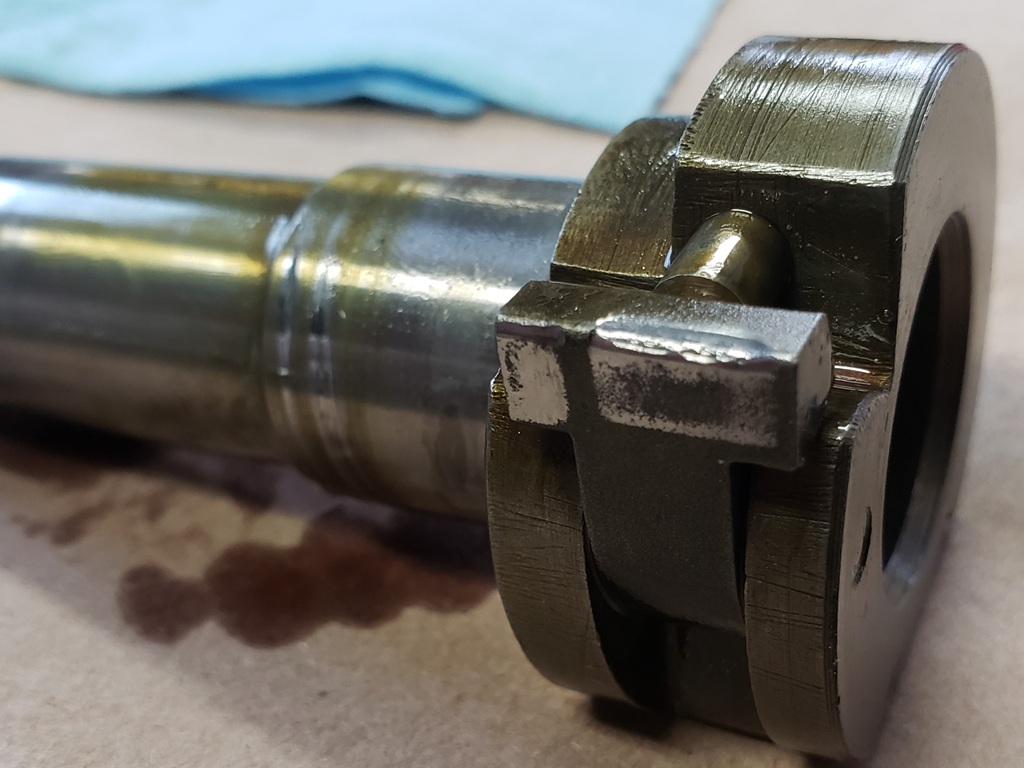
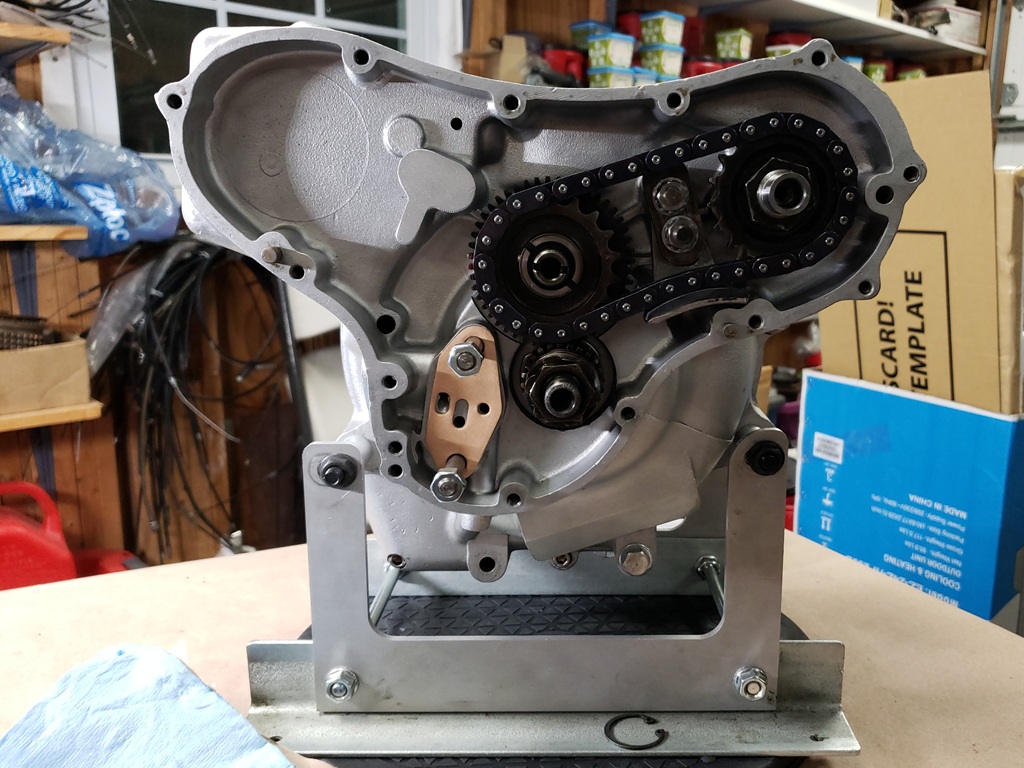
February 16, 2026 Yesterday I put the bottom end together but just snugged the nuts and bolts. Today, I put it in the stand and properly torqued all. Then I started on the timing chest. One thing to address was the intermediate gear/sprocket spindle I mentioned on December 13th. More on that in a minute.
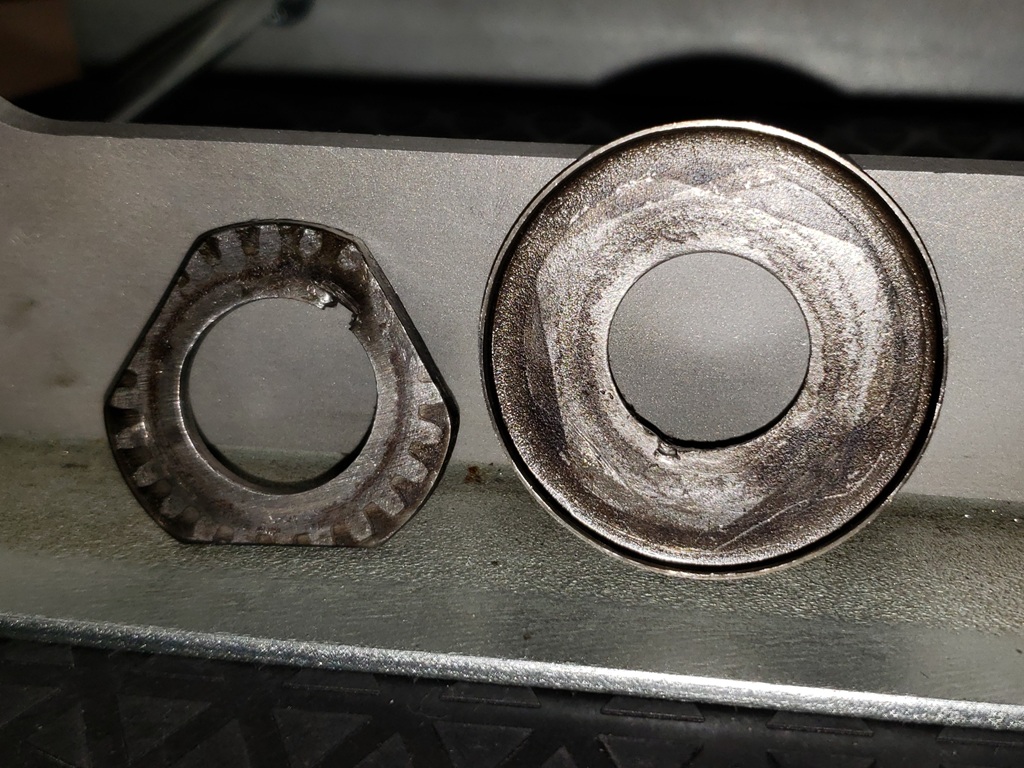
When I took it apart I had some trouble with the crankshaft pinion key and the camshaft sprocket key. The camshaft sprocket key was stuck hard in the old camshaft so I got one out of my good used parts which solved that problem. The first picture shows some gorilla work. The part on the right goes on the crankshaft and the backside is against the timing-side main bearing. It is basically an oil seal. The other part goes between it and the pinion and it is there to give you a way to pull the pinion. The slot you see in it does not belong there. Hard to tell in the picture, but thee one on the right is bent and the one on the left has burrs that marked the other one. Would they still work? Probably, but I have parts of engines and had a good one of both so those two have been recycled.
The second picture shows the intermediate gear/sprocket spindle just stuck part way in to show where it goes. The workshop manual is very specific about not doing was some gorilla did! When I torque everything I'll show a picture of the tool you use today, but without the tool, it's a matter of slow steady pressure to unscrew the camshaft sprocket nut and pinion worm gear. Otherwise, the hole can become elongated and not hold the intermediate gear/sprocket correctly. So, I used Loctite 641, installed the spindle, and immediately installed the timing cover. Overnight, the Loctite will set and all will be fine again. The point of putting on the cover is that the outer end of the spindle is supported by the cover. I used 641 because if the spindle ever needs to come up, just a little heat and pull. Had I used 620, it would be nearly impossible to get out without damaging the aluminum.
(3 Hours today. Running total, 54 Hours)
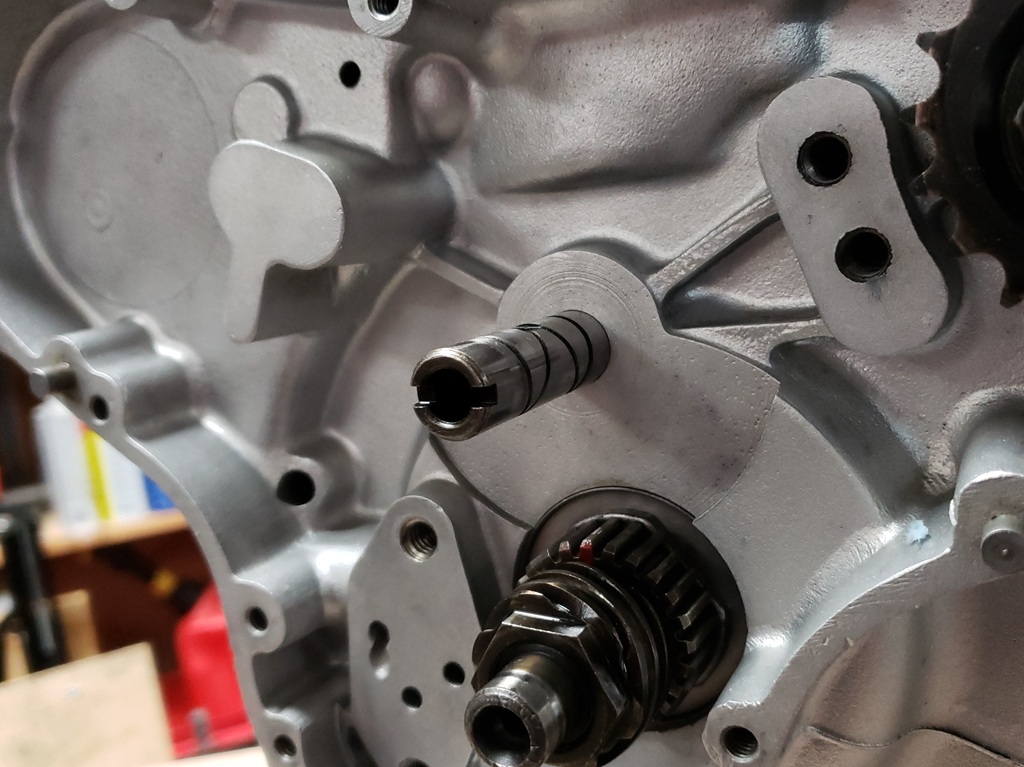
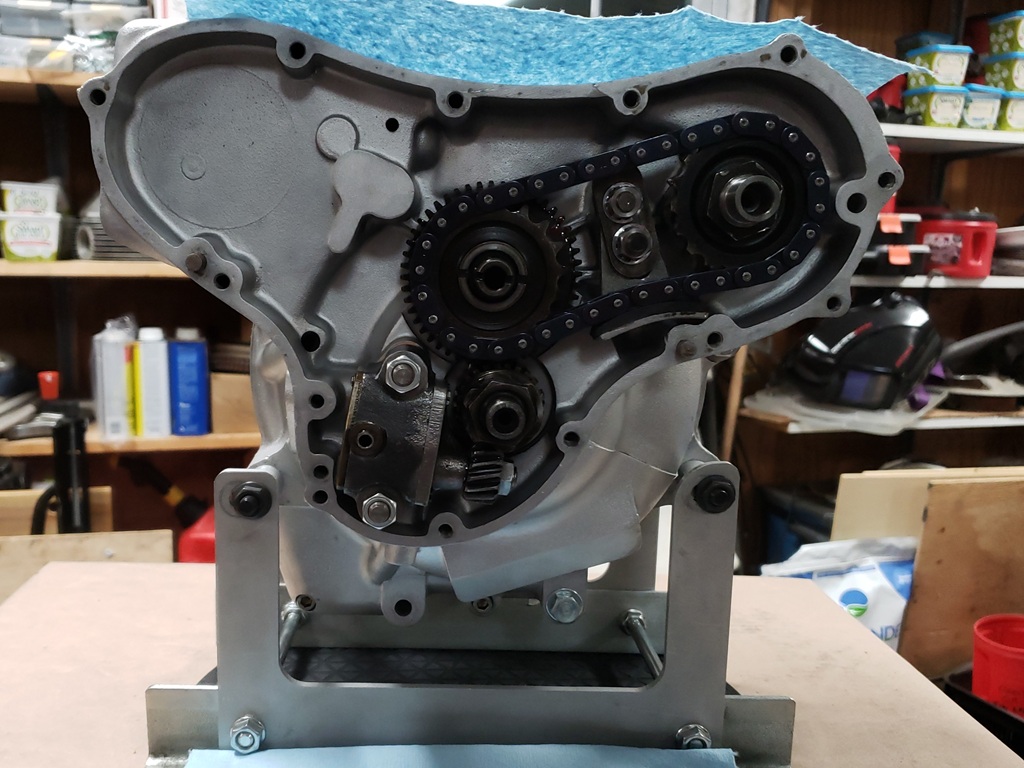
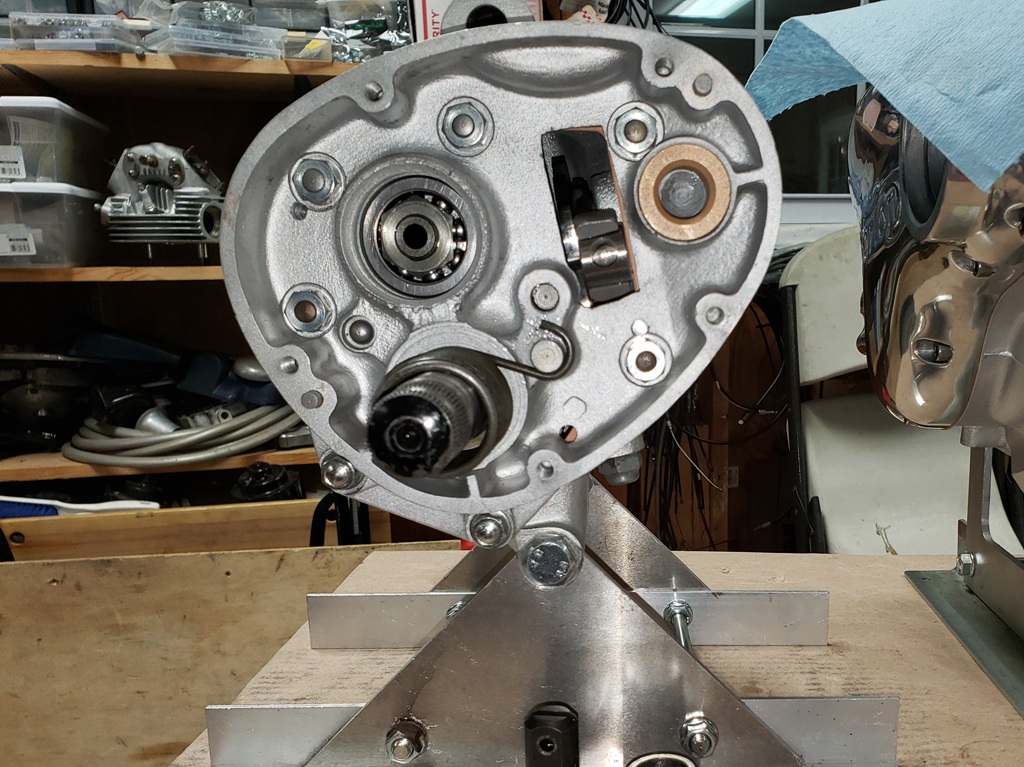
February 17, 2026 Except for the oil pump and cover, the timing chest is done. As promised yesterday, the first picture shows the intermediate gear/sprocket spindle in place to support the spindle while tightening the camshaft nut and then the pinion nut/worm gear.
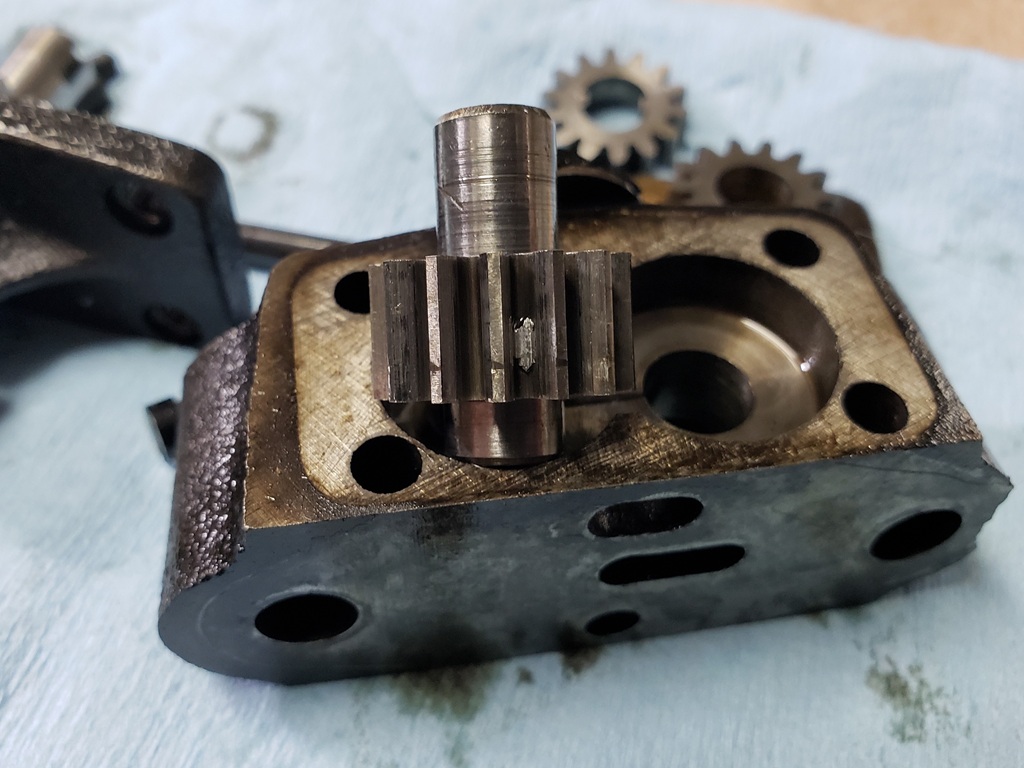
On December 13th I talked about the oil pump having a problem. The second picture shows the aftermath of that. You can see nicked teeth, and the bright thing is a piece of metal stuck between the teeth. Less evident is that the idler shaft is worn and the gear does not turn smoothly on it. At a minimum, I have to change the idler shaft and two feed gears. Pump parts are not available but I have some used parts. Hopefully I can put together a good pump. A new one would cost about $500 delivered to me. I did order a used one on eBay today that is supposedly good - we'll see.
The third picture shows it ready for the oil pump. the valve timing and chain tension are set. The timing cover is cleaned, but it is a shame. It generally looks good but has two large gouges that there's no way to get out. I've been watching for a nice one but everyone is very proud of them and a new one would cost around $575. Before tariffs, I would push to put a MK3 cover on as they stop (or greatly reduce) wet sumping, but $575 is a lot!

(3 Hours today. Running total, 57 Hours)
February 18, 2026 Tomorrow morning I'll get a steroid shot in my foot so Superman mode and doing stupid stuff will kick in around 3pm. So, why stupid stuff today? I had to move my big tool chest to install the new heat pump and that's not done yet. The wheels on the cabinet are not locked and my floor is not as level as it should be. Drawers keep coming open and I keep forgetting to lock them so they don't. Went to get a tool today and didn't notice that lots of drawers were open to partly open. When I slide open the top drawer, I needed shoulders I don't have and to be much younger stronger than 75. Fortunately it was near the wall so it slid back and was leaning at me at about 60 degrees when I caught it. Not sure how, but stopped it from falling on me, got it upright, and the drawers pushed in a locked! I guess in a crisis, I'm still pretty strong.
OK, less dramatic, but I got my box of Norton oil pumps out looking for parts to fix this one. The smart thing to do with bad parts is to throw them away. I finally smartened up and as I inspected each part and found it bad, I threw it in the recycle bin. In the end, I had a few good parts, but not the ones I needed! I bet I've done this 4-5 times in the past!
OK, now what? I have a used one coming but I couldn't believe that is all the stuff I have I couldn't come up with a good pump. Then I remembered the bike I had to part out. The timing chest was unopened. Lots of trouble getting to that engine hidden away on a shelf, getting the timing cover off, and the pump out. Took the pump apart to service it and realized that it has the AMR o-ring mod and had been serviced by them. Then realized that the timing cover also has their mod and looks WAY better than the one that came on this bike. I ran out of steam before checking the timing cover carefully, but if it's good, it will go on this engine. Will cost less than the time it would take me to make the old cover presentable.
(3 Hours today. Running total, 60 Hours)
February 19, 2026 Phones! I have a Samsung Galaxy S9+ that I bought unlocked in Sep 2018. The battery still lasts 2-3 days, no cracks, great picture, charge jack flaky but I use a wireless charger, so no problem there. It annoys me no end that the pictures are not good. I take many pictures of each thing and then look for the best - they just aren't great. Now, I would spend $1400 and get the latest and greatest - but would the pictures be any better?
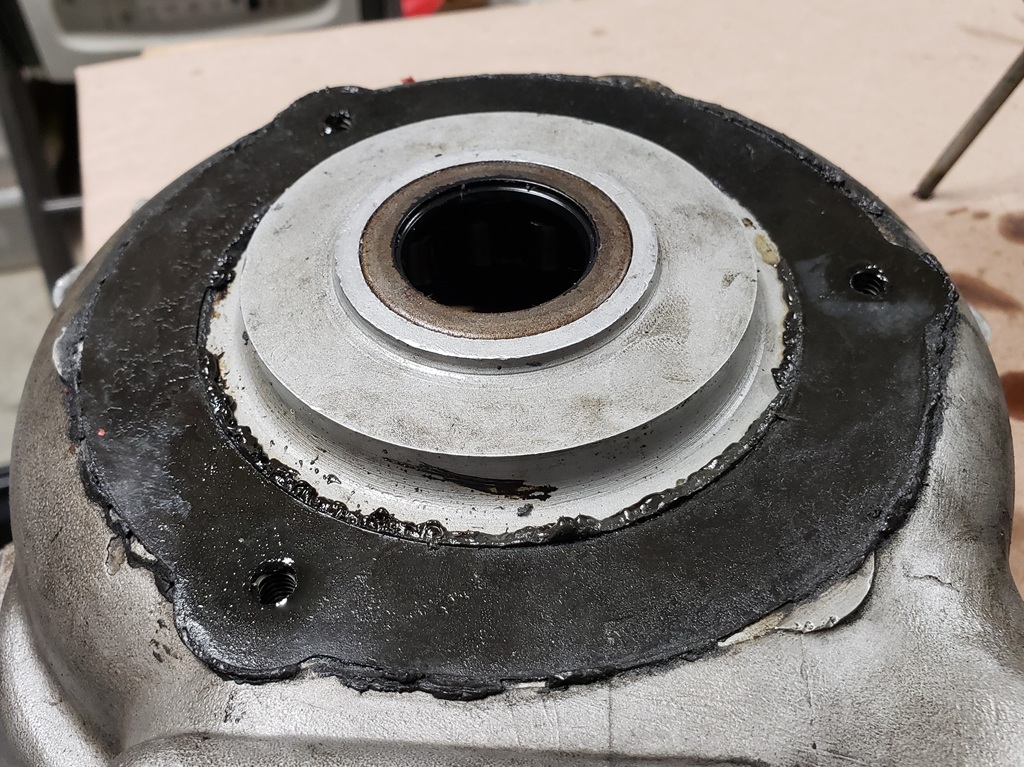
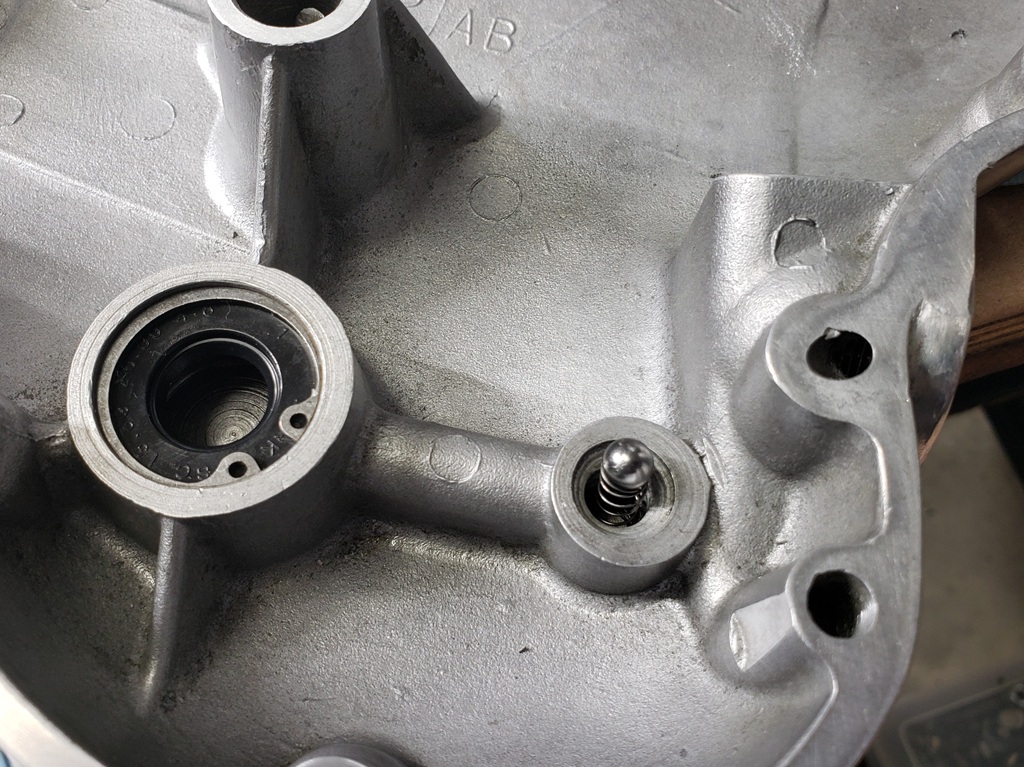
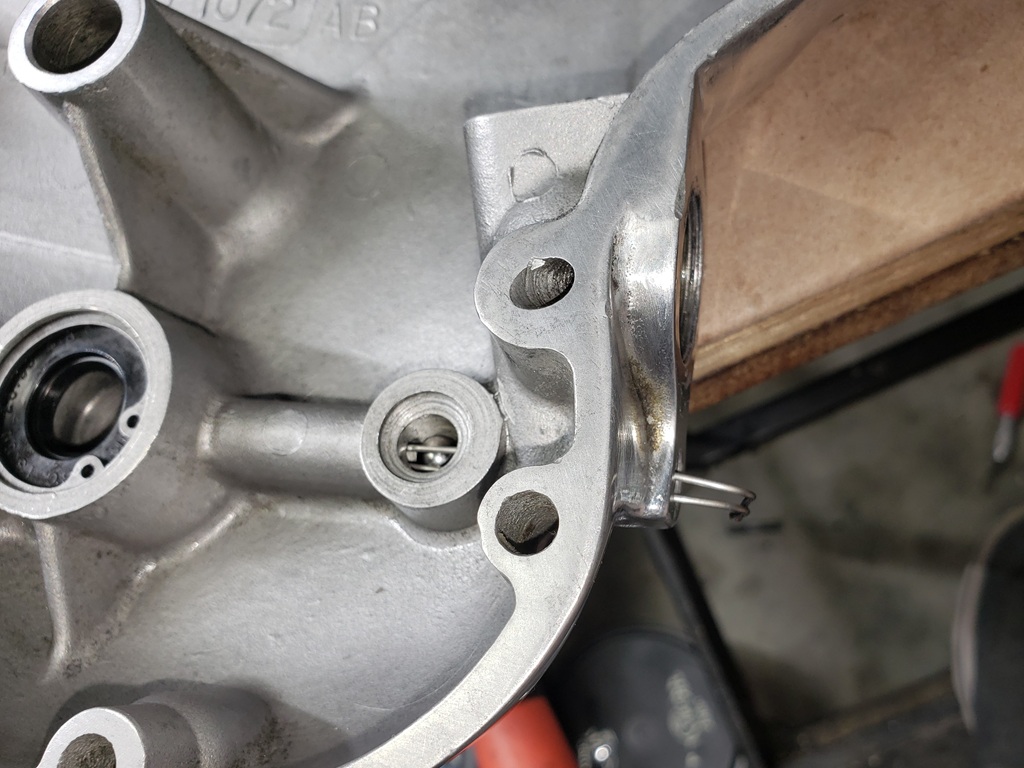
The timing cover was installed with gasket sealer so it took forever to get that clean. After getting most of it off, I flattened the surface on my surface plate with 400 grit paper - didn't take a lot. Also, it was over tightened last time installed and the outer edge of the screw holes were mushroomed so a tapered reamer fixed that easily. The cover has the ARM anti-wet sump mod. The first picture shows the spring and ball in place. The second picture shows a doubled-over piece of wire holding the ball and spring in preparation to putting the cover on. Once the cover was on the wire was pulled out and the ball then rests against the conical oil pump sealing washer. The third picture shows the timing cover installed and two items needing addressing at the bottom.
The oil pressure relief valve was stuck hard halfway open. Fiddled with it and got the piston loose and the bore cleaned out. Will try polishing the piston and bore - they are a little rough still and might need to be replaced. It has one shim - I like two so I'll add another. There was a lot of grit and some metal flakes inside which is weird. There was some grit in other places but no metal filings. The pressure side has a screen so I have no idea how metal flakes got inside!
The tachometer drive is very rough. I haven't studies it but I think the problem is burrs where it met the cable. It is the original style and there at more styles after it. They were a leak problem and the latest version has a real oil seal to stop that, but a complete replacement is very expensive. I'll have to look at what I have, If I have the right inner part for the seal type the outer part with seal is not bad as I have some pre-tariff. The inner part is the expensive part. I might have the intermediate version which is not as good as the latest but might better than the one in the picture.
(4 Hours today. Running total, 64 Hours)
February 20, 2026 I had medical appointments today so didn't get a lot done, but did get the pressure relief valve moving smoothly in the body. I'll replace the cap, it's too ugly to go back on and I tried buffing it but the rust and stains are too bad. Then I went looking of tacho drive parts. Didn't find any better but did get the existing one working right. It was full of grit and it had two o-rings where there was supposed to be one and both were hard as rocks. With it all cleaned up and the o-ring replaced it is fine. Of course, the latest version would be nice but that's too big and expense to justify.
(1 Hour today. Running total, 65 Hours)
February 21, 2026 Tariff understanding day - wow! Tariffs got worse, not better. See my updates on Access Norton.
Finished everything I can on the engine until the cylinders get back from being bored. the oil pressure relief valve spring length measured at 1.171" and even with two shims, the piston could rattle quite a bit. Found another used spring that measured 1.181" and it rattled slightly with one shim and not at all with two so I used that and installed the valve. Installed the drive-side crankshaft seal, and the tacho drive.
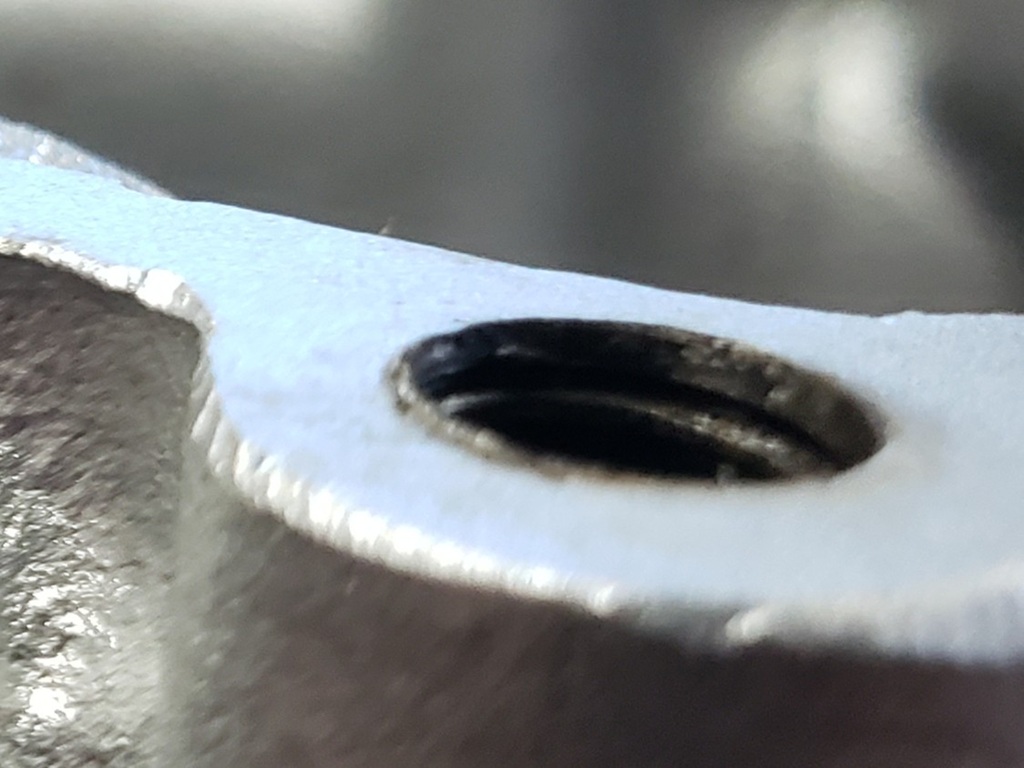
Then started on the gearbox. I always remove the studs and two dowels so I can check the gasket surface on the surface plate. That is usually a 15 minute job. This took over 2 hours! At first I thought someone had used red Loctite on them but it turned out that they were just very overtightened. You can barely see in the first picture where the metal is squeezed out of the hole and the stud's shank was down in the hole. I had to use a LOT of heat to get the metal to expand enough to get the studs out. Once they were all out, it took a long time to cool off so I could surface it.
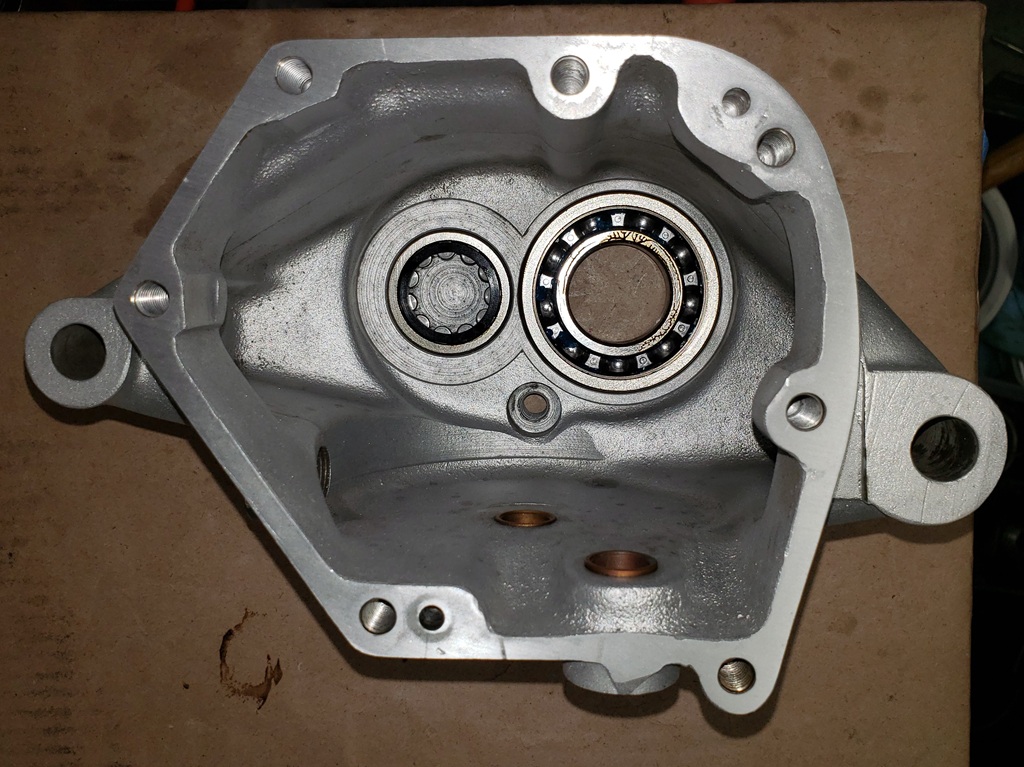
The second picture shows the bearings in and the gasket surface flattened and the holes cleaned out. I'm positive it didn't leave the factory that way - they usually come out with fingers or just a tiny bit of force when double nutted.
(4 Hours today. Running total, 69 Hours)
February 22. 2026 The gearbox is coming along nicely, but my AN order is not here yet - supposed to be here tomorrow. I'm out of the 3rd gear layshaft bushings and the one for this gearbox is well worn. I have the 2nd gear mainshaft and 1st gear layshaft bushings in stock. I'm not sure yet what to do about the kickstart bushing. Once I can put it all together I'll figure out if that is bad or not.
Anyway, the camplate and quadrant are in and set, the sleeve gear is installed as is the oil seal and sprocket. Getting the sprocket tight is a lot of fun with torn up shoulders but I did enough contortions "to get er done". The studs and dowels are back in as well.
It is snowing hard and starting to stick - don't need that!
(3 Hours today. Running total, 72 Hours)
February 24, 2026 The AN order came yesterday, late. By the time I had it all in inventory, it was too late to get started.
As of today there's a new rule for visitors to my shop! "Help" me by "putting things away" and you might leave a finger behind when you leave :-)
When assembling a gearbox with the roller bearing for the layshaft, you must shim the layshaft so it does not have too much or too little end float. Most use the shims for the rear isolastic for that but I'm out of those and the ID of them is a little small so it was a PITA. I ordered a selection of shims with the right ID and OD from McMaster Carr. Today, I looked for them for two hours. I had them in a clear plastic "shoebox" with a lid on the shelf with the other gearbox parts. I finally found them in a cardboard box on the other side of the shop!
The gearbox internals are assembled and tested and the bushings and bearings have been changed. The bushing for the first gear layshaft I pictured Jan 31st did mark the inside bushing of the kickstart but that didn't hurt anything as the shoulder of that bushing rides against the gear itself.
I mentioned before that the clutch mechanism is worn in a weird way. The ball is too but I think the roller is OK. Once I have that all worked out, I'll look into the gearshift and outer cover.
For those on Access Norton, unless I have a change of heart, I won't be back there. I've had my fill of trying to help people and L.A.B sticking his nose in with half answers and saying I'm wrong even when I'm agreeing with him. Besides half answers, he half reads. Everyone makes mistakes, but when you make one you own up and move on. Not him, he edits what he said to look innocent. If a man does that to another man in person, there's a good chance of a broken nose!
(4 Hours today, 2 not chargeable. Running total, 74 Hours)
February 25, 2026 Morning:
Just got really bad new. The guy boring the cylinders blasted them and found a crack in the skirt of one cylinder. It probably happened when the engine was new and needed a piston changed, but there's no way anyone in their right mind would use those cylinders now. So, I'm on the hunt for a cylinder.
Evening:
I only had the nut for the clutch mechanism in stock, but I went through my miscellaneous gearbox parts and found one good set of the parts. That area gets very little oil other than occasional splash so often the used parts aren't good. So, that part is all done and I'm now working on the outer cover.
I found a 750 cylinder in my blast cabinet just as I was shutting down for the night - I'll measure and inspect tomorrow.
(2 Hours today, 2 not chargeable. Running total, 76 Hours)
February 26, 2026 If things weren't weird, they wouldn't be normal! I remembered that there is a 750 cylinder in the blast cabinet - didn't remember why or why I didn't finish it. Blew it off, got it out, and measured. Standard size and no taper! So, back in the cabinet and started blasting getting ready for paint. Something felt weird. Finally noticed that the four outer head bolt holes were 5/16", not 3/8"! It's an Atlas cylinder - where the hell did I get that - I don't rebuild Atlas!
Then I looked again on eBay for a set of cylinders - most are not worth having and the decent one the owners were way too fond of.
OK, before starting on the gearbox outer cover, let me check to see if I have one that needs less work. Where the hell did that cylinder and pistons come from? Just sitting on the middle shelf with oil form the engine above dripping down on it. I said surely its for the next 850. Nope - it's 750. OK, inspect it. Standard size and absolutely no detectable taper! The tappets look basically unused! More inspecting and cleaning, then a LONG time getting the glued on base gasket off - can't find anything wrong. The blast cabinet has beads in it right now so I need to change them and I was out of glass abrasive so what arrived today - 70 pounds of glass abrasive! Also, arrived today were repair parts for the blast "gun". So, I guess it's cylinder time and instead of going .040" over, this engine is going back to standard!
(5 Hours today, 3 not chargeable. Running total, 77 Hours)
February 27, 2026 Spent a while making the gearbox cover the best I could. Lots a scratches and gouges. Got some of them out but a long way from showroom. Forgot to take my phone with me so no picture, but it does look decent and it shifts very well.
Spent some time on the cylinders. Realized that they must be washed before blasting - too much oil on them.
I hate all the old man talk but that's what old people do :-( Carrying the cylinders in the house to wash was hard. Much harder still was getting the 70 lbs box of glass abrasive to the shop! In the middle 70s I had a home improvement business. I complained all the time that bags of concrete or mortar only came in 40 and 70 pound bags. I would grab two 70 pound bags, throw them on my shoulders and off I would go bitching that I hated making extra trips - why not 100 pound bags! A few years before that when I worked in a steel mill loading railroad cars, I walked many times a day with two oak 18' 4x4s (full 4" x 4") on my right shoulder and one on my left - that was a total of 300 pounds and the walk was from 50 to 100 yards depending on where the car was. It's really annoying having trouble carrying a 35 pound cylinder!!!
(3 Hours today. Running total, 80 Hours)
February 28, 2026 Only got the cylinder washed and ready for blasting and then company arrived
March 1, 2026 Had company again, and he was working on a BSA B50 I sold him. He was using my process to make the hear and rocker box look new and so he had the blast cabinet tied up, and then the blast cabinet dedicated vacuum died so that was another time problem having to look into that and then replacing it with the shop vac.
While he as doing that I finished the gearbox. In the picture you can see the oil I used on all the parts. Then I added 2-3 ounces and turned the gearbox every which way to coat everything, and then I drained it. Once it's back in the frame it will need to be filled.
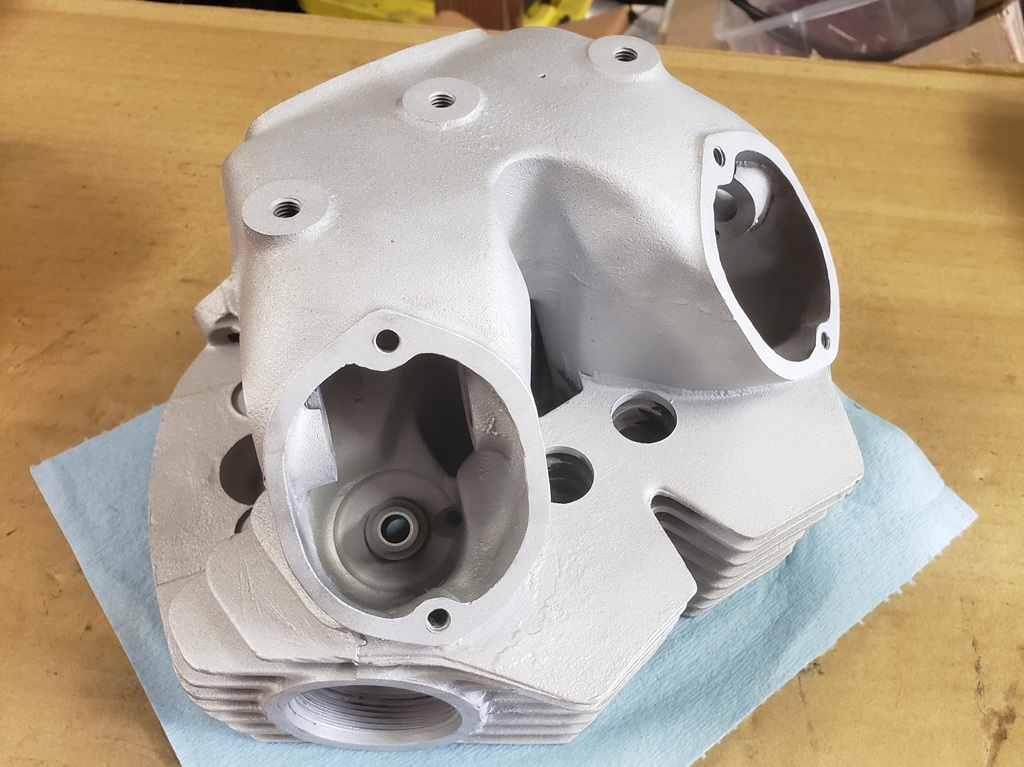
I also started on the head. As soon as I started removing the rockers, I ran out of propane. So, I had to go to the oven method which takes much longer. At any rate, all studs and rockers are out but it was too hot to remove the valves so that a job for tomorrow.
(4 Hours today. Running total, 84 Hours)
March 2, 2026 Took the valves out and inspected. The intake valves and seats look perfect. Will have to finish cleaning before I can see about the exhaust vales - pretty sure the seats are good.
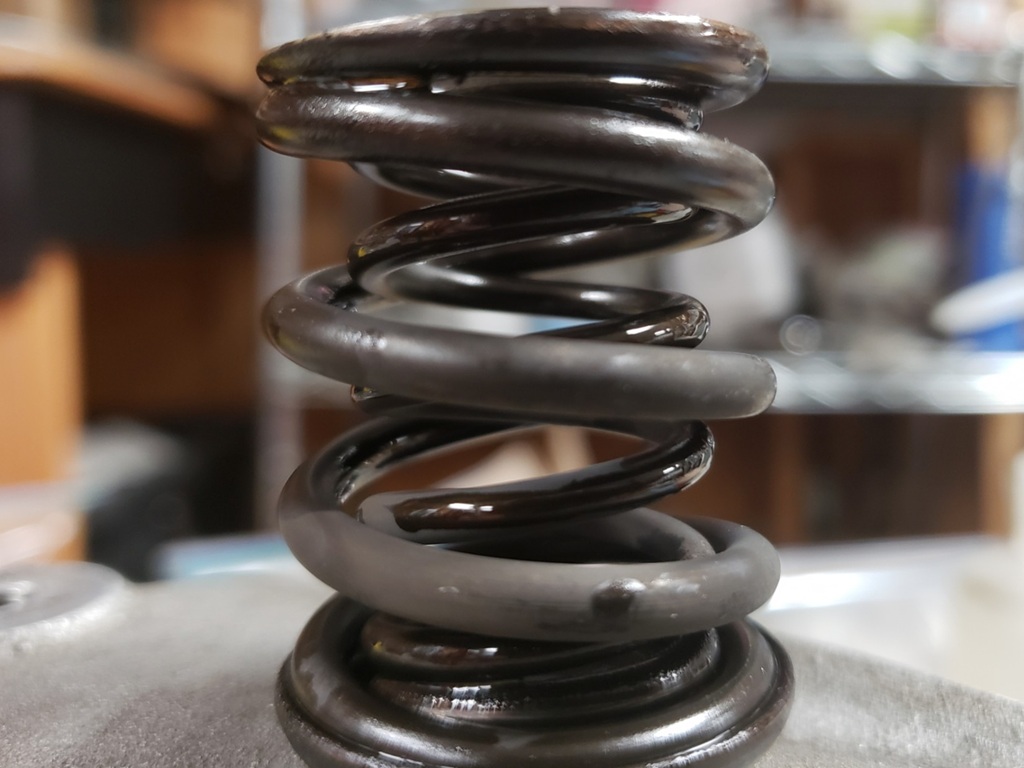
In the weird department, look at the picture of the timing side exhaust valve springs. That flat-black area is exhaust carbon! I've never seen that before! The only way for exhaust to get there is via the valve guide but it seems to be fine. I wish I had checked before taking the head off, but I'm guessing that the rocker was too tight and making the valve leak - the valve looks a bit weird too. See the discussion Dec 10th - that cylinder was having trouble.
Also in the weird department, measured all the springs:
- Timing Side:
- Exhaust:
- Outer: 1.622" (.004" long)
- Inner: 1.464" (.018 short)
- Intake:
- Outer: 1.626" (.008" long)
- Inner: 1.480" (.002" short)
- Drive Side:
- Exhaust:
- Outer: 1.615" (.003" short)
- Inner: 1.460" (.022" short)
- Intake:
- Outer: 1.623" (.005" long)
- Inner 1.464" (.018" short)
- Correct Size:
- Outer: 1.618"
- Inner: 1.482"
Quite confusing. The inner springs range from .002" to .022" short. One of the outer springs is .003: short and the other three are too long! I've never seen any too long and I normally change if .010" or more short. So, a new set is in order.
So, now: Rub a dub dub, one head in a tub (kitchen sink).
It's a greasy grimey gopher guts head and I have to get the oil and grime off before blasting will work.
(3 Hours today. Running total, 87 Hours)
March 4, 2026 Had another customer IT emergency yesterday and basically got nothing done on this other than starting to soak the head.
Today, I can barely walk due to my knee. It's always difficult due to the poor job the surgeon did replacing it, but so much sitting yesterday probably made it worse.
Throughout the day today I scrubbed, drained, and refill the sink five times and the head is finally clean enough to blast. I'll be very happy when the threat of freezing is over and I can power wash things - all my outside water is shutoff for the winter. There was no way my knee would let me stand at the blast cabinet long enough to accomplish anything today. However, superman mode will kick in tomorrow afternoon and I should be able to stand at the blast cabinet and do the cylinders and head - I hope anyway.
March 5, 2026 If nothing weird happens then I must still be asleep!
Showed up for my steroid shot appointment and he came in right on time - that's not weird, that's normal. He did the first shot and I told him to give the other higher power but short lived shot as I needed to stand at the sand blaster for hours. He got a syringe out of the drawer, loaded it with the milky steroid followed by lidocaine (they do that so the steroid doesn't burn/hurt on the way in) and then started to inject when the needle popped off the syringe and got use both in the face! He said that's only the second time that ever happened in his career - those syringes do not have removal needles!
OK, went home and did the IT work for the I needed done for day. By 1pm, my knee was so swollen that I could barley bend it. So I went to put my feet up and wait for superman mode to kick in. Of course, I promptly fell asleep.
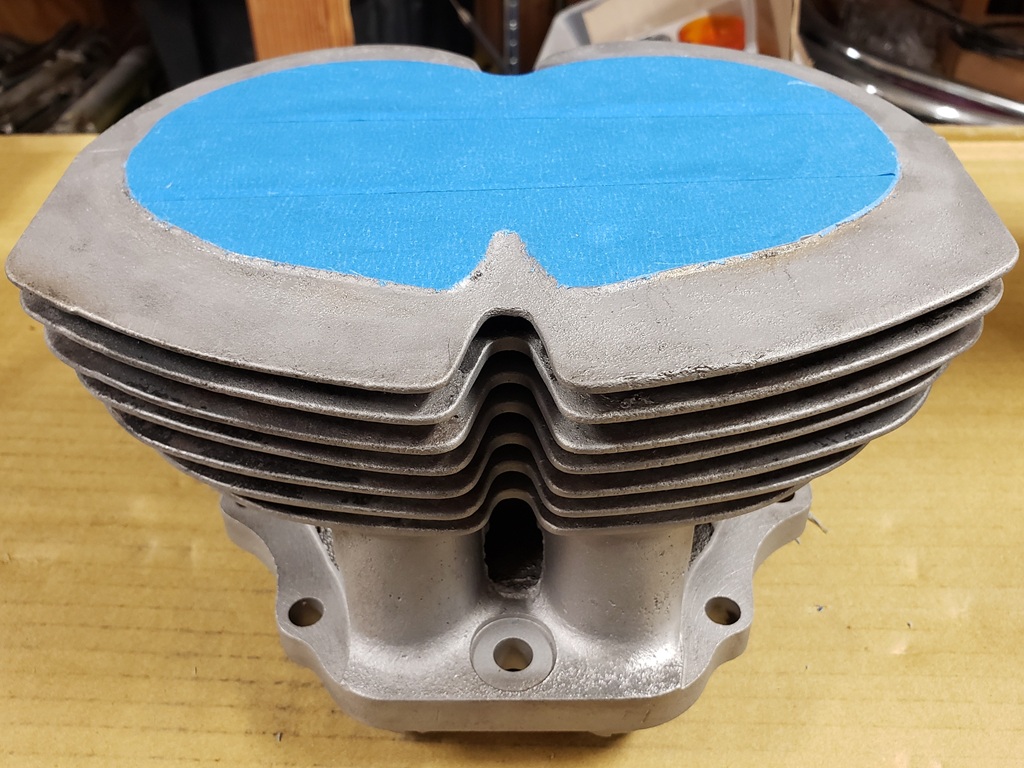
At 4:23pm my eyes snapped open: Ish bin ein Uebermensch! Got up, took care of a couple of things and off a blasting I went. Finished the cylinders and started on the head. When about 80% done with the first blasting step on the head I got to thinking that I didn't want the cylinders sitting around unpainted and that they would require time to harden before handling so I moved on the masking them.
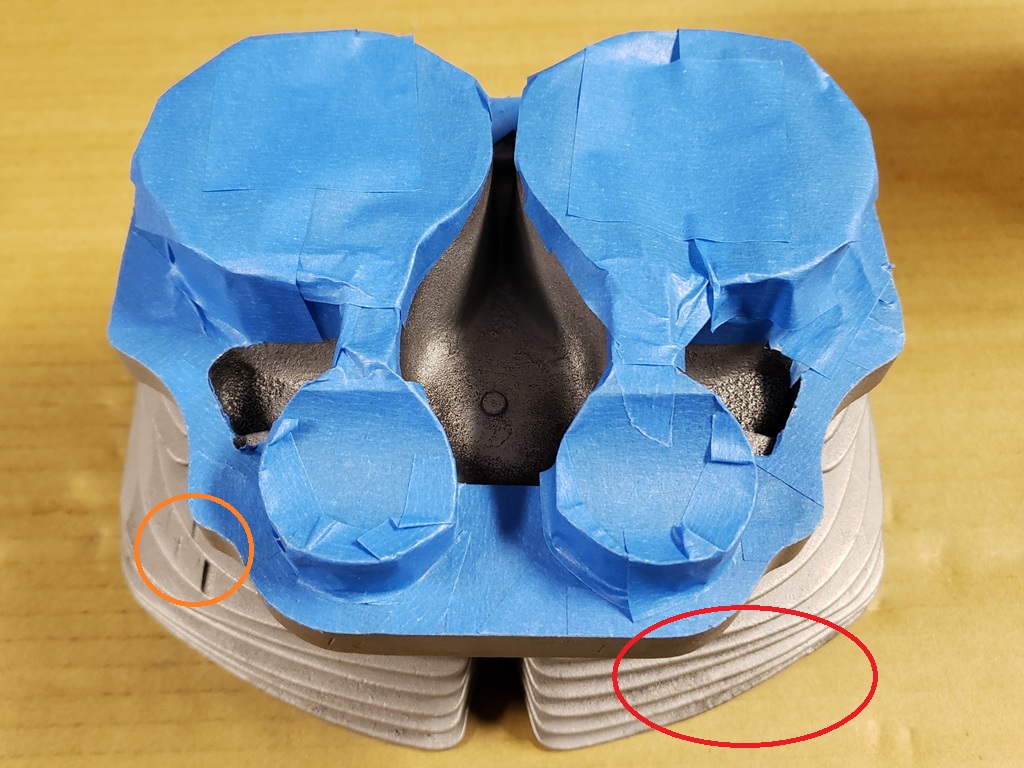
In both pictures there are places that don't look clean. They are. Besides washing, wiping with denatured alcohol, wiping with acetone, and the stainless steel brushing with acetone, they are fine! The red circled area in the second picture really looks dirty - it is not. The grooves in the orange circle in the second picture are factory - I'll seen them in the same place on other 750 cylinders.
The VHT Barrel paint I use requires all coats to be on in one hour or wait seven days to re-coat - I've never had to wait and re-coat. It also requires a decent warmth day and humidity 50% or less. In winter the humidity is normally not a problem but today it was. Even though my heat pump is out, my propane heater will get the shop warm enough. So, unless it is very cold or high humidity tomorrow, I plan to paint the cylinders.
(4 Hours today. Running total, 91 Hours)
March 6, 2026 I guess I'm not living right, it's 10:30am, 48F which I can live with but the humidity is 90%. I hope they don't rust as I would have to take the masking off and re-blast. The masking is a PITA.Tomorrow is supposed to be 85% and 64F and Sunday 82% and 66F :-( I've never worried about a dehumidifier since in the summer the heat pump keeps the humidity down as normally the humidity is low in winter - of course, we're getting near Spring where humidity is high often.
Not the first time humidity has annoyed me so I have a dehumidifier on the way that I can run all the time and it has an outside drain so no emptying it. Once I have finished installing the replacement heat pump, the humidifier just won't run when the heat pump takes out the humidity. I already have an outside drain for the heat pump so I can tie the humidifier drain into that.
So, back to the head.
Blasted the head until the cows came home - mostly it's done but the deep inside the front fins was still packed with road grime. When you try to blast that the media just sticks. So, I kept scraping it out and it is mostly gone. The head is back in the sink in straight hot water and Dawn. I prefer Tide laundry detergent as it is stronger but I used it all up. Hopefully Dawn and water will get the last of it out and I can move on to glass beads to make it looks new. All the carbon ins the combustion chambers and ports is gone and they look good.
(4 Hours today. Running total, 94 Hours)
March 7, 2026 So, last night when Dawn did not get rid of the last of the road grime and I was out of Tide, I had a bright idea. A little Cascade dishwasher detergent. Left that soak for a while, while I relaxed. Bedtime, I went to rinse it and let it dry over night, and the it was flashback and heart attack time! Flashback because of a 1971 incident.
My Triumph 500 had been stolen in late 1970, I got married the first time in 1971, we moved to a newly built apartment in 1972 which had a dishwasher. I bought a basket case Triumph 500 and the head was quite dirty so I had the bright ideal of putting it in the dishwasher, by itself and run a full cycle with both trays filled with whatever dishwasher detergent we used then. This caused three bad things. First, I had a battleship gray head, and second I had a badly stained dishwasher, and third I had a VERY mad wife. Ended up using the head that color - could not get it off. Ended up doing without lunch for a very long time to save the money to replace the dishwasher and begged forgiveness MANY time even after replacing the dishwasher!
So, I've never put a motorcycle part in a dishwasher again. However, aluminum pans were not common in the 70s and I figured that since they are now, that dishwasher detergent wouldn't discolor aluminum. WRONG - when I saw the battleship gray head come out of the sink, I simply said I'm screwed and when to bed thinking I would spend today looking for a replacement head. Woke up a first light, couldn't stand it, and headed to the shop. To my shock, the grime was gone and blasting easily removed the battleship gray!
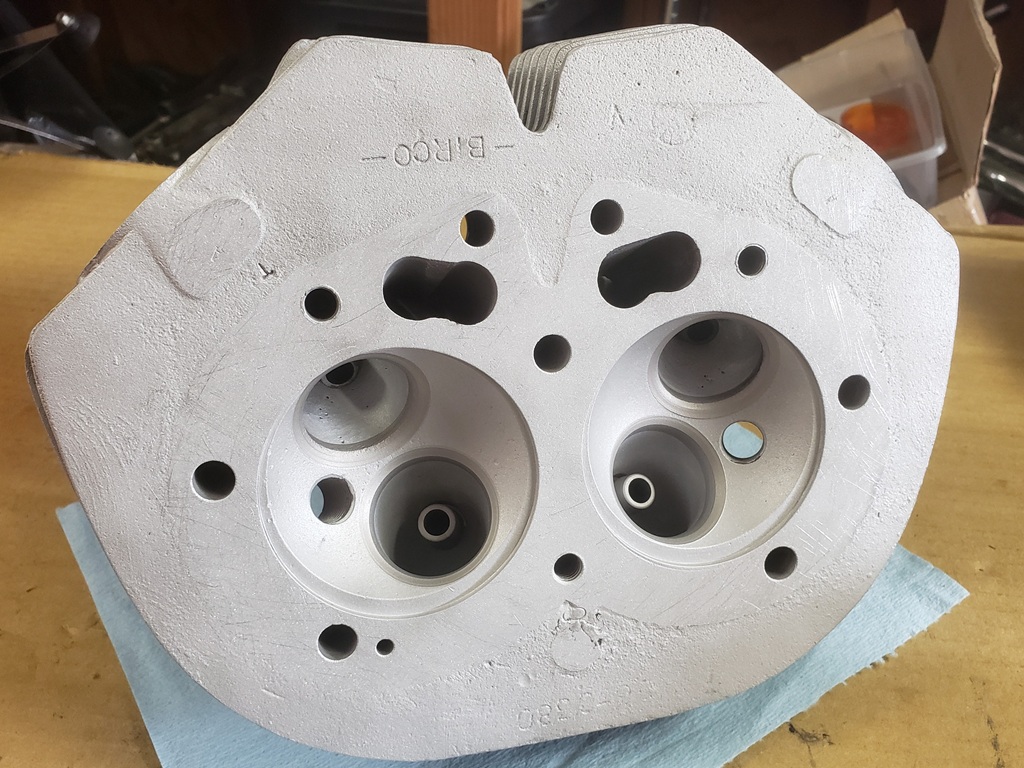
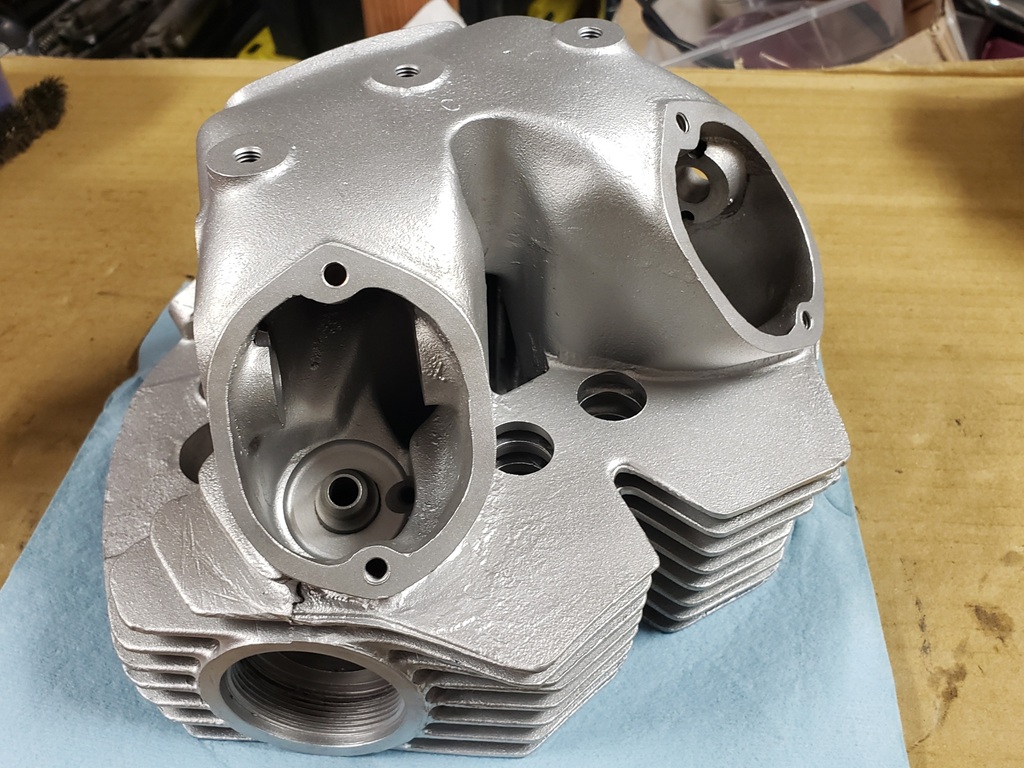
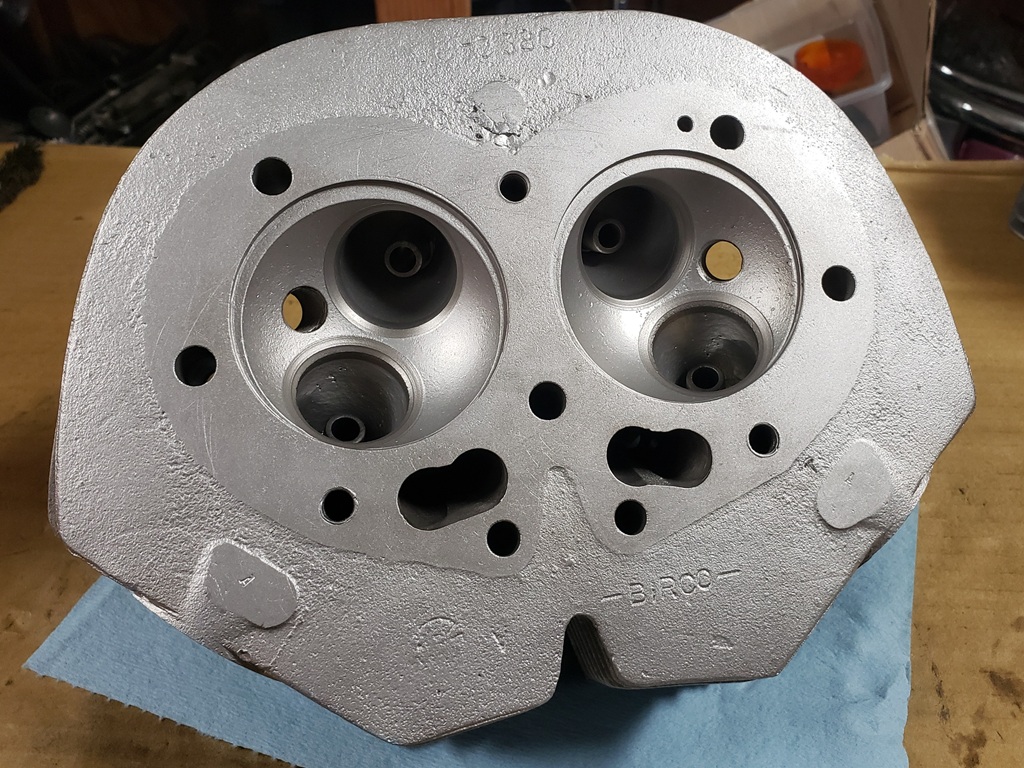
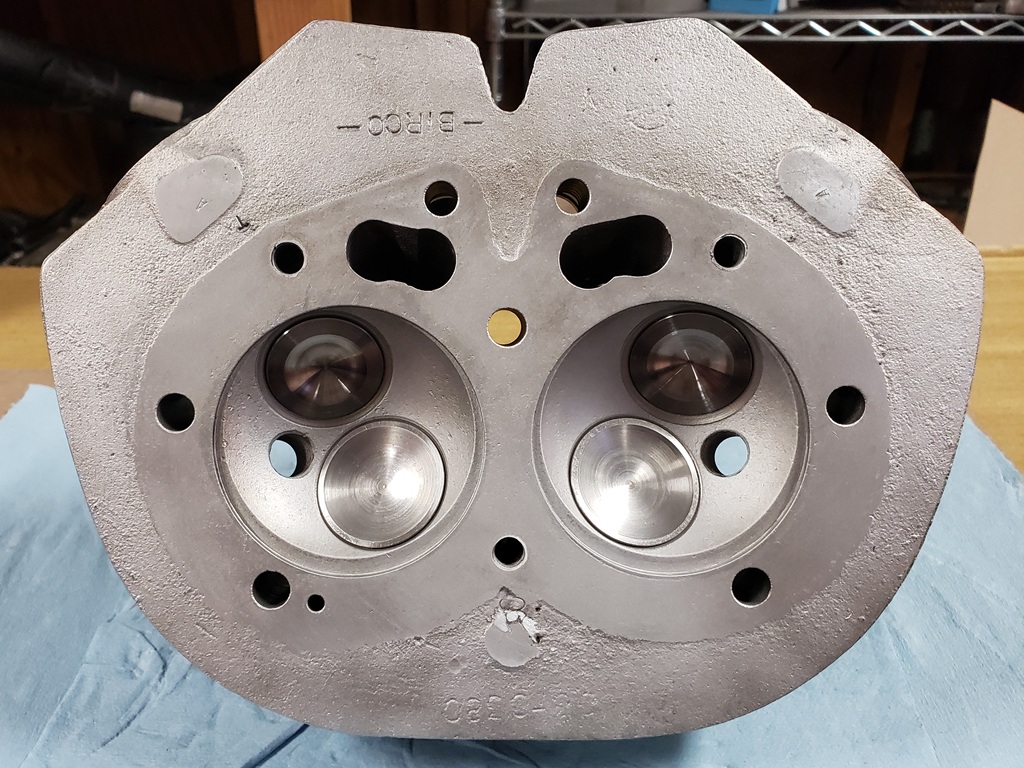
I don't think I've ever shown what parts look like at this step of my process. The first two pictures show the head and after scrubbing, blasting with glass abrasive #75, making the mistake above and re-blasting. Then the head was thoroughly scrubbed and all the glass abrasive was removed from the cabinet, replaced with glass beads #8, and the head blasted at low pressure at an angle from a few inches away. This step takes very little time, closes up the metal, and is magic before your eyes! THe 3rd and 4th pictures show the head right after bead blasting.
The final step is being done now. Repeated washing until I am positive all media is gone. This is where the stainless steel kitchen sink helps. You feel the bottom and if there is even one bead, you will feel it. Once I'm sure there are no more, I do it once more time for good measure.
(6 Hours between last night and today, but 3 are due to a stupid mistake so running total, 97 Hours)
March 8, 2026 When I wrote this a few hours ago I thought it was Saturday - it's Sunday!
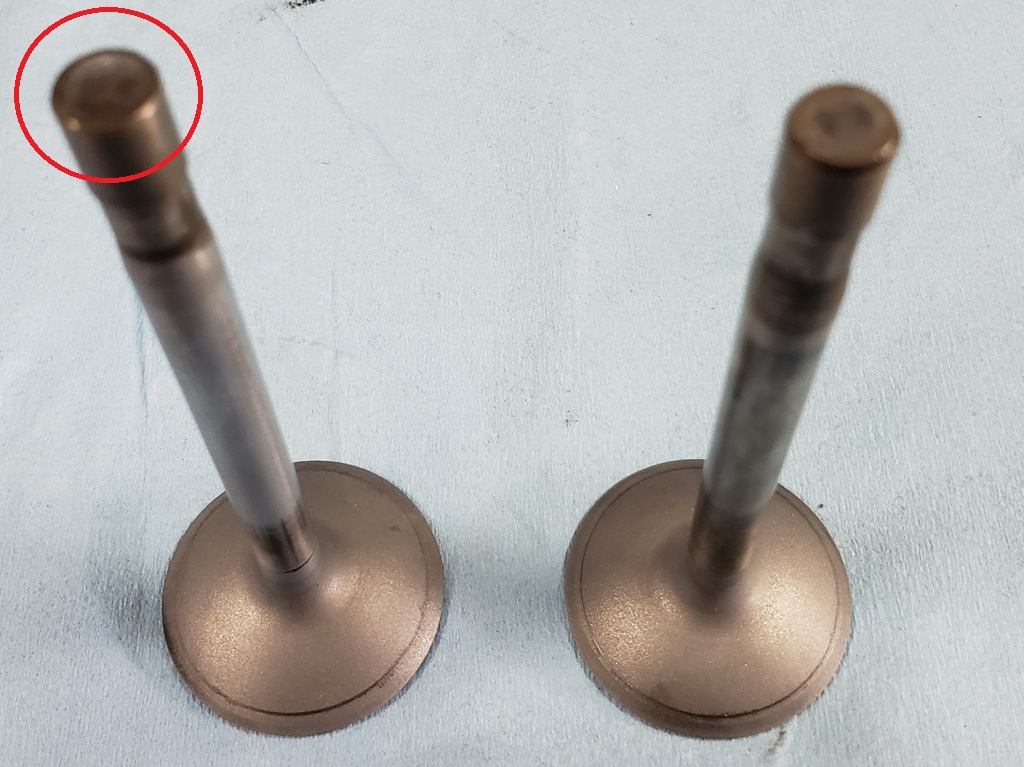
Cleaned up the intake valves and did what I call a light test. With the valve in but no springs I put a strong light in the combustion chamber and look through the intake ports (for intake valves) to see how much light shows, if any. There was light on the timing side and quite a bit on the drive side. Twisting the rocker end would get rid of the light on the timing side, but not the drive side. That concerned me especially as I turned the valve the light increased and decreased which probably meant it was bent. Then I checked the stems of all four valves - all were between .002" and .003" undersized in the wear area and worse than that you may be able to see in the first picture. The divot where the rocker adjuster presses on the end of the valve is as much as .011" deep - see the crappy first picture. That means there was no way to accurately set the valve clearance. Clearly, at least new set of valves was required. Checked my inventory and I had a set but also had a set of new valves from an old guy I bought out. Tried those valves and all had no to a tiny bit of light showing through with them just in by their own weight. So, I lapped them all and they all then passed with flying colors. Just because I'm not living right, the flashlight I was using for the light test I also used in the blast cabinet (yep, what you're thinking happened). After all that testing I found beads on the table and in the head :-(. OK, time to wash the head - AGAIN!
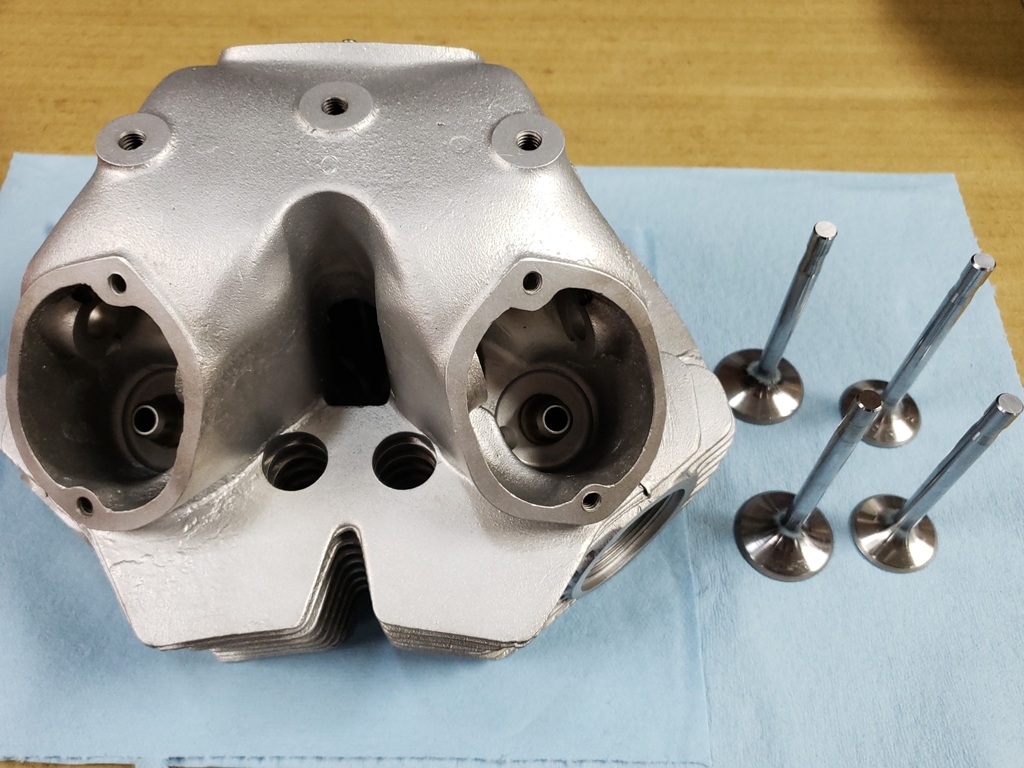
OK, head, once again, media free, dry, and the guides and seats oiled so they wouldn't rust. Lets assemble it. Need springs, check inventory, have none - wait I had them - what happened? Checked inventory for this engine/gearbox and sure enough there was a set allocated to it. Gave up after two hours of looking :-(. Now I have to place an order! The second picture shows the head with the valves ready to go in.
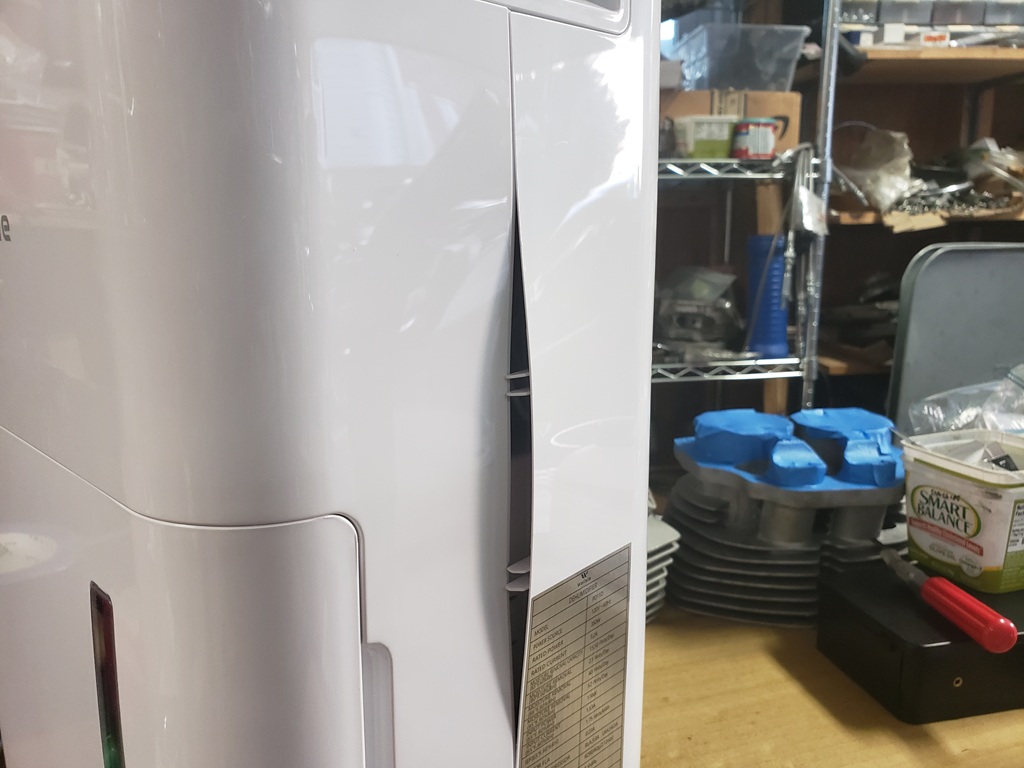
The dehumidifier arrived yesterday afternoon. I unboxed, it yesterday but it needed to sit upright for several hours before turning it on. It's knocking the humidity down quite well. In three hours it went from 82% to 61% so tomorrow, hopefully it will be holding at 50%. The third picture shows an example of Chinese workmanship/QA. That's how it was when I opened the box. Had to take all the screws out of the back, put it in place correctly and put the screws back in!
(5 Hours, but 3 are due to a stupid mistakes so running total, 99 Hours)
March 9, 2026 The valve springs are on the way. I'm guessing they will be here between Wednesday and Friday as long as there's no customs slowdown - UPS has them an they in a customs clearance right now. The current UPS estimate is Wednesday afternoon.
The other day, the dedicated vacuum for my blast cabinet died so I ordered a new motor and some cabinet maintenance items. They came this morning. I've been blasting with an old leaky shop-vac that is weak an very noisy. So, I installed the motor and did other maintenance work this morning.
The humidity went down on it's own and the dehumidifier is turning on a off as needed - success! However, as I feared, the cylinders got surface rust. Most would paint over it - not me. It's 2pm and I'm already worn out. I have company coming tomorrow. So, I may get it ready again later today, or wait until Wednesday when the company is gone - haven't decided. Really annoying, it's only about an 1.5 hours to unmask, blast, and re-mask. And then an hour to paint. Until I was about 70 there would have been no question - it would be done today along with many more things.
Really starting to wonder how much longer I can go getting my project list done. After this, I have: some partly finished bikes, some commitments, and some I want to do. I will finished my commitments and do a good (if slow) job on them. Not sure about the rest!
Got a little second wind. I un-masked the cylinders and re-blasted them. Now that the dehumidifier is running, they should not rust but if they do it will be light and easily blasted off.
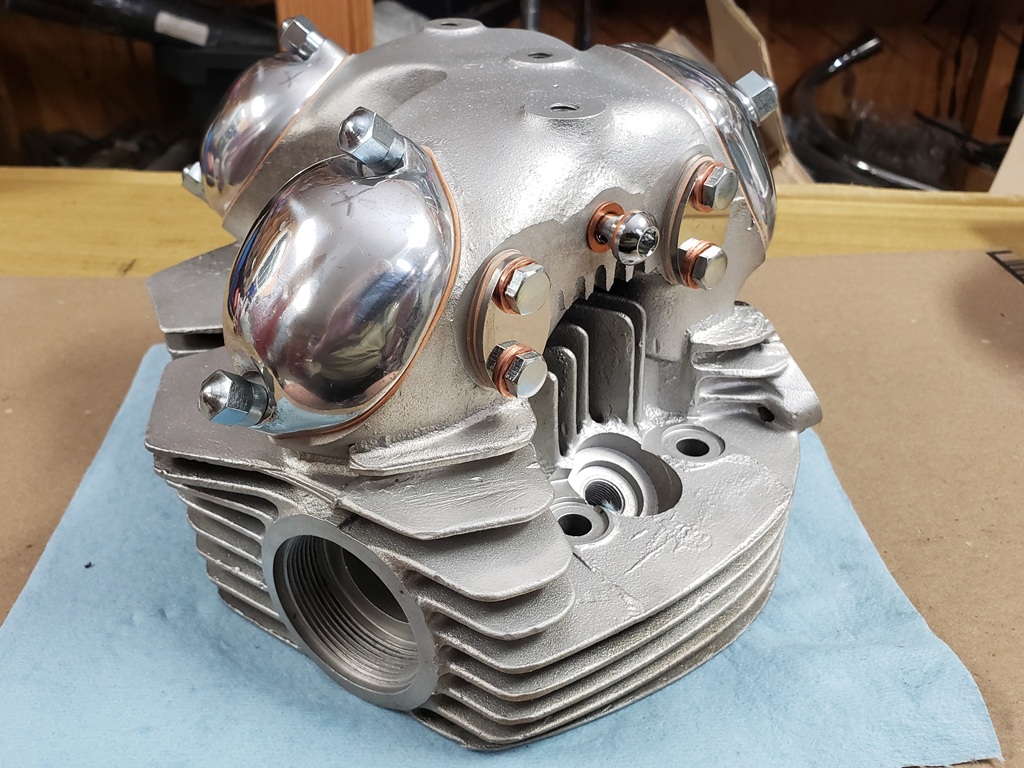
March 11, 2026 My AN order arrived and my company left. I didn't have a lot of time, but did get the valves installed. The exhaust valves look dark in the picture, but that are exactly the same color as the intake valves. All new valves and springs. I also very lightly surfaces the head on the surface plate - note the little shiny spots around some of the holes. Since a combat head is factory skimmed .040", you have to be real careful not to take more off - just wanted the small high spots gone.
(1 Hour, Running total, 100 Hours)
March 12, 2026 Not sure turning 76 is a good thing, but: Happy Birthday to Me! I guess it's a lot better than the alternative!
Here's a subject that I've talked about many times and probably will many more because I simply do not understand! Most Norton engines I work on have at least one bad rocker spindle and many have four.It is rare that a rocker is bad - before today, I've only had two.When working on Triumph, I've never had a bad rocker or spindle. Triumph rocker spindles and therefore rockers are feed by return oil pressure - in other words, almost no pressure. Norton spindles and therefore rockers are feed by the same passageways as the crankshaft - in other words, full crankshaft pressure. Since this bike is high mileage, I expected to need to replace all four spindles but figured the rockers would still be good. Here's what I found/did:
- Timing Side Intake: No issues, cleaned the parts and reinstalled.
- Drive Side Intake: No issues, cleaned the parts and reinstalled.
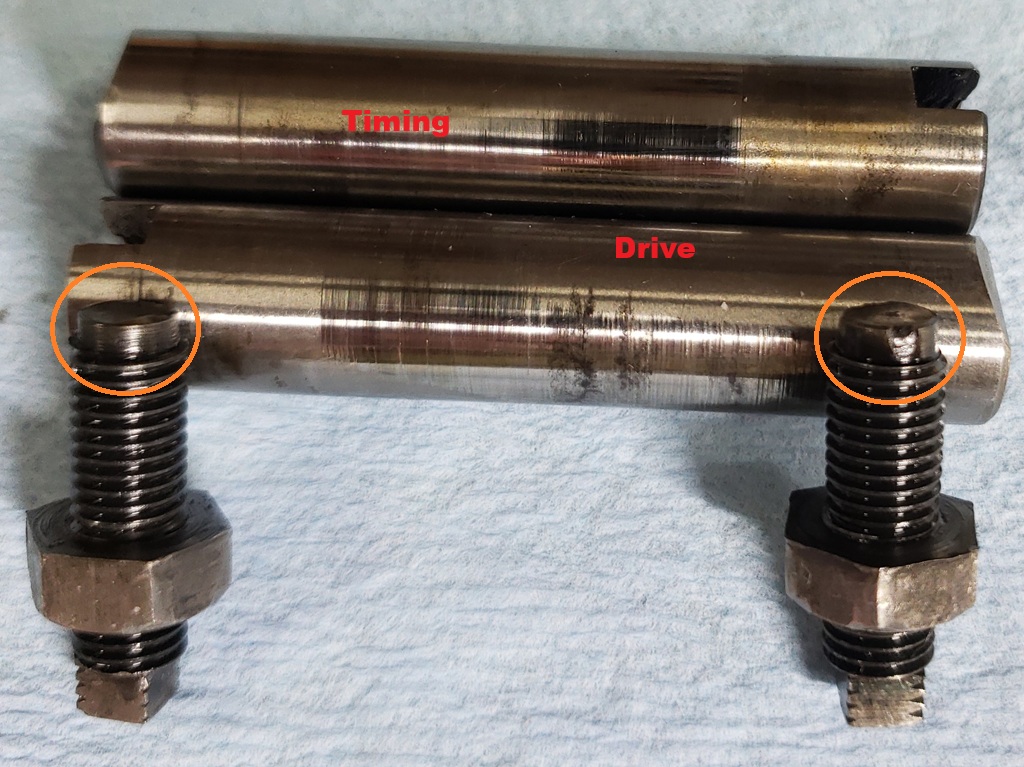
- Timing side Exhaust: The spindle is marked in the picture.. It was .002" undersized and lightly scored. Tried a new spindle in the rocker and the rocker was fine. Reinstalled the rocker with a new spindle,
- Drive side Exhaust: The spindle is marked in the picture. It was .002" scored and noticeably loose in the rocker. Tried a new spindle in the rocker and the rocker was clearly bad. New rockers are very expensive, and I have heads I bought for parts. When through them and found an excellent rocker and matching spindle. So, I installed them.
Also in the picture are the two exhaust adjusters. Both appeared to have been filed - poorly - see the orange circles. Hard to tell in the picture but the one on the right is filed crooked and even had a chip. The one on the left is not as bad but quite rough. I could have installed new, but again I had quite a few and took the time to go through them all throwing away those this bad threads, bad adjustment end, worn valve end, etc. That left me with 7 good ones so I used two for this engine. The intake adjusters had not problems.
Too many called while working to wish happy birthday so I didn't get anything else done.
(2 Hours, Running total, 102 Hours)
March 13, 2026
Had a steroid shot yesterday morning so should have gotten a lot done today. No, seems like everyone I know needed help today and one side-effect on steroids is motor mouth. So, they called, I answered their question and then when on to anything that came to mind! Finally got started at 5:30pm. Did get the head finished. Put the rocker cover studs back in, polished the covers, flattened the sealing surface of each on the surface plate and installed the covers finger tight. They must come back off to install the head and to adjust the valves, but with them on no crap can get in the head.
Also installed all new rocker spindle covers, gaskets, and screws. And put the banjo bolts in so those holes are blocked from debris.
(2 Hours, Running total, 104 Hours)
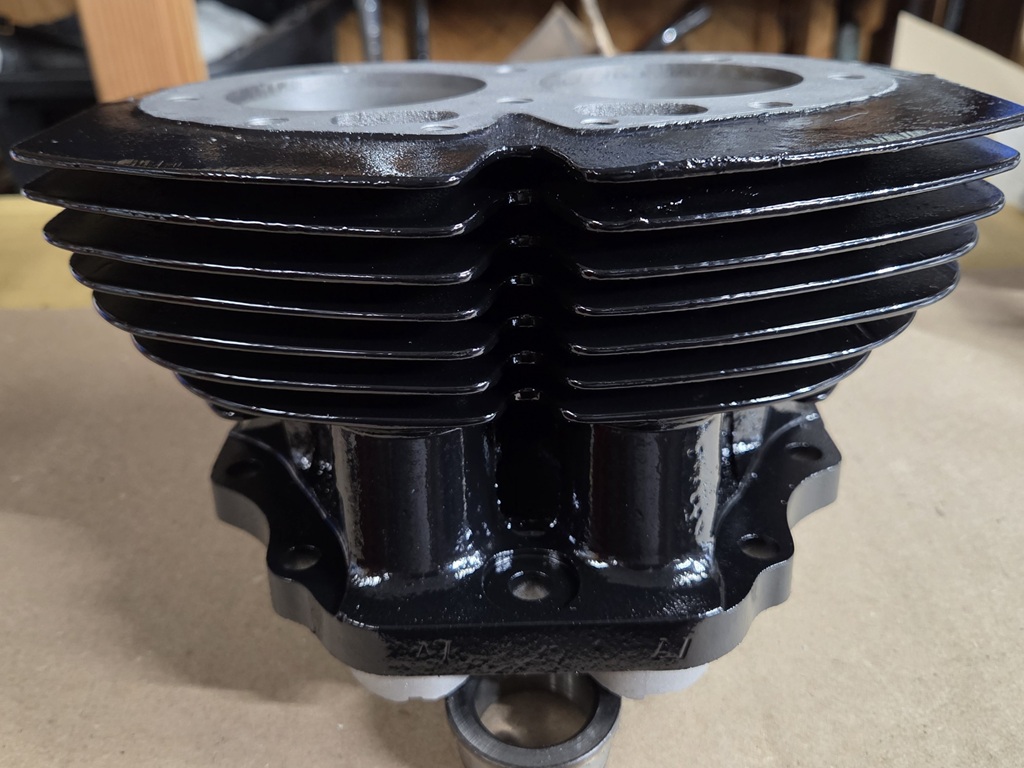
March 14, 2026 Finally! The cylinders are painted! Heated the shop to 75F and got the humidity to 50%. Re-blast again, re-masked, setup the powder coat cabinet for painting, put in the "Lazy Susan" I use to turn the cylinders while painting, put in the cylinders upside down and got started.
I use VHT Gloss Barrel Paint. All coats must be on within one hour or you have to wait seven days to re-coat. First, I use a folded over pipe cleaner to get paint the air passages that the spray will never reach. Then three light coats waiting five minutes between. Then a wet coat and wait 10 minutes. Turn the cylinders over and then four medium coats ten minutes apart. This uses most of a can of paint. I reserve the rest to go with the engine. If it gets chipped while installing the engine, it can easily be touched up with a paint brush and spraying a little in a container. This paint can be handled in a few hours, gets fairly tough in a few days, and gets real tough once heated. I normally don't bake it - I let the engine to it.
(2 Hours, Running total, 106 Hours)
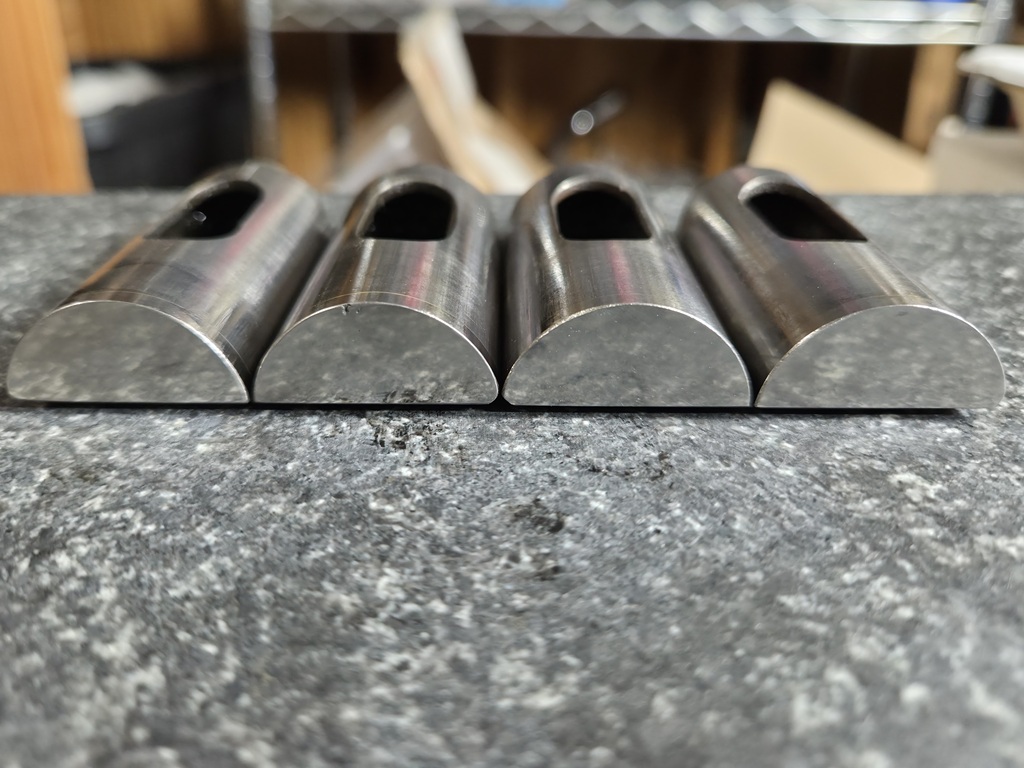
March 16, 2026 Actually made some progress! Unmasked and inspected my paint job on the cylinders. They came out the best I've done! Often, there will be a small spot or two that the spray didn't reach so some touch-up is needed. Not this time. Next the cylinders will get a very light hone just to give them a cross hatch, then cleaning, then installing the tappets, and then finally putting on the engine.
Next I restored the tappets. They were quite good but I like to make them like new when I install a new cam. It's not hard but requires careful work on the surface plate and time. Considering how very expensive new ones are, it's time well spent.
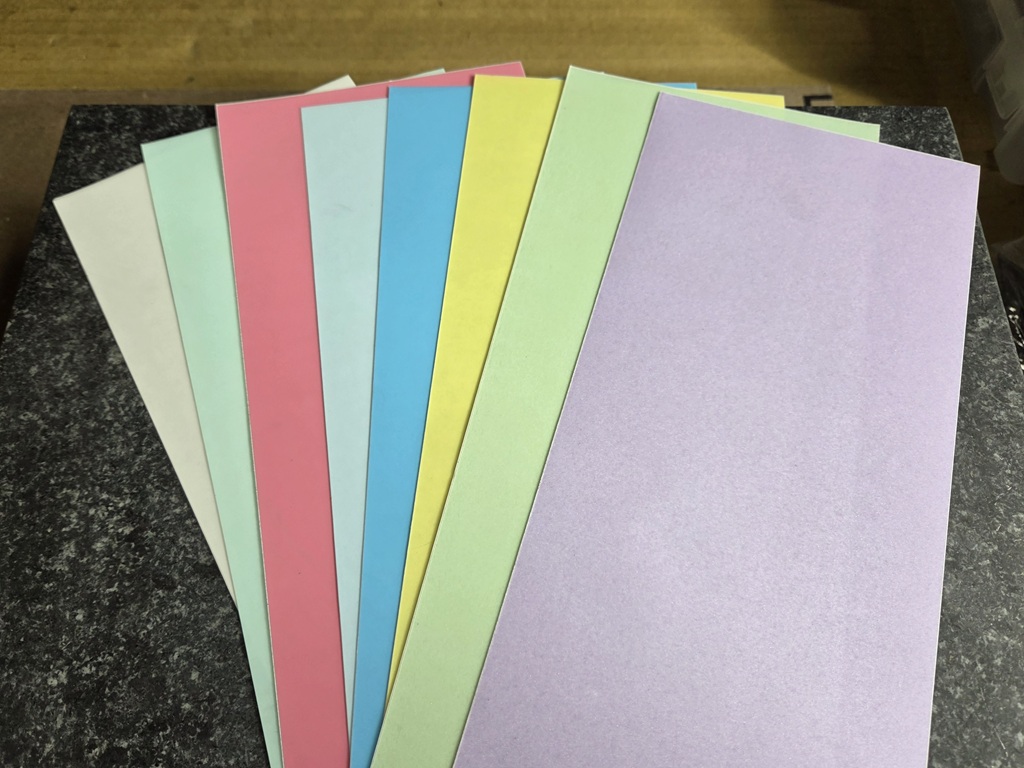
I started with eight long strokes on 600 grit paper on each, then eight on 800 grit, then 10 on 1000 grit, then 10 on 1200 grit, then 10 on 1500 grit and then 10 on 2000. Each time being VERY careful to keep them flat. At that point the marks were gone and they were dead flat. Then I went through the lapping papers in the second picture from right to left doing five long strokes, turning the tappet 180 degrees and five more long strokes. In the third picture, you can see the results. Notice that they are like a mirror and are showing the surface of the granite. I also cleaned an polished the sides - no sandpaper there - just hand polishing and cleaning.
(2 Hours, Running total, 108 Hours)
|


|
Copyright © 2003-2026
Greg Marsh Enterprises
8116 Arlington Blvd. #171, Falls Church, VA 22042
(703) 200-4025 marshg@gregmarsh.com
|
|