33July 10, 2023
I've been discussing building a 1973 Norton 850 Engine and Gearbox and exporting it to a guy in Australia (AU). We agreed today. Edit 9/10/23 I had AZ instead of AU!
Since this is the first time I've done an export like this, I'll document it here. He will be able to follow along with what's in his engine and gearbox and all will see the crating process. I've done a lot of woodworking in my time, but not engine crating!
I'm in the middle of a couple of other Norton projects so this will fill-in time while waiting for missing things on those projects. Once they are done, this will speed up.
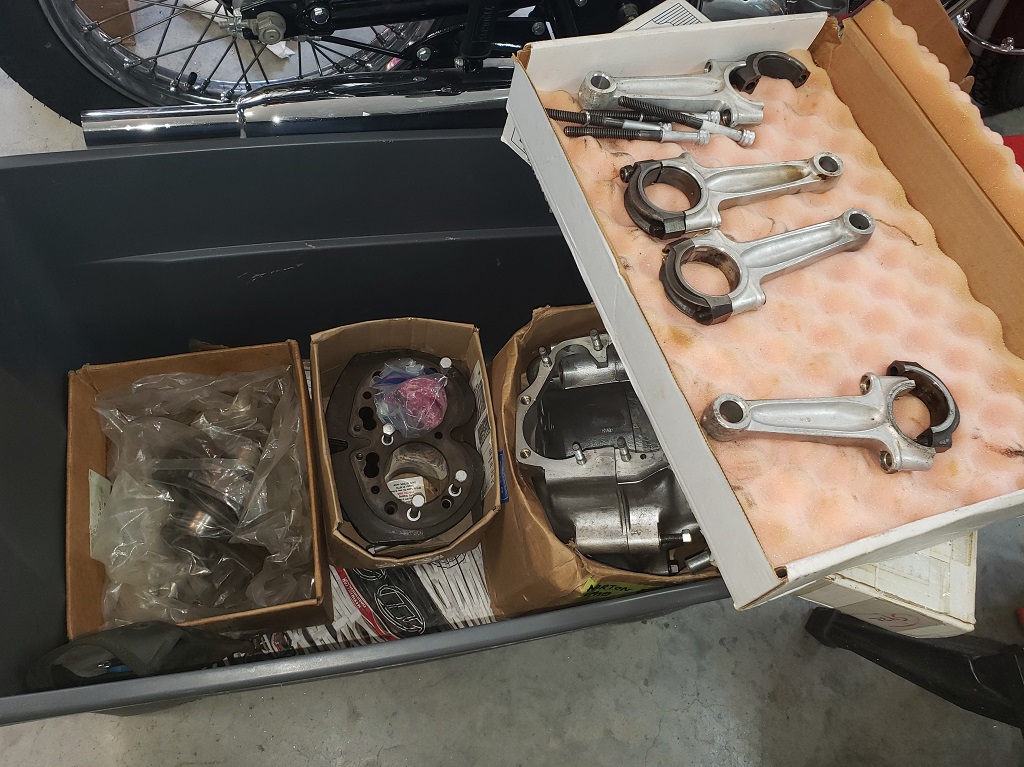
July 11, 2023 Let's get started by inspecting what we have. The first picture shows the content of the bin this has been in since I've had it. I guess it should be called a bin case rather than a basket case! Here's each thing inspected:
- Crankcases - they are in good shape but dirty.
- Crankshaft - this was apart. It is in excellent condition - just needed cleaning. The journals measure perfectly after a quick polish with 800-grit paper and WD40. On the timing side, as I've often found on 850s, did not have the oil holes chamfered. I'll do that, give a final clean, and assemble with new hardware.33
- It came with two really good rods and two OK rods, I'll polish up the good ones and install with new standard shells.
- Cylinders - They are tapered out of tolerance so will need to be bored (see the comment below about the head).
- Lifters - Great shape!
- Timing cover - OK but some bad scratches. If the owner doesn't opt for a MK3 cover, I'll use one I took from another bike when installing a MK3 cover.
- All the stuff that goes in the timing chest - didn't come with any but I probably have good use parts except maybe the oil pump.
- Pushrods - Grrrrr! Didn't come with any!
- Camshaft - Grrrrr! Didn't come with one!
- Crankshaft sprocket, primary chain, rotor, and hardware - Grrrrr! Didn't come with any. I probably have used parts for most of this.
- Head - beautiful, rebuilt with new valves, springs, covers, etc.One problem - it’s a 750 head!!!! I have quite a few heads, but those I've checked so far are all 750. If I don't have an 850 head and I can't find one reasonable, I have a complete 850 engine that I won't get to for a long time. I'll check that head and the cylinders before I go too far.
People always ask how long things take so like the High Mileage Combat engine I'm rebuilding at the same time, I'll keep a running total of the hours here. In don't include time ordering parts or updating this page. (3.5 hours)
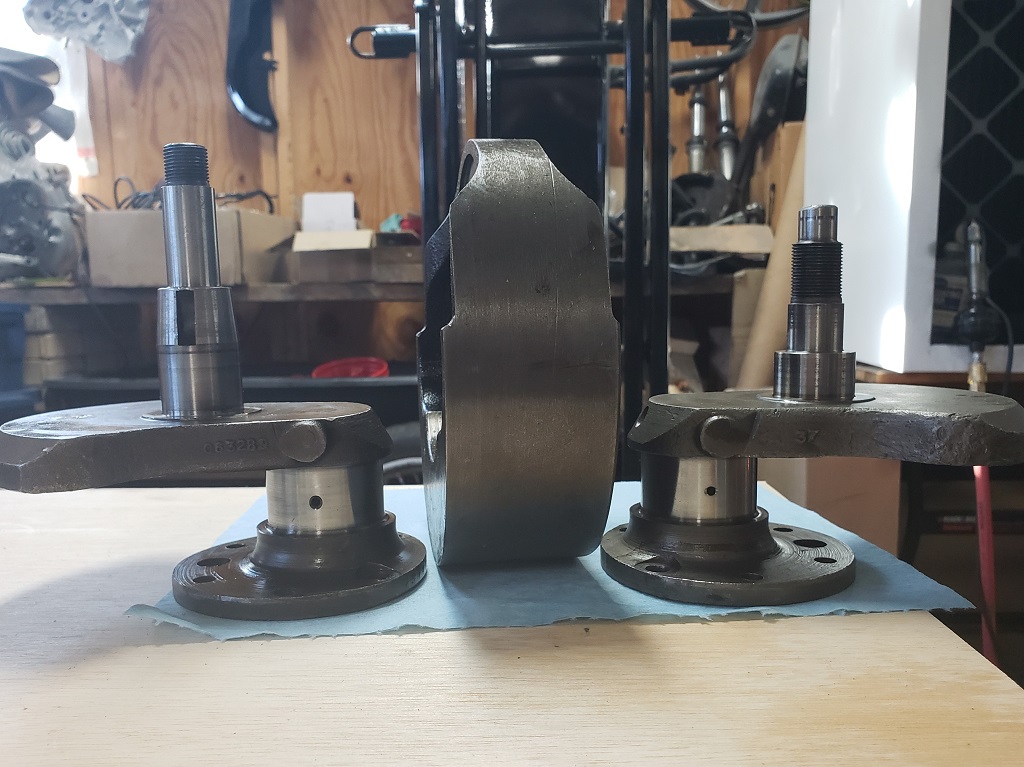
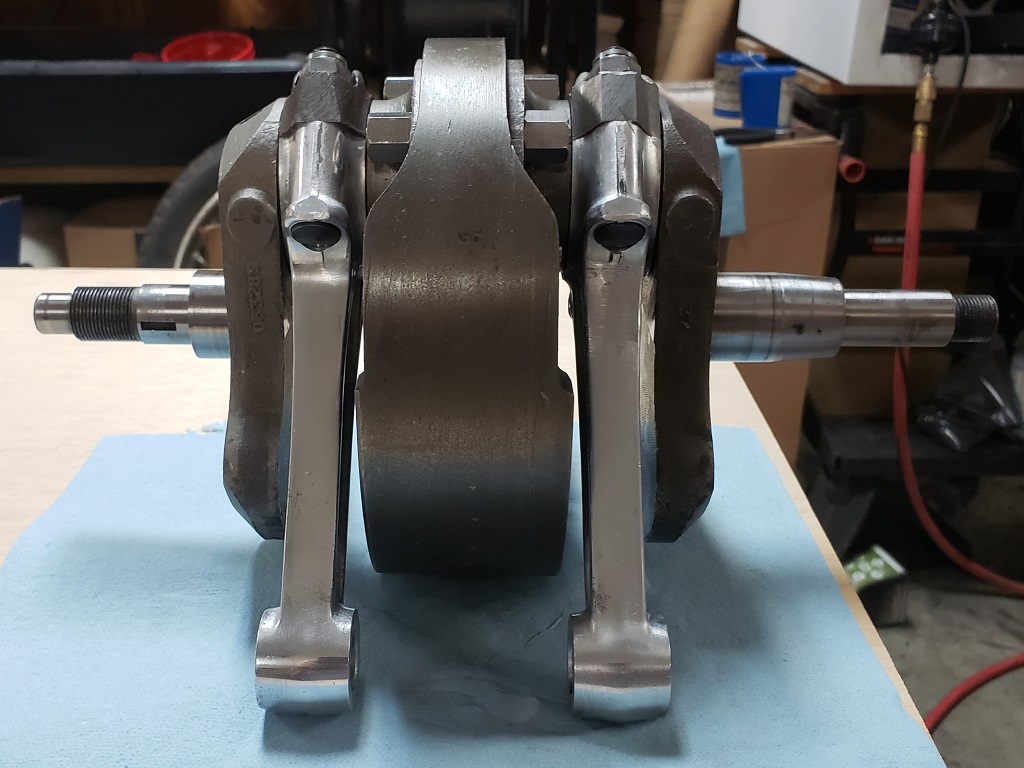
July 12, 2023 Too many calls for help today to get much done. I studied the conrods. It came with four. On was slightly bent - recycle bin. The other three could have been used but would have taken quite a while to get rid of scratches and to polish. So, I cleaned up another set and polished them. I also chamfered the drive side oil holes and did the final clean on the crank. I should be able finish the crank done tomorrow. The buyer decided to install a reed valve later so as soon as the crank is done, I'll start beautifying the cases.
July 13, 2023 If a picture is worth 1000 words, then a movie must be worth 2000. (5 hours)
July 14, 2023 Phase on of the crankcase cleanup is done. (7 hours)
July 15, 2023 Quite a bit of progress today!
- Finished cleaning the cases and testing/cleaning all threaded holes.
- Checked all the used camshaft I have - all were either bad or unsuitable so used a new camshaft.
- Tested the camshaft busings in the crankcases - both were in great shape.
- Installed new top case studs and cleaned up and installed the case location dowels.
- Installed new "SuperBlend" bearings in the cases and on the crankshaft.
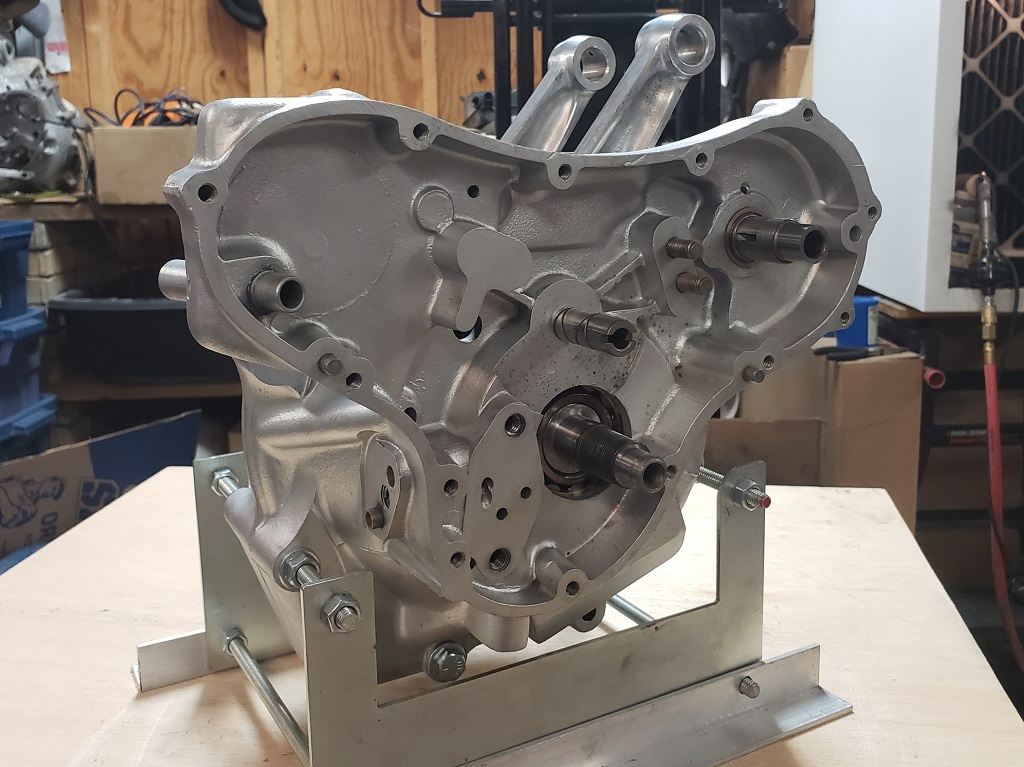
- Applied the sealer and assembled.
Now I need to scrape up all the timing gear. I should have good used spares of all except maybe the oil pump. I also make to strip another 850 engine I have to see if the cylinders are good. It takes forever to send them out to be bored so if I have good ones I would prefer to use them and send the other out when there is no rush. (13 hours)
July 17, 2023 The timing side only came with the cover - fortunately for the buyer, I've accumulated good used parts I didn't need many new parts. I did need a chain, the chain tensioner, and some other minor things. Then, I went on the great oil pump scavenger hunt! I knew I had some, but where my helper or I put them - turns out in several places! In the end, I found complete ones, partial ones, partly damaged ones. After some testing, I chose a complete one to service even though it had a minor bind. Once I got it apart, I saw that the return side driven gear had a chip out of it, and it was catching as it turned. So, I discarded that gear and the one it meshed with even though that one looked good. Then I did a complete service and test. This is now an excellent pump. Of course, I was missing one stud to install it and I didn't find a used one. I have new but by then I was too tired, so I quit for the day. (16 hours)
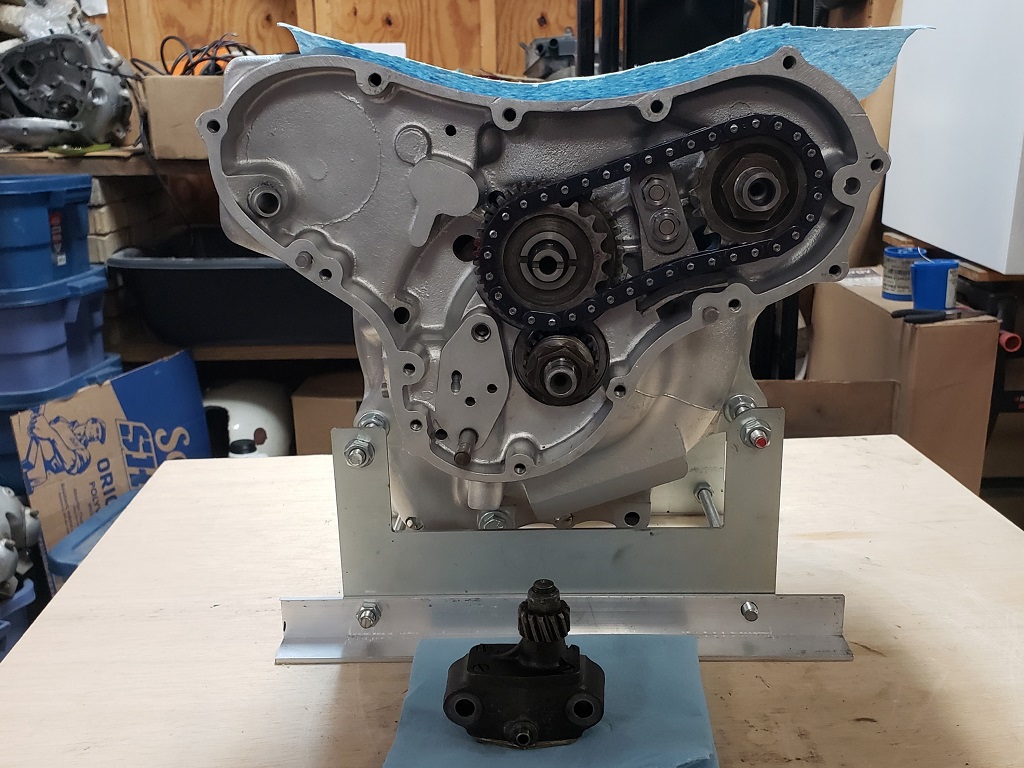
July 18, 2023 I didn't have much time today but I did get some things done. I installed the oil pump, polished the timing cover, and installed the internal seals in the timing cover. However I could not find a circlip for the crankshaft seal and it was late so I didn't get the cover installed. I have a new one so I can install it tomorrow. I'm also missing the pressure relief valve - hopefully I have a good used one. (17.5 hours)
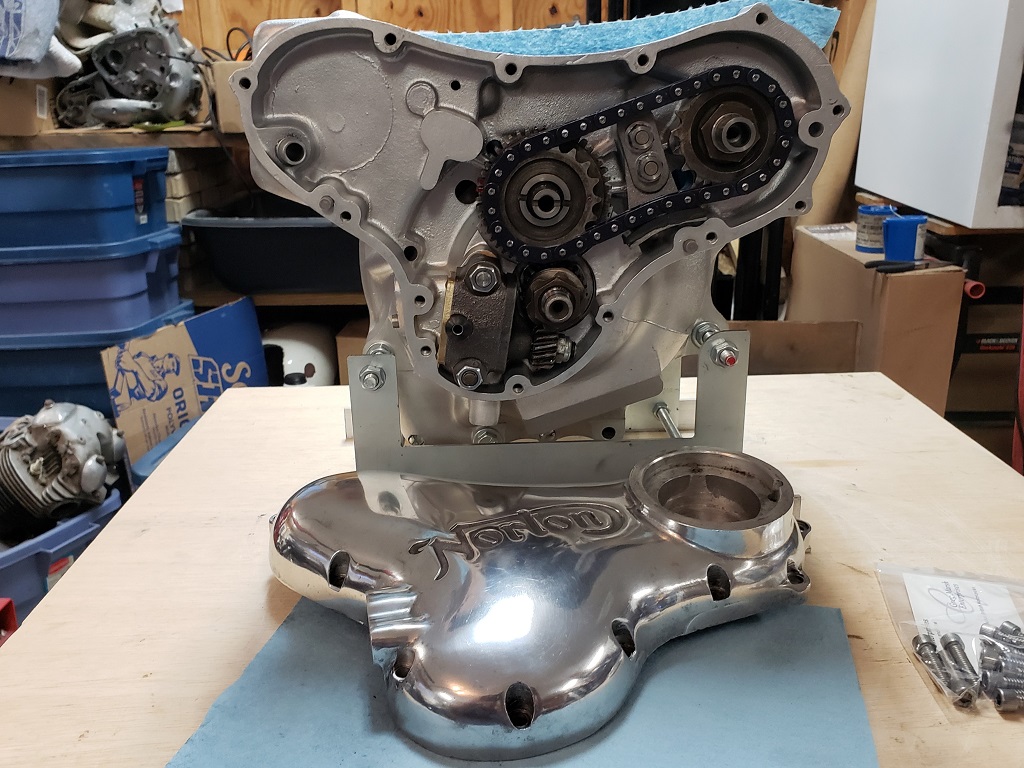
July 19, 2023 Put the timing cover on, but forgot to take a picture. Also took apart another 850 engine I have hoping to use the cylinders and head. The cylinders are functionally fine, but they have two broken fins so I'm still looking. I think the head is good, but I haven't stripped and checked it yet. (18.5 (spent 4 hours on thee other engine by that is not directly a part of this project)
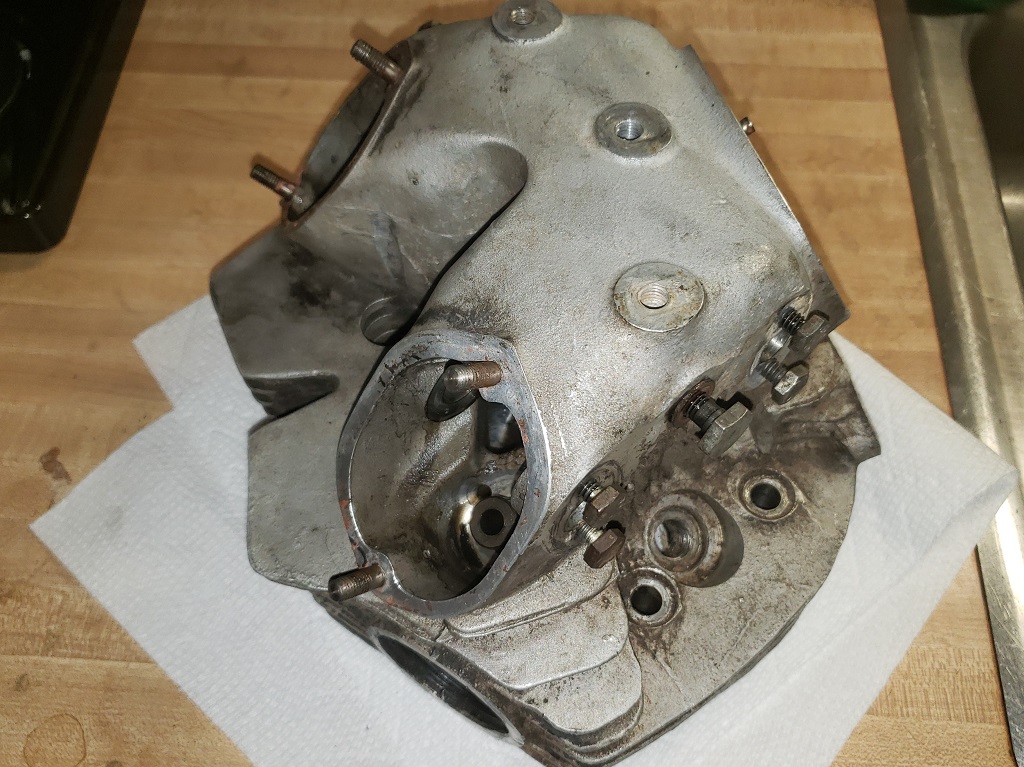
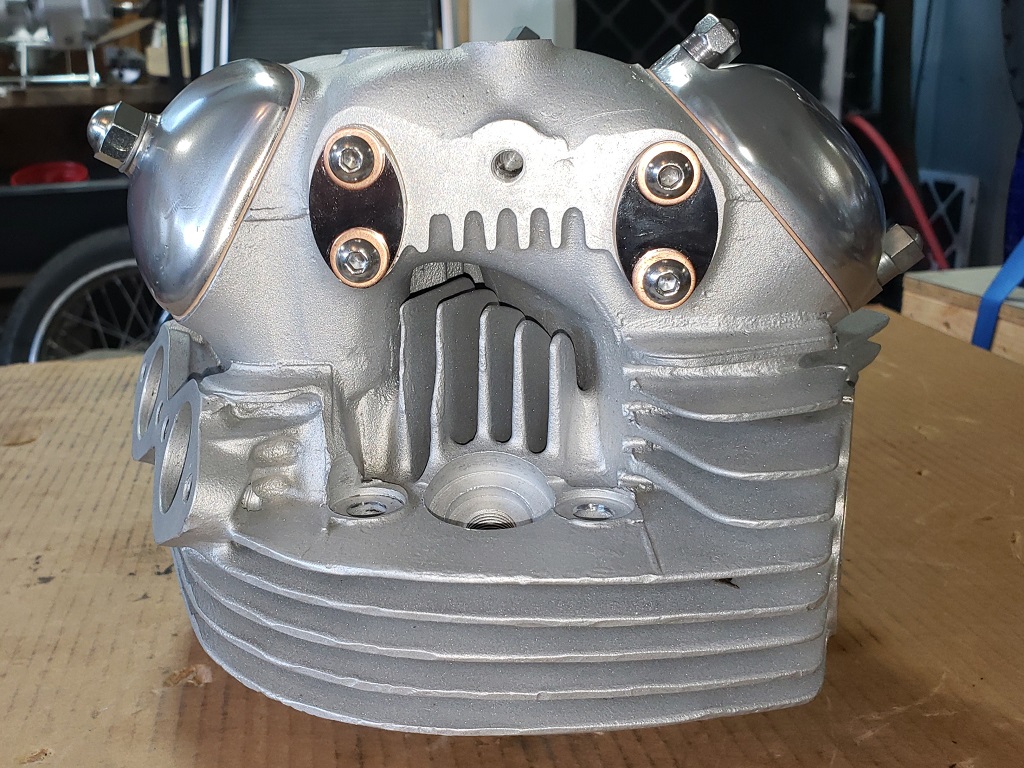
July 21, 2023 Finished striping the head. The picture shows an ugly, dirty head that even was a home to mice - it's ready for phase one of the beautification process. The next time you see it, assuming I find no problems, it won't look the same! (20 hours)
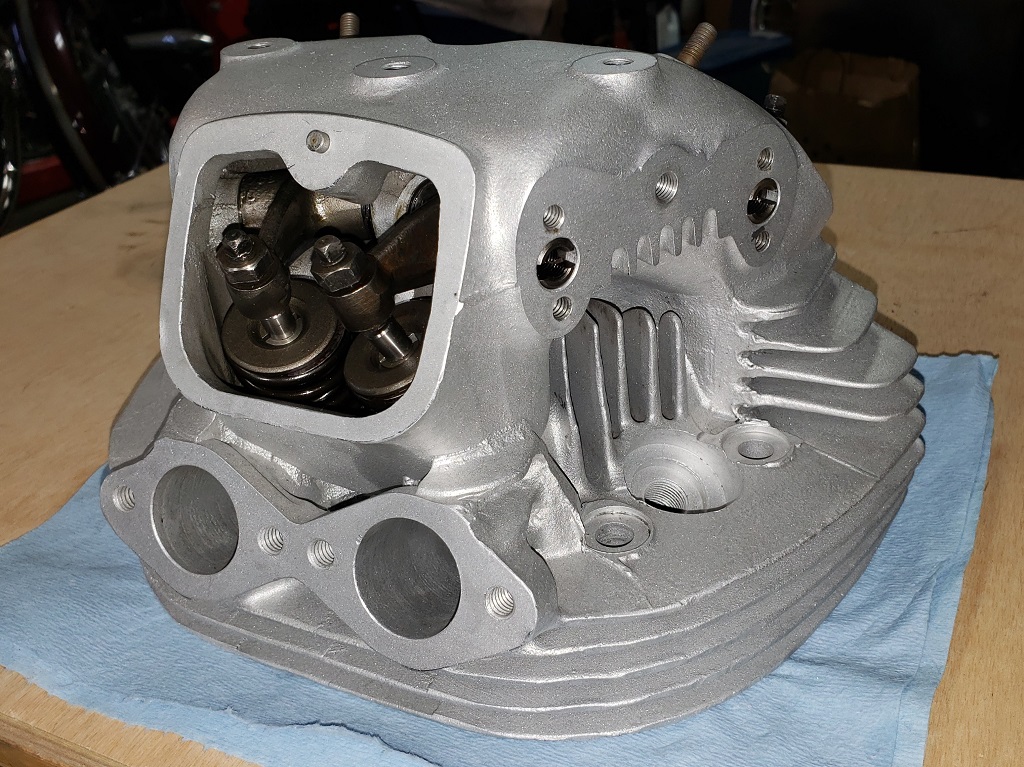
July 22, 2023 The head and gearbox shell are looking great now. I hate to let this head go - it's the least porous 850 head I've ever seen! It's ready to go back together. I'll get rid of the carbon on the valves and inspect them. Sometimes the valve that was open needs replacing - we'll see. I already checked the guides, they are fine. So, I'll lap the valves in and if need be change any that are bad. The seats look fine and as long as they lap-in and pass the leak test we'll be good. (25 hours)
July 23, 2023 Well, the head is done for now. Had to deal with some surprises which caused this job to take most of the day.
- Good: All four rockers and spindles are good - usually at least one spindle is bad and has to be replaced
- Bad: Both exhaust valves were heavily pitted on the combustion chamber side. They would have run just fine because the sealing side was fine on both, but I can't let things like that go. Fortunately, I had some lightly used valves in great shape to replace them.
- Good: The stems on the two intake and the two exhaust I had all showed no wear on the micrometer. The valve guides show only minimal wear.
- Bad: All eight valve springs measured short (worn out). Fortunately, I had a set that came with a buyout that measured perfectly. They appeared to be new.
- Good: The exhaust valves and one of the intake valves lapped in easily. The other intake was never fully lapped in by whoever did the last head service. That valve took twice as long as the other three combined,
but in the end it is perfect.
- Good: Both the light test and leak tests pass without problem.
The rocker spindle covers are uuuggglllyyy. I normally stock polished stainless versions from Wassell but they have been out of stock for a while. Supposedly British Cycle Supply has even nicer ones; but, their site it so terrible I can't get a price so I've written to them. I still have to polish the rocker covers and find polished stainless (if possible) nuts for them.
Besides the minor things, I'm now stuck looking for a set of cylinders. The set I have has two broken fins. I also need a gearbox inner cover. I have one I could use but it's on a ready to install 1971 gearbox and I at least want to use a 1974 gearbox (even though it doesn't really matter.) (31 hours)
August 3, 2023 I found a new company to bore and hone today that are more reasonable and (in theory) quicker. I'll send to them as soon as I find a set. I can finally work on the gearbox. I had everything but the inner cover - I won one on eBay at an excellent price and it arrived today. I already beautified the case, and I just cleaned and inspected the inner cover. It has the bearing installed and that is frozen solid so I have get it out, Then, I will beautify it and then I can assemble it.
August 5, 2023 Did a lot of blasting today. Since I had to do the inner cover for this gearbox, I collected up all various cases for projects I'm working on and upcoming ones to. Everything gets washed, then blasted clean with GA #75, and washed again. Then every speck of GA #75 is removed from the cabinet and it's loaded with #8 bears. When blasted with beads at lower pressure, the cases go from weird looking to new looking and the metal is closed up (peened). Now all the parts must be cleaned until every last beads is gone. Since I put a screw in every threaded hole, after two complete cleanings they will be close. Then I'll removed all those screws and clean each part over and over in the stainless sink until I can feel no beads on the bottom of the sink. (32 hours (inner cover time).
August 6, 2023 The Good, the Bad, and the Brain Fart!
In the movie, the Good and the Ugly worked together when not trying to kill each other. Today, the Brain Fart ended up being the Good! I've been looking for a set of 850 cylinders for this bike every day. Look at the first picture above! I even wrote up that they need bored! I do need a set of cylinders but that's for a bike I'm working on in between getting parts for this one and waiting for the cylinders to come back for the other one I'm working on. I guess juggling three at once is not good!
The Brain Fart also ended up being the Bad! Started assembling the gearbox. Bearings went in fine. Gear change quadrant and cam plate cleaned and inspected - they are in excellent shape. OK, time in install the sleeve gear - oops! Don't have one with the gearbox but I do have a new on that I got at a good price. OK, check everything. Main shaft: bent! This is going the wrong way. Layshaft: Excellent. Gears: Excellent, Miscellaneous: Good or being replaced. Kickstart: Don't have one with the gearbox but I do have a NOS one from a guy I bought out. I do have a complete gearbox. Can't find any of it at reasonable prices and hate to pay new prices. I do have another complete gearbox I can check - would rather do that and keep looking for good parts. Two years ago I found three perfect NOS main shafts for $100 - maybe I will again.
I wrote all that while taking a break. When I went back to the shop the first thing I saw was a second plastic shoe box marked Norton Gearbox Parts. Main shaft: Yes and a good one at that. So, back in business. The sleeve gear would not slip properly into the bearing - common problem - those SHOULD NOT be forced home. This is a case where I wish I had a lathe. Chuck it up, use some emery while spinning - 5 minutes and your done. Instead was two hours with 400-grit wet and dry. It now slips most of the way in and some light convincing gets it home - perfect! Next I realized I don't know what sprocket the buyer wants and it is much easier to put it on without the main shaft installed so I spend the rest of the time cleansing and getting things ready to go together. (36 hours)
August 7, 2023 The buyer decided on a 21 tooth sprocket so I've ordered one and will wait for that. In the meantime - STILL no communications from the shop boring the cylinders!
August 10, 2023 The cylinder are finally on their way back for the other bike. When my crate gets here, I'll pack the cylinders for this bike and sent them off - but not to those guys! I've had recommendations for a couple more that promise two week or less turn around. the AN order may arrive tomorrow - they didn't get me tracking. Once I get it I can finish the gearbox and as soon as we have a cooler day, I'll go in the attic and find a cradle so I can get that done.
August 12, 2023 Surprise! Surprise! The Andover Norton order that was scheduled to arrive Monday arrived this afternoon! So, I was able to put the gearbox together other than the outer cover. All three of the lockrings I have for the clutch mechanism were removed last by gorillas. Naturally, I don't have a new one. I'll have to see if I can clean up so the proper tool will work with it - they do thread in OK. (39 hours)
August 13, 2023 The gearbox should have been done today - it isn't :-( I got all the parts for the outer cover in one place, cleaned, and inspected. That included going through all my outer gearbox covers that were not on a gearbox. Found a ugly one with minimal dings and scratches. Cleaned, blasted, sanded, and polished - looking good! Needed to stick it on to mark the clutch cable location so I could finish the clutch actuator. It would not go on - it was hitting the kickstart return spring. That's when I realized that it's not a Commando gearbox outer cover, it's an earlier Norton gearbox outer cover! None of the other loose covers I have are usable on a decent looking bike. I have a few complete gearboxes - I'll have a look at them, too frustrated today! (42 hours)
August 27, 2023 Been trying to finish the other bike, but I had a stud pull out of the head, a machine shop supposedly fix it, but they got all three studs in crooked so the head cannot be installed. Trying to resolve that. Have the cylinders for this one ready to go but I don't want to send to the same people that took 11 weeks to get the last one back, so I got more recommendations - none of them will call or write me back! I understand having too much work but I don't understand not communicating!
August 30, 2023 Bought a 73 850 assuming that the seller finds/gets the title. I have no room for it so I'll break it down right away. It has low mileage but has sat indoors for about 20 years. I'm hoping the cylinders are in good shape and well within tolerance so I don't have to have them bored.
September 3, 2023 Still trying to get someone to bore and hone the cylinders, but now I have a solution. I have a basket case 850 (where I got the head from. I inspected the cylinders today and was shocked to find that they are standard bore with NO taper. I started a thread on it today on Access Norton. Long story short, I have a good set of cylinders that I can blast, paint and after a quick hone and cleanup install!
See the head stud study I did here. That problem is resolved for this head and I've also installed the other parts I received. Of course, the rocker covers are just on finger tight since I'll need to adjust the valves once the head goes on. They are not perfectly polished but they started out REALLY ugly and now they are nice. (47 hours)
September 4, 2023 Next, minor, problem. I generally stock standard, 20, and 40 over pistons for both 750s and 850s. The standard size for 850s has been out of stock for a few months and I don't have any. I just checked and they are due in this week so assuming that happens, no problem, the cylinders aren't ready to go on yet anyway. I wanted to check the skirt clearance before painting them to see how much if any honing I need to do but I can do that with them painted.
September 13, 2023 I was informed today that the piston sets are back in stock. Placed the order right away - they may get here Friday but probably Monday.
So, I figured I best get the cylinders ready.Put them in the blast cabinet and within minutes I knew I was going nowhere! I forget that last I was finishing crankcases and I had beads loaded. No problem, put in some glass abrasive (I knew I was out of garnet). Guess what, I am out of glass abrasive too! I just ordered some of each so that will slow me down!
September 17, 2023 The blast media arrived late yesterday. On the recommendation of the "expert" I get my media from, course garnet would do the best job. Today, I cleaned out the beads and put in the garnet and started blasting. I was doing better but not great. So, I installed a new jet and a new nozzle - still removing the paint like molasses in winter. I've used fine garnet in the past and it cut very well. I think my setup is not powerful enough for the course garnet (even though I have $6000 in it). So, I cleaned out the garnet and put in my old faithful GA #75.
OK, now we're getting somewhere. I quickly realized that the idiot who painted them last, did not remove the original paint, did not remove the rust and most importantly left chunks of grease and grime and then to make it really hard, used epoxy paint. Blasting will not remove grease! To make a long, back breaking story short, after almost 4 hours I had them mostly looking like cast iron. Now I must wash them in very hot water to get the grease and grime off, then blast again which should be quick, and then do the final very hot water wash followed by quickly going in a hot oven to dry - prevents rust. Then, finally, I can mask and paint them. The whole process including painting is usually 2.5-3.5 hours! (50.5 hours)
September 18, 2023 Today was one of those days when I was on the phone a LOT. I would be helping someone, and the phone would be ringing with another call so I didn't get done all I wanted. Also, UPS was supposed to deliver today and didn't. I finished getting the cylinders completely clean and masked. That also took longer than expected. It's hard to see between the fins while in the blast cabinet and every time I would take them out, I saw another spot. All good now. (52 Hours).
September 19, 2023 The cylinders are painted. I do four light coats upside down and four light coats right side up, check with a flashlight In between the fins for coverage. I wait six minutes between coats (all coats must be done in 60 minutes). I use VHT Gloss Barrel Paint. This paint will be ready to handle tomorrow and cured in seven days. Since it contains ceramic, once the engine runs, the paint will become even stronger. In the meantime, the inevitable little chips that come from handing and shipping are easily fixed with a small brush and the leftovers from the rattle can.
Thursday, I'll give the cylinders one more soap and water wash to be sure the cylinder walls and tappet tunnels have no embedded media followed immediately by a WD40 wipe down. Then the cylinders and head can go on the engine. The cylinders are a gloss deep black - the pictures never do them justice. (53 hours)
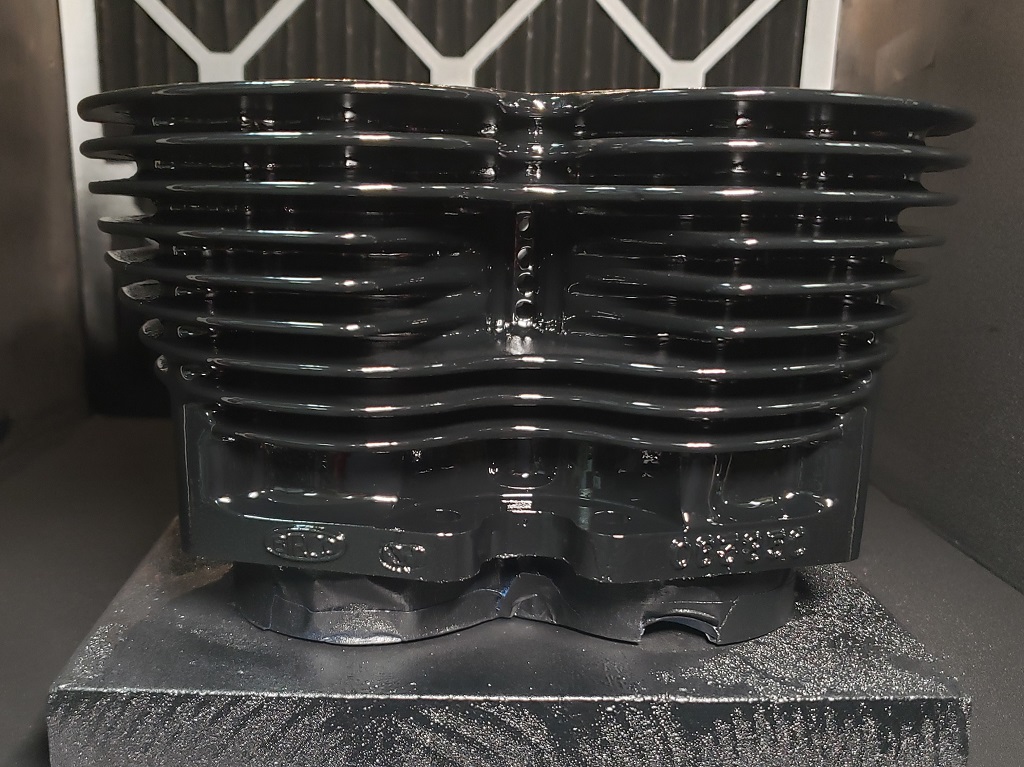
September 20, 2023 Unmasked the cylinders and inspected them under a strong light. I found a couple of spots deep within the center of the cylinders that didn't get coated (not uncommon) and touched them up. Next up is washing them as I described before and then installing - I need to check if I have the cylinder base studs, washers, and nuts in good shape. I definitely have the through Allen bolts - I've already tested those and the other threads in the crankcase. (54 hours)
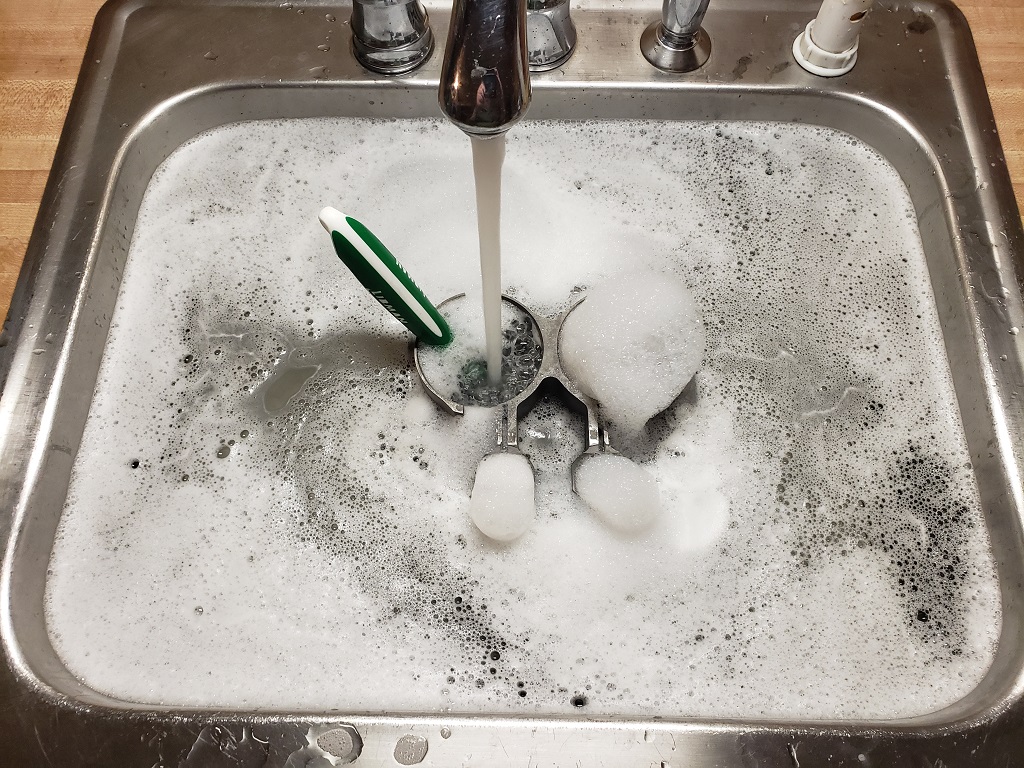
September 21, 2023 If you have a wife or significant other, this is were you show them how lucky they are to have you instead of me! Yes, that's the kitchen sink. This is the last water change - next drying and WD40 (of course, in the kitchen - it's dark outside! Any wonder I'm alone in the world? (56 hours)
September 22, 2023 Checked/cleaned all holes (threaded and not) in the cylinders, slightly countersunk the threaded holes and then checked the cylinders for flatness on the surface plate - all good. Resurfaced the tappets - they didn't need much - and installed them. Re-checked the crankcase threaded holes and installed the studs with blue Loctite. Then rigged the cylinders for lifting. They and the head may go on tomorrow - I have a morning commitment that I can't get out of (wish I could) and I don't know when it will be over - hoping for early afternoon. (60 hours)
September 23, The cylinders are on. The head will go on as soon as I find out where the black hole put my box of good pushrods! I just checked, cleaned and bagged them about two weeks ago - now I can't find them :-( (63 hours)
September 24, 2023 Found them - they were in a weird place - where they belonged! The cylinders are installed but the head is just sitting there. I realized once I found the pushrods that I only have ugly head bolts. Everyone is out of them in stainless so I ordered standard ones from Andover Norton today. (66 hours)
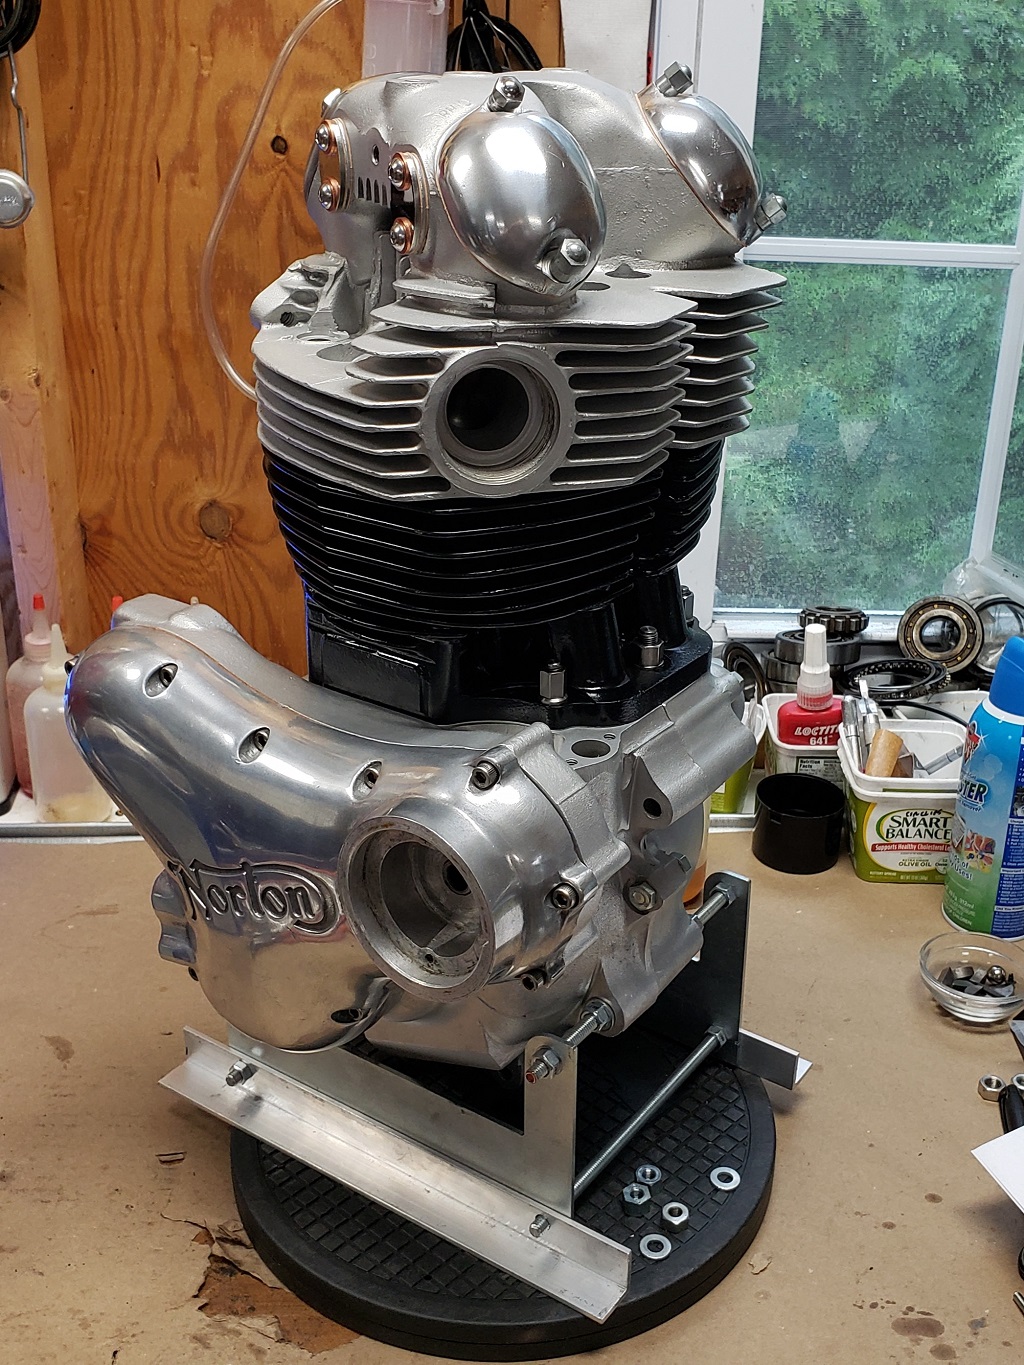
September 30, 2023 My parts orders arrived yesterday. Long day checking in the parts and sorting out what I need for each project. Then I decided no matter what I was going to get two heads on today. Once I started in this one, I decided to finish the engine - which I did. The head is on and torqued, the valves are adjusted, and most holes are plugged. The head steady and rocker feed holes will be needed to move the engine and during crating. I need a cradle for this one and for another, so I'll blast and paint them soon. I already blasted all the head steadies I have - just need to powder coat them. The gearbox for this one still needs an outer cover - just haven't gotten to it. Now for some bad news. The project I was working on before starting this one has been a PITA but the head is back and installed so I can finish that bike. That's my number one priority now. I need it finished and gone - I can barely move for all the bikes. Right after that, I have another one I have to finish
and get rid of. As it stands right now, I have nowhere to build crates. So, expect some delay until the next update. (70 hours)
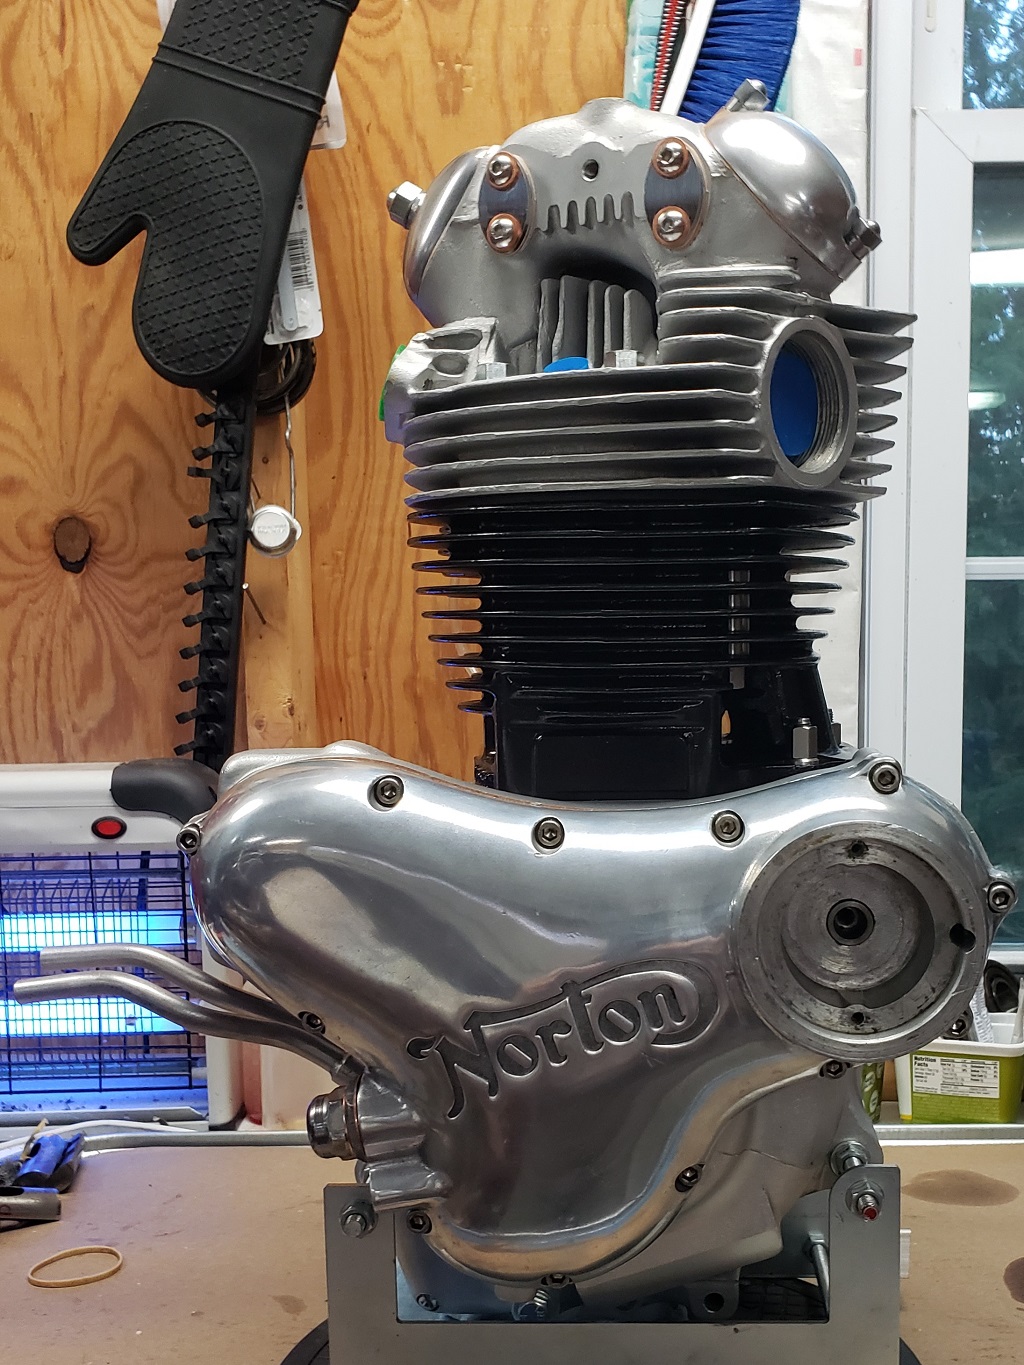
October 29, 2023 I'm in outer gearbox cover hell! When I last wrote, I was looking for one. Before that I polished one and then realized that it is not for a Commando. I've ordered and returned two since then.
Te frames going to Norway are finally crated and waiting for the truck.
The high priority bike, is still here. Something happened to the throttle cable and wiring when the tank went on (I had a helper). The engine started easily and sounded great but wouln't go below 3000 rpm. While looking into that, the fuse holder and master switch started smoking! I haven't had time to look into that yet.
Today, I took the outer gearbox covers from the two basket cases I have. One had something wrong with the kickstart shaft and that hole is damaged beyond use. The other is so cut up that I can't stand to use it. I have an engine and gearbox coming - hopefully that outer cover will be good.
November 2, 2023 I decided to use the inner and outer covers from the donor as a pair on a different gearbox since this gearbox already has an installed and tested inner cover. I have two more outer covers on the way - hopefully both good!
November 9, 2023 I have finally received two outer gearbox covers in OK conditions. I will clean them up and make sure they are good before assembling the inside. I also identified a good outer primary cover that just needs some time at the buffer. Finally, the Engine/Gearbox going to France is enough together that I could check some thing for making the crates. That set has no cylinders but does have the head. It has a Seely cradle so the mounting to the crate will be different, but the crate will be about 24" long, 16: deep, and the height is to be determined.
December 3, 2023 It probably seems like I have forgotten this but I haven't! The big crate has been gone since early November, and the second one is awaiting pickup. I spent the last two days rearranging and cleaning up from that project (I'm pretty slow these days). I hope to have high-priority bikes done this week. Then there's the other bike that wasn't a priority but he wants to go on a New Year's day ride so I need to finish it - should be quick. Then this will be the priority to finish. I'm pretty sure I have everything to finish it.
January 5, 2024 I'm finally back on this. Went through the gearbox outer covers I bought. One had great internals and terrible scratches. Another has a nice external and terrible internals. So, took them both apart and started polishing and will use the internals of the first. I hope to finish the gearbox tomorrow
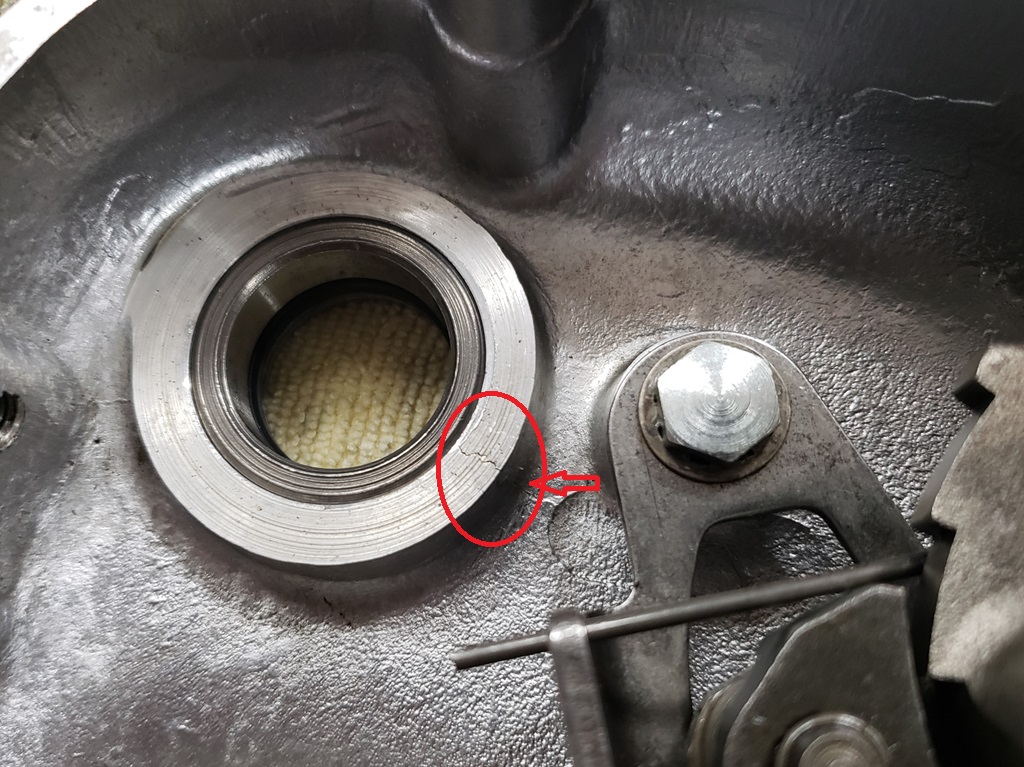
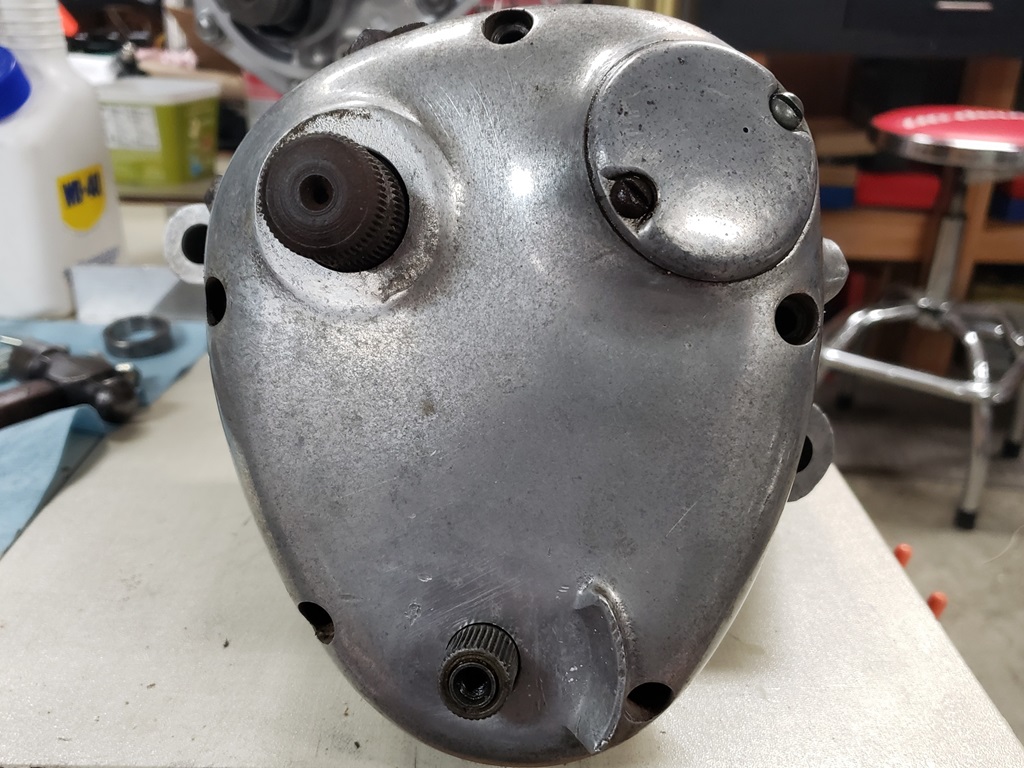
January 6, 2024 Maybe the third time will be the charm! First is was a already polished cover that I discovers was for a pre-Commando after getting it ready. Then the one I finished today - as I was getting it ready, I noticed that the kickstart bushing was missing. OK, the polished one had a new bushing - use that. Well, it just slipped in - supposed to be a shrink fit. On careful examination, someone in the past hammered a bushing in - you can see the marks where it wasn't going in straight and looking even closer, I saw the crack shown in the first picture. It does not go all the way through to the outside, it stops where the red arrow points. There's no doubt that with some bearing fit it would work, but for how long, and I don't do things like that! So, now I had an issue. The other covers are terrible so I started looking through the basket case boxes and found the compete gearbox in the second picture. That was from a bike who's parts sat in a farm barn on the ground in a
box. It took me FOREVER to get the five screws out - they were extremely rusted and full of dirt. Then some a-hole glue it on - I wasn't sure I would ever get it off without damage but I finally did. You can see from the picture that it doesn't have a lot of scratches or dings, but it has plenty of black corrosion. I spent a long time at the buffer getting it to look good. So now, just like yesterday, I hope to finish the gearbox tomorrow!
January 7, 2024 Maybe a jinx, maybe a ghost, maybe I'm a big dummy, maybe fate is paying me back for something but one thing's for sure, I'm not ending writing today with what I ended with the last two days!
The outer cover in the last picture is now pretty and I put it on. Was a little difficult to get on but they sometimes are. Before torquing it down, I went to check that all gears worked - could barely turn the sprocket - weird! Played with it a while and then took the outer cover off and everything turned fine and all gears selected fine - double weird! Then I noticed the kickstart bobbing up and down as I turned - bent layshaft! I've had plenty of bent mainshafts so I thoroughly check them for straightness before assembling. I've had bad layshafts but this is the first bent one - I always inspect them, but not for straightness - I will from now on! So, I went through my stash. Found one that looked really good, was not bent but when I checked it in the kickstart, it was loose - turned out to have .010 wear - in other words, trash. The next one would have worked but the splines had a LOT of miles on them. Then found another complete with all it's gears. One gear had a lightly
chipped tooth and I didn't like the looks of the
1st gear bush so I mixed and matched and made a nice set. This layshaft fit perfectly in the kickstart but still had a ball bearing attached. Getting it off was a pain but a bigger pain was getting the inner race from the new roller bearing off without damaging it. Finally accomplished both and put the gearbox back together up to where is was yesterday. Just need t put the outer cover on again and test.
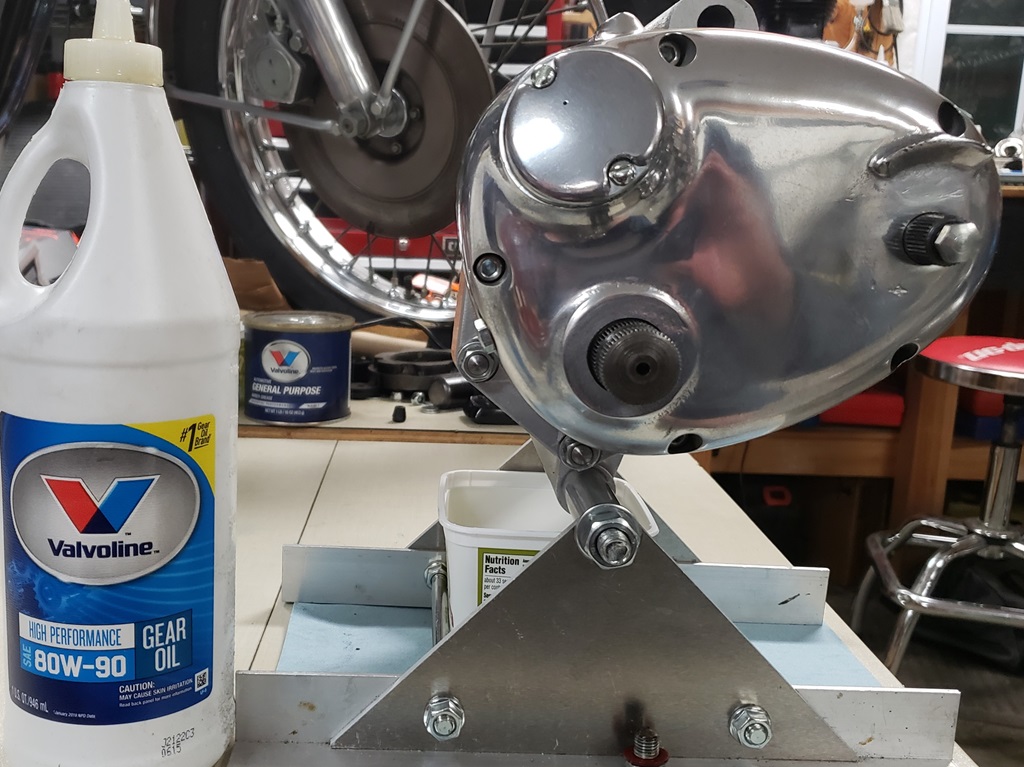
January 8, 2024 Finally! The gearbox is done. It was built with the gear oil shown. Then a few ounces were added and it was turned every which way and the mainshaft turned in every gear. Finally here, it's being drained. I just wanted everything well coated in oil but it must be drained for shipment.
The owner confirmed that he wants me to ship it using UPS. So, I have to figure how to crate at less than 150 pounds. Once I have all components together I'll weigh everything and figure out how to do that. The engine is right at 100 pounds. I may experiment with plywood lined cardboard boxes (probably two) rather than wooden crates. The wooden crate that went to France was almost 150 pounds without pistons, cylinders, or a head and it has a Seely aluminum cradle and a belt drive. I imagine that this will total over 200 pounds so it clearly must be split.
January 13, 2024 Last I said that the gearbox was finally done. Well it's not. Before taking it off the stand I wanted to be sure the oil was out and I did a final re-check of the gear changing, which was all fine but I was hearing a noise I didn't expect. To be sure I wasn't going crazy, I checked other gearboxes and there was no such noise. So, I took it apart and have spent MANY hours over the last three days. It is making no sense. If I leave out everything but the sleeve gear, mainshaft, and layshaft with 4th and 3rd the noise is there. I've changed the layshaft and both gears to ones from another gearbox and the noise remains. The two bearings and the sleeve gear are new. I tried a layshaft with no gears just the inner race and can detect no noise. I can spin the sleeve gear and there is not noise. So, I've tried everything but a another sleeve gear - that's next. It's a PITA since the sprocket is already one a torqued but I have no choice. If this doesn't work, I'll
probably switch to a different box.
Jan 25, 2024 the gearbox hell continued to today. I've been trying to figure this out almost every day. I have taken it apart and put it together over 40 times trying different things. Norton gearboxes are easy - what the hell!
Yesterday I took a good gearbox for a matching numbers bike apart and put all its parts in this shell - the noise continued. That was the final straw. The shell is bad even though it looks perfect. So I cleaned up another shell and put the parts I had originally in the bad shell in the new one and it is fine! I would have done that sooner, but since the engine is an 850 and it's been know since the beginning that the engine and gearbox would not match, I chose that shell because it cam from an early 850. The only other one I have that was originally with an 850 is the matching numbers one I mentioned - can't use that. So, the shell I'm using now is from a 1972 750. That gearbox matches Combat engine I have so I want to save it for an export (it has not title). If I don't find a shell to use soon, I'll just use it. It makes no actual difference - it's just not what I wanted to do.
February 1, 2024 Well, it may have been the final straw but I couldn;t let it go. I finally realized the bushings for the camplate and shift quadrant had been replaced, were too long, and were inserted too far. This was causing the shift forks to push on the gears and not letting them move 100% into place. After I correct that, I put it all back together, filled with gear oil and it was quiet. But, with all the switching of parts, I ended up with a slightly bent mainshaft or layshaft. The gearbox would work fine, but I don't work like that. I have checked all the shafts I have on my surface plate with feelers gages and discarded all I found bad but this is not the best check. So, I'm sending all to a friend with a lathe who can put them between centers and check them with a dial indicator. At lease I know I'll be able to assemble it one final time once I have for sure straight shafts. I REALLY wish I had room for lathe and mill!!! I've worked on the gearbox everyday until yesterday!
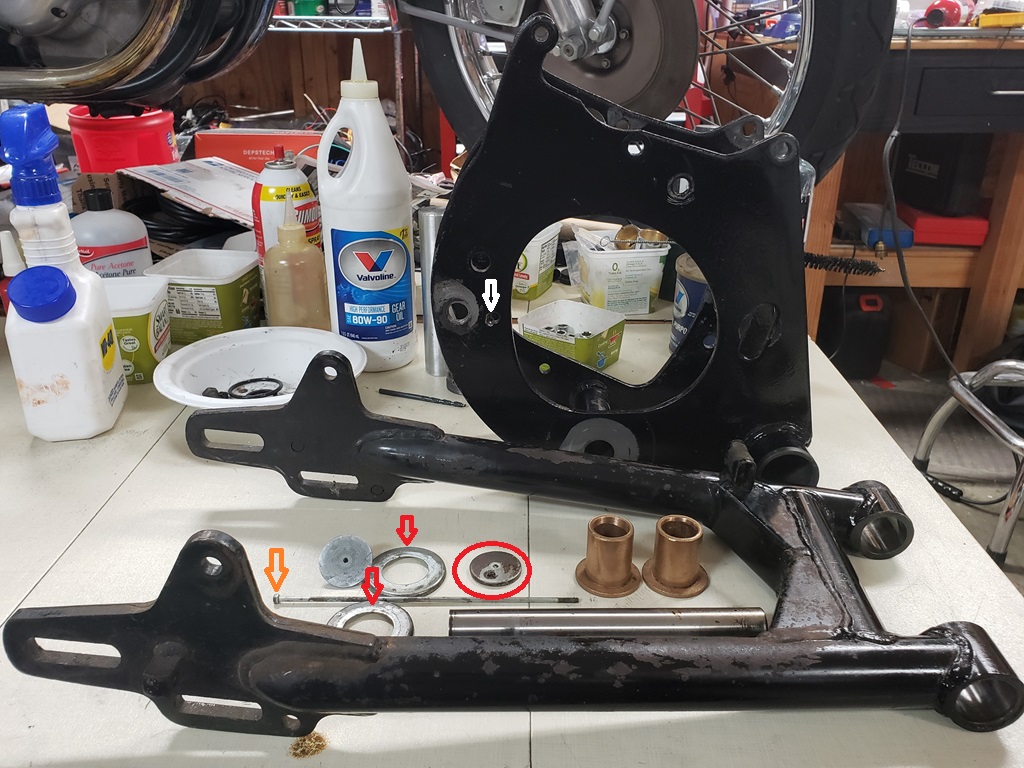
Today I started on the cradle and swingarm. I selected the best 850-style set I had and started disassembly. I was immediately worried. It was full of grease instead of 140W oil. I expected the worse. Fortunately it came apart without much drama. The spindle has some rust, but the working areas are fine and the fit in the cradle is excellent - I would reuse it. The edge of bushings collapsed slightly as the often do when pressing them out but I dressed the ridge and they fit the spindle very well, so I would reuse them. the o-Rings are hard, so they need to be replaced. The o-Ring cups (red arrows) are mechanically fine but ugly, I would replace them. The through bolt is usable but the hex end is rusty - I would replace it. the timing side end place (red circle) is ugly, but I found and will include a decent looking one - it's not new but no rust and has a good oil nipple. The cradle overall is in excellent shape. The pivot holes for the center stand are good. I've cleaned it up so I can blast and paint it. I often weld the are where the center stand rests when up, but there is so little wrong there I won't on this one. The hole (white arrow) for the center stand spring would be fine but it is a little wallowed out so I'll weld and re-drill that.
The swingarm has some minor rust on top and not on the bottom. It is straight and the new owner will have it powder coated so I'm leaving it alone. The rear wheel adjusters are rusty so a new set of those is needed.
February 3, 2024 Got the front ISO mount ready for power coating and then started on preparing the cradle. I'm by no means an expert welder but I was happy with myself today! I prepared the spring hole for weld, touched it once solidly with the stick and came out perfect without the need to drill! A little filing on the outside and it's done! Reinspected the bottom of the cradle. As is often the case, the cradle is precision where important and not where not. The center stand did dig into the timing side a little so I ran a bead of weld down it, filed it smooth and then filed the drive side to match (by eye). Assuming a properly made center stand, it should now bear evenly on both sides. None of this is critical, just something I prefer. I also knocked all the factory weld splatters off the cradle. My plan was to give it a quick sand blast all over, sand to feather out and chips, and paint.
It turns out that it was last re-painted with quality paint but poorly prepared for painting. About half of the paint came off very easily, and where the surface was good when painted, it was very difficult to get off. When I saw this happening, I knew it was a full blast job. It's ready for paint and that will happen tomorrow. The VHT Rollbar and Chassis paint I use must have all coats applied within an hour and if any more coats are required, you must wait a week. I normally get it done in an hour without problem.
February 4, 2024 The front ISO mount is powder coated and the cradle is painted. Once the paint is cured I'll put the ISO internals in both and mount them to the engine. Then I can see what that weighs. I need to figure out how to get under 150 pounds so I can use UPS shipping. If the engine, cradle and front ISO leave enough room for the weight of the crate we'll be golden. If not, then the engine may have to go by itself in encapsulation foam.
February 7, 2024 I've had company/help the last couple of days. The only thing I got done on this is installed the internals in the front ISO mount.
February 8, 2024 Installed the rear ISO and started planning the crating. To do that I started weighing and documenting the components.You can see the beginning results of that here.
February 14, 2024 I've been under the weather the last few days. Did get some done today. I have WAY too many bikes in the shop! I needed to get the engine hoist out so I can move this engine to the table where I'm working to figure out the shipping. In that process I'll get an exact weight of the engine. It took me over two hours to move enough around to get the engine hoist out and by then I was too worn out to actually move the engine - sucks being old!
February 15, 2025 had a steroid shot in my foot at 10am. Worked on IT until 4pm and was exhausted. Put my feet up for a few minutes and fell asleep. At about 5:30pm, Superman mode kicked and an I got to work. I'll be power up until at least Saturday afternoon and hopeful Sunday afternoon. I REALY wish steroids weren't bad - I love them but am very cautious.
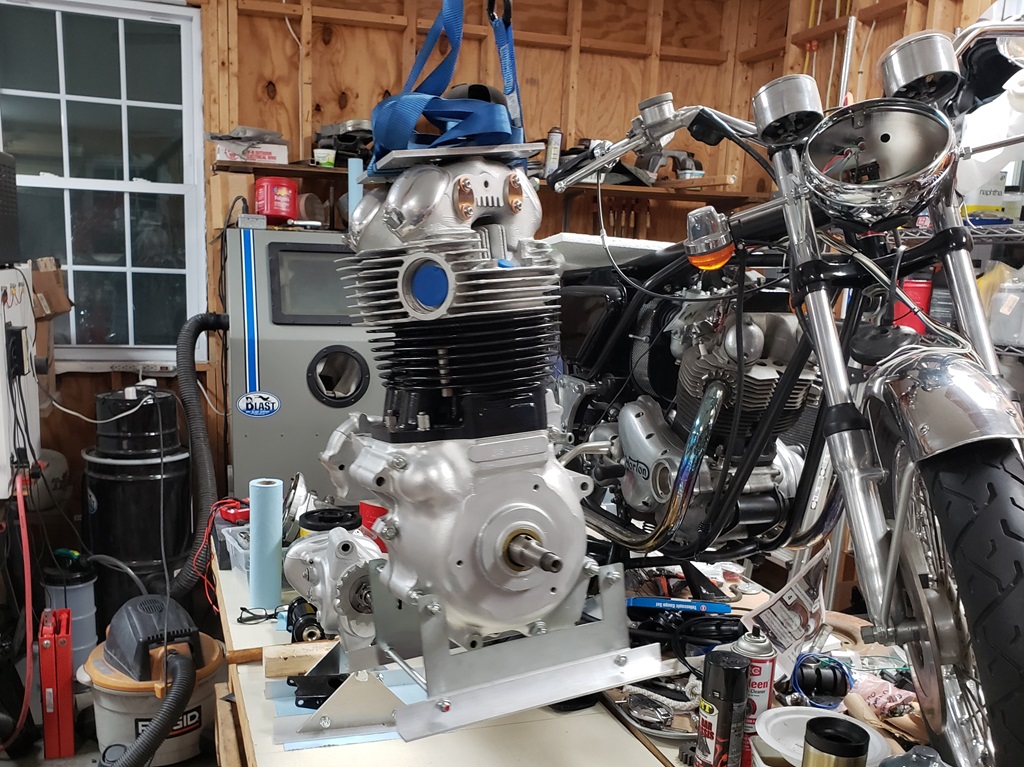
First up was rigging the engine for moving and then moving it to a big worktable. The aluminum plate screwed to the head is just a 8" x 8" x 1/4" aluminum plate I bought in the 70s. it has LOTs of holes for special purposes. Originally I mostly used it to split Triumph crankcases. These days the main uses are installing Norton cylinders, moving Norton engines, and installing Norton engines. The rigging will start attached until it is crated or boxes - I am no longer strong enough to pickup and manipulate that much weight.
Speaking of weight, the second picture shows the engine weight today. All oil has been drained, there is no sump plug or oil drain plug, and I noticed today that I forgot the tach drive. Also, the engine stand is attached. My guess is that without the stand and those three items added, it will be about 92 pounds. I'll do some more weighing once those plugs are in and the stand is off.
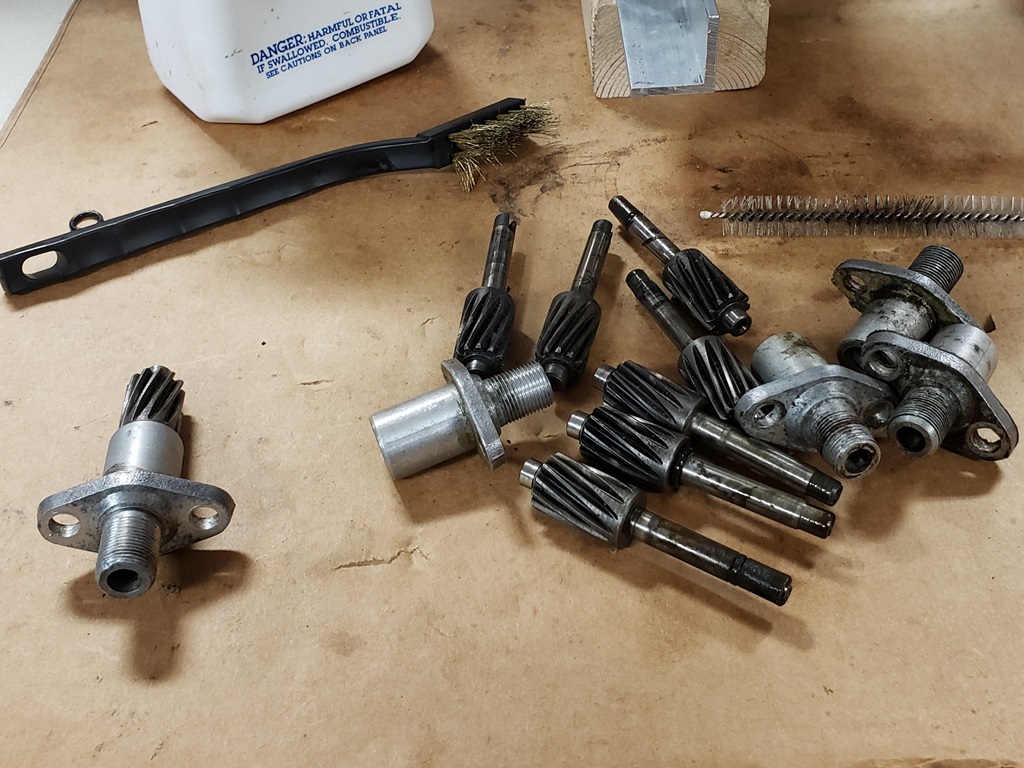
Speaking of the tach drive, the third picture shows my loose collection of them.There are three forms of housings and two forms gears. The one shown put together is now installed. The housing and shaft I selected had no play and almost no corrosion. It is the type with an o-Ring near the end of the shaft and an o-Ring in the bottom of the housing. These are unlikely to leak and I tested the threads and they are smooth.
I'm still toying with the way to ship. In a crate, the cradle needs to be installed, but the gearbox will make it too heavy (I think). The engine could go in a strong cardboard box reinforced on the bottom internally with plywood and engine encapsulated in expanding foam. Than makes a very safe transport method. Everything else should easily be under 150 pounds in a second box. The only thing holding me back on the foam method is how to hold it suspended while the bottom half of the foam takes shape. I do an experiment rigging it and using my engine hoist to hold it sideways.
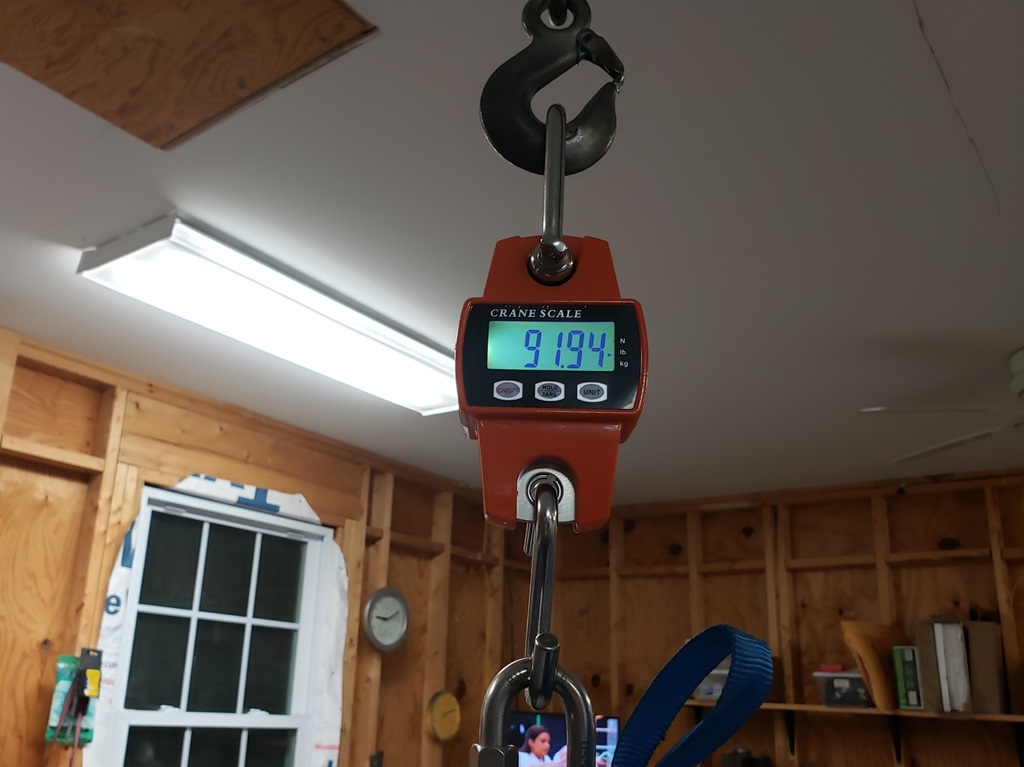
February 17, 2024 Reweighed engine with the sump plug, drain plug, and tach drive installed and the engine stand removed. Then weighed the rigging and subtracted it. That puts the engine at 88 lbs, 12 oz so for planning I'll use 89 pounds. Also weighed the gearbox, That's 11 lbs, 3 oz. So the engine, cradle, gearbox, front ISO and mounting hardware is about 117 lbs. The question now is can I build a crate at 30 pounds or less. Have 33 lbs, but want a few pounds less. If their scale is slightly different than mine it could be bad as anything over 150 pounds makes it cost about $1000 more! I may have enough pieces of wood to figure that out - going to try that now.
OK, with the engine and gearbox in the cradle and in a crate, it looks like 162 lbs so that won't work. I can put the cradle on the engine as well as the front ISO and still use a crate to make it safe. The only PITA is that you have to undo the cradle to get the gearbox in (dumb Norton engineers!). Without the gearbox, it's still right on the edge. When I shipped to France, it was a Seeley cradle(aluminum), a cNw belt drive and the rest of the primary, and no head, cylinders or pistons. That came to 142 pounds. I wish I had weighted the crate to France by itself - my figuring today came out at 42 lbs. There are some things I could do to reduce the weight of the crate bit, but I'm not sure I could lose more than 12 pounds. I will look into that. I already have about half of the crating materials but I could ignore that. The other crates all had 3/4" bottoms, 1/2" sides and tops and a full 2x3 framework. Using a combination of 2x3 and 2x2 framework and 3/8" (if I can get it) for the sides and top might get it done. I would rather not use thinner for the bottom as it takes the most weight
February 18, 2024 I bought some higher quality plywood that is more stable and a little lighter. The sheathing I used before was a PITA but was OK for outside. I'll finish this in some way to make sure it's not damaged. The shocking part is that the expensive plywood is only about 5% more than the sheathing - sheathing used to VERY inexpensive! MDF would cost a lot less but is very heavy and very prone to water damage. I have some ideas on how to build it with less framing and still be strong - need to mock it up to see if it will work for getting the engine in and out. In the last, I've made them so you took off the top and then the found sides, and then unbolted the cradle. I'm going to try to make the ends permanent and only the sides come off..
February 19. 2024 More studying on shipping. Put the cradle on to have a look. Crating is hard than with the Seeley frame, but not impossible. The base of the crate will be 24" x 15" or 16". the front ISO will require a squared-off "U" of steel as there no room to get wood next to it. The rear ISO is no issue nor is locking the head in place. I weighed again with the cradle on and some bolts for the ISO lock downs - all very close to 115 pounds. Doesn't leave a lot for the crate. I'm probable going to make just the bottom and then stack up the wood and metal for the rest and weigh. I'm also looking again for another way to ship. It sure would be nice to put it all in a 220 pound box and ship!
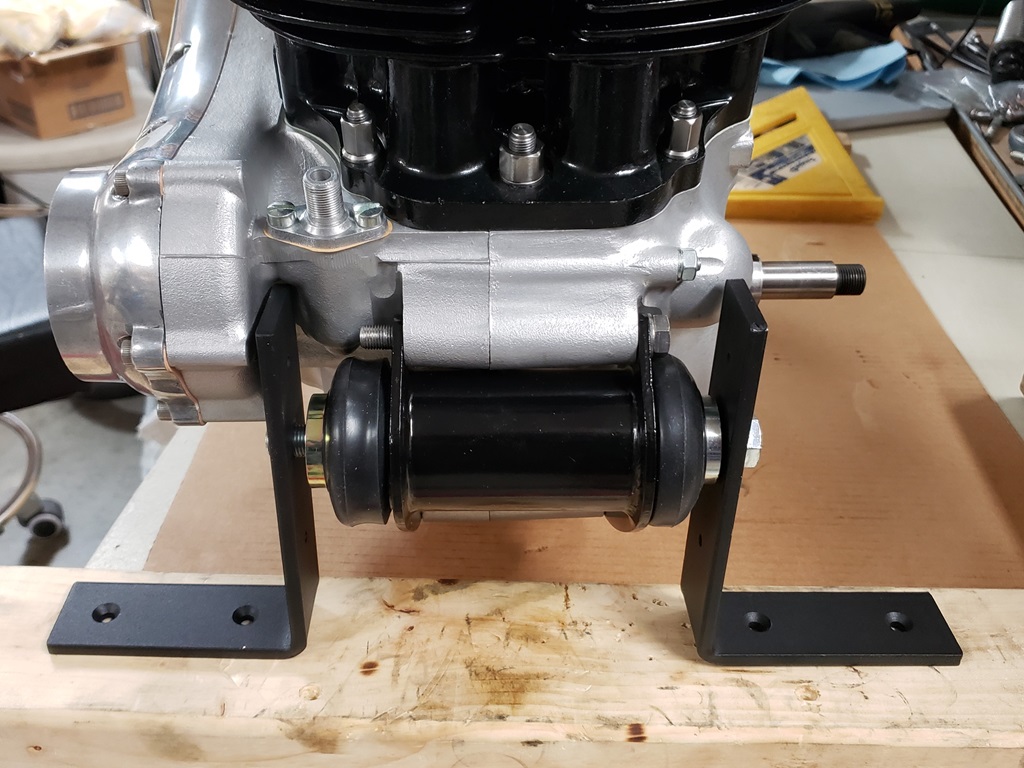
February 21, 2024 Found the two black very heavy duty shelf mounts on Amazon for much less that I could have bought the metal! I'm trying to workout whether to have a piece of 2-by under them like shown or have them mount directly to the bottom with screws through to the sliders underneath the crate. I drilled a 1/2" hole in each for the way shown and would need to cut the excess off the top. If there is no 2x4 under them, then I could just drill holes higher and not need to cut them off. Either was is overly strong, it's just a matter of working out the framing to hold the ends and sides.
I've been studying other UPS freight options when I could do the shipment in one crate. Ground (sea) which takes 20+ days is not a lot more expensive that the way I've been talking about. Full door-to-door air freight is about $600 extra so that's not a great option. I need to get this all mocked up so I can see for sure if the best UPS way is possible or not.
February 29, 2024 It feels like a conspiracy to stop me from getting this done! Made the decision with the new owner that I would crate it all together and ship fright. Got a good start on that but here are the stupid things that happened. First, the wrong length bolts, didn't buy enough blind nuts, bought one 2x2 and two 2x3s. The 2x2 was the only more or less straight one in the store. Cut the two lengths I needed and temporarily screwed one to the base so I could align the front mount - the damned thing split down the middle! Of course, if I had bought extra, that wouldn't have happened. Went back to the store - very long walk to get what I needed, got it all the register and realized I forgot my wallet at home - I never do that. I was already tired, and the walk wasted me (bad foot and two replaced hips). OK, Monday was supposed to be sunny and not very cold - rained all day. Tuesday was supposed to be 70 and sunny - rained all day. Wednesday I had a visitor. Today, back to the
store - having learn nothing! They has no 2x2s. This is why I call Home Depot, Make Do Po. OK, got the bolts, blind nuts, and figured I would rip a 2x3 down to size and I already had them. Get back to the shop and realize that the 2x3s I have are mostly warped badly. Did find a length to rip and did find four lengths out of three boards that were straight so I figured out the height on the four vertical members and cut them. Of course, I broke rule one of carpentry! All perfectly cut at 15-3/4" but were supposed to be 18-3/4". Oh well, tomorrow is another day.
Hard to believe that I had a home improvement business in the 70s and that I have rebuilt most rooms in my house - in theory, I know what I'm doing!
March 2, 2024 It rained until about 3pm today. Once it stopped I got busy and finished the crate's frame. Tomorrow is supposed to be nice - I hope so, I want to cutout the four sides and top. I'll put the engine back in the crate and figure out the rear mount, swingarm, and if I need a head mount.
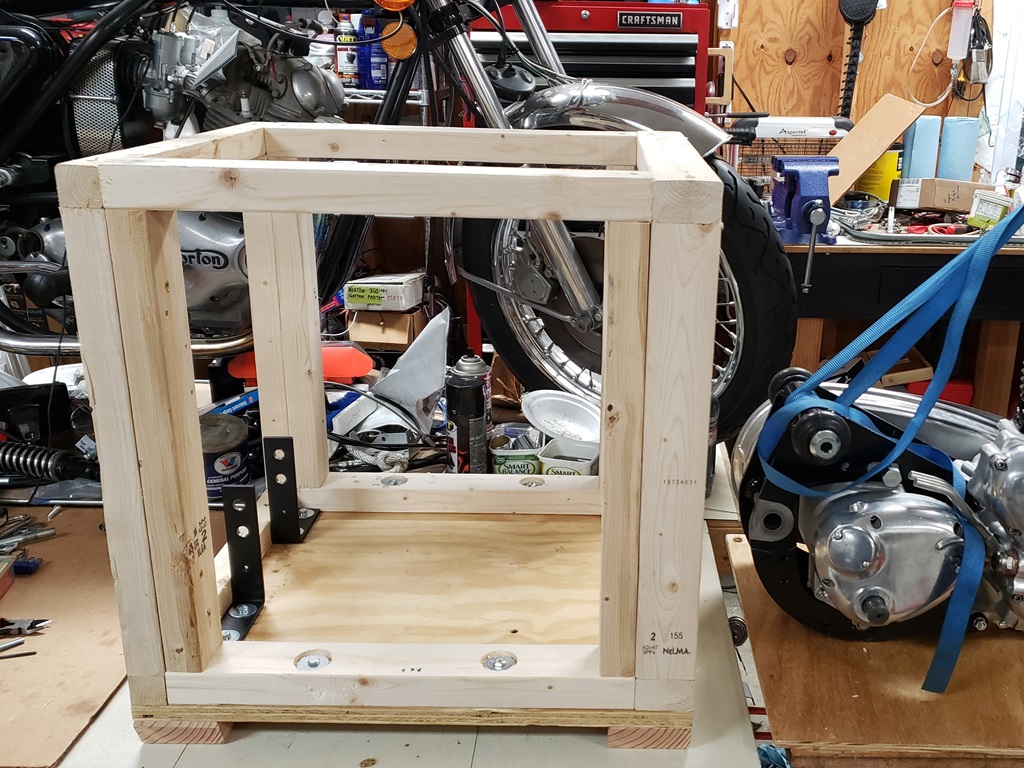
March 3, 2024 Got a lot done today. The four sides are cut out and have been partly screwed on the be sure everything is right. Then got an AN oder yesterday with a few things I needed. The gearbox adjuster and cross-head are new and installed. Also installed the inner chaincase to check for the needed shim. Since this is a 850, it needs two gaskets between the inner chaincase and engine. That's all done now but I did not bend the tabs or seal the screw as the buyer may need to remove it. Likewise the gearbox is in place but not tightened down - that needs to be done once the primary is installed - I'm only providing the chain cases. It's ready to go into the crate now and have the rear support worked out. I also need to see if I have a piece of plywood for a top since I didn't buy enough.
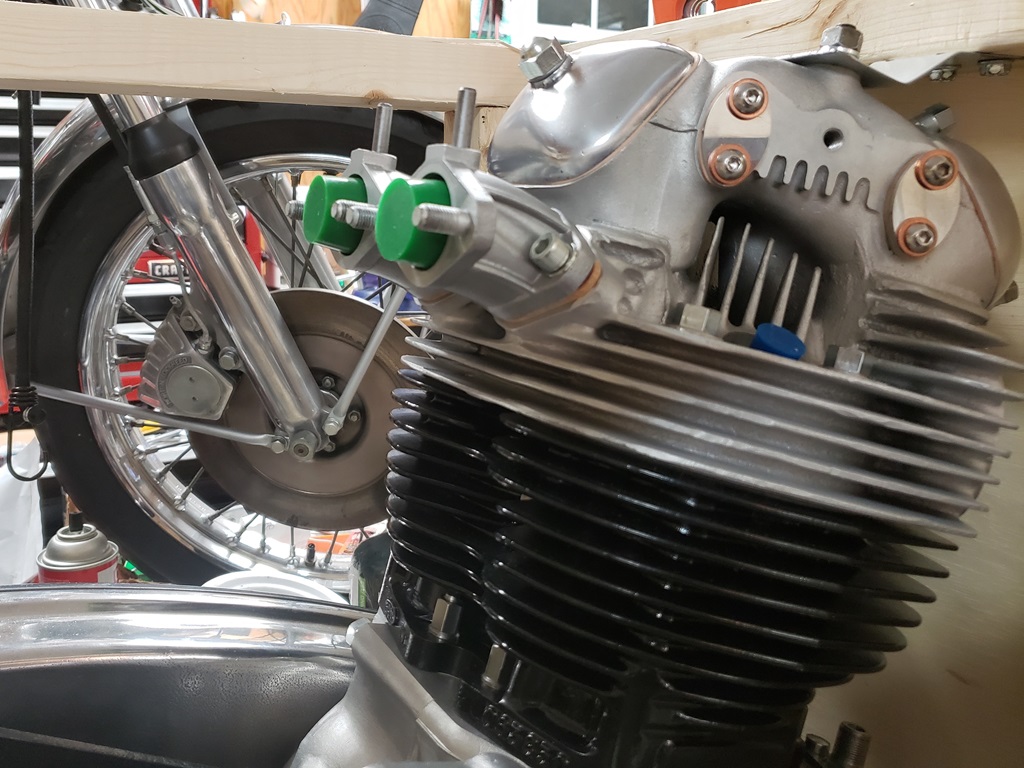
March 8, 2024 I've been plugging away at this. Made another measurement mistake that slowed me down - that's resolved. The new owner wanted a set of manifolds. I dug out the only set of 30mm x 32mm I had (ugly) and made them look pretty much new. They are lightly installed to see if they will interfere with the shelf I need to put in the open space for the box of other parts. In the picture you can also see one of the two head steadies I made for shipment. I still have to work out the rear steady - probably would get the just fine with what I have but I can't count on some a-hole along the way turning the crate on it's side or top so I'm going to lock the back down too.
March 10, 2024
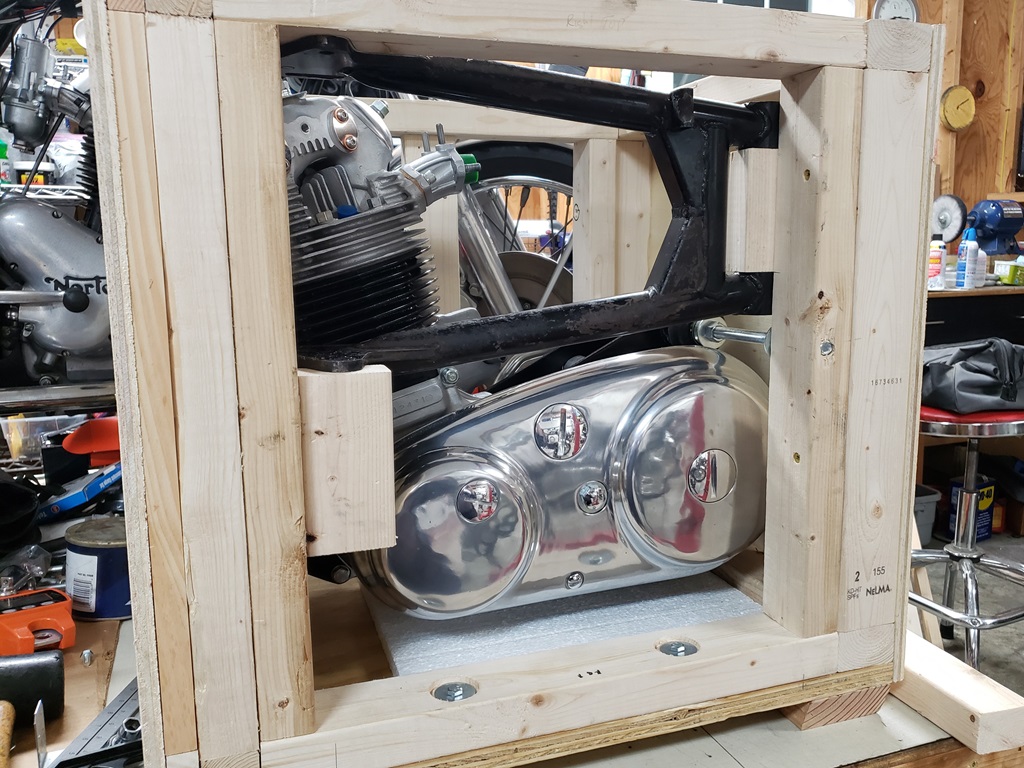
The rear mount is figured out and installed as is the swingarm mount. I may change the right side of the swingarm mount a little because it's in the way of the planned shelf for the small parts. This is quite the jigsaw and I've started on the uncrating instructions - that's why you see circled screws in the second picture. The basic uncrating is:
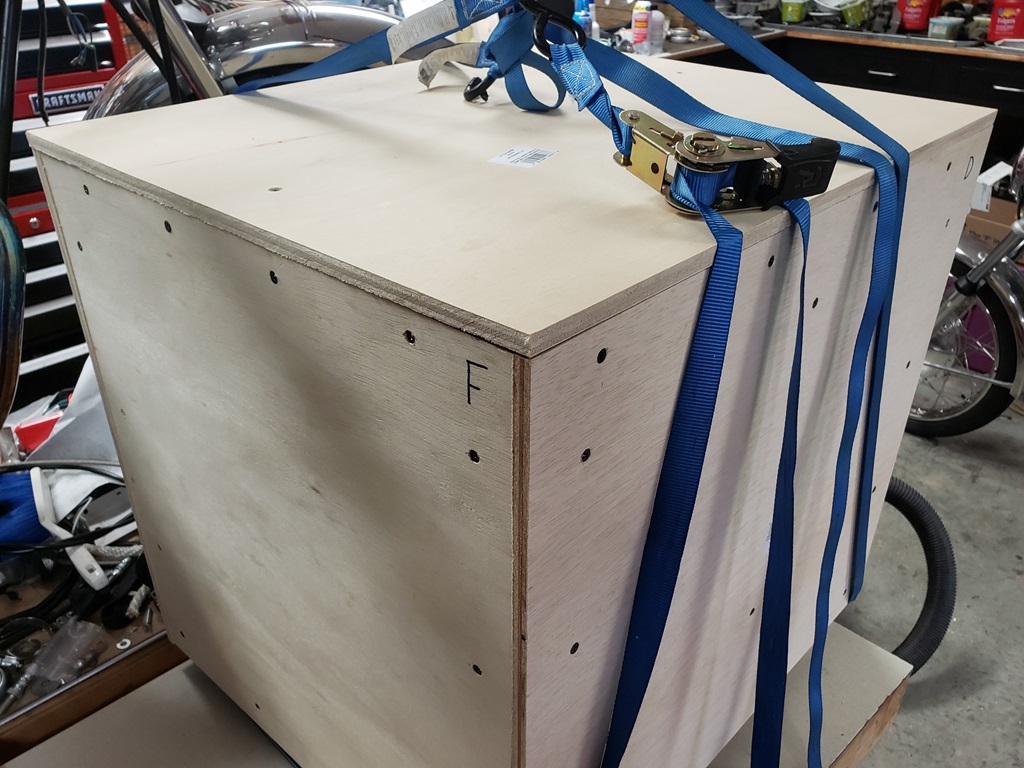
- The "front: is the engine front and the crate is marked with an "F". the back is the back of the cradle and is marked with a "B". The drive side is marked with a "D" and the cradle is mount to that side. The timing side is marked with a "T".
- Remove all black screws on the outside from all four sides and the top
- Remove all loose parts except the swingarm - leave it attached until that side is removed.
- Remove the shelf (if I add one) and the supports.
- Remove the four hex bolts and the 8 black screws near them pointing downward.
- Be careful - the back side will easily fall of in the next step.
- Removed all circled screws. There are four screws holding the frame down on the front side and the four on the back side - I forgot to circle them but may take the ends off and do it.
- Remove the two nuts on the head and lift off the front side.
- The two sides will require wiggling and maybe slightly lifting the rear of the cradle to get them off the threaded rod through the rear ISO. The four nuts on that rod have been secured with blue Loctite.
- At this point, the engine is just held in place by the front ISO bolt (a genuine Norton front ISO bolt.
There is actually a lot of space for other parts - especially if just wrapped and packed into the free space. I would prefer everything to be locked in place but might pack some things loose with a lot of padding.
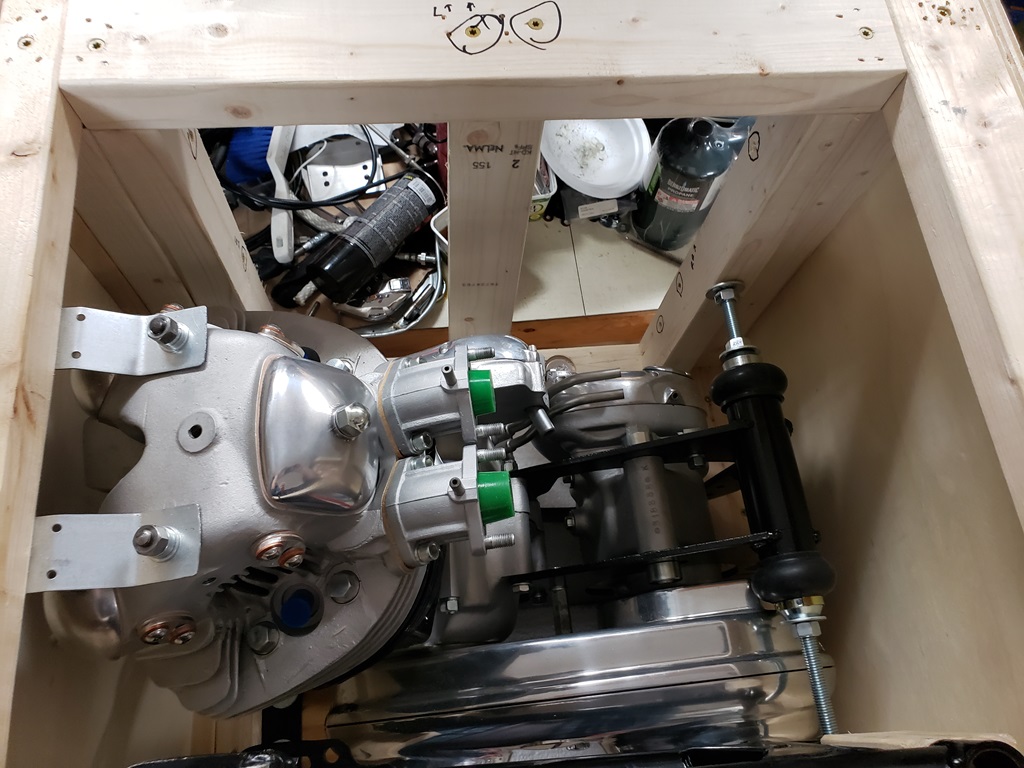
March 12, 2024 Happy Birthday to me! Hard to believe I'm 74 :-(
March 15, 2024 The crate is built and packed. It only needs two sides and a top. Notice the red arrow in the second picture. A bit to match the inside screws is taped there. The black screws are Phillips and the rest are special.
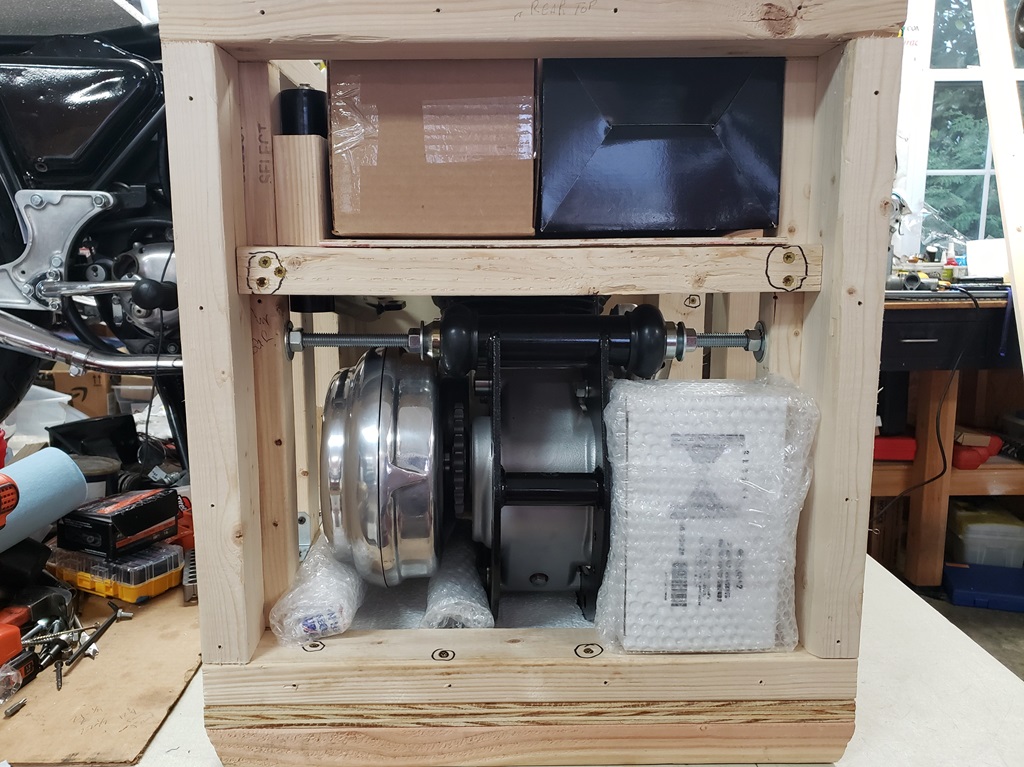
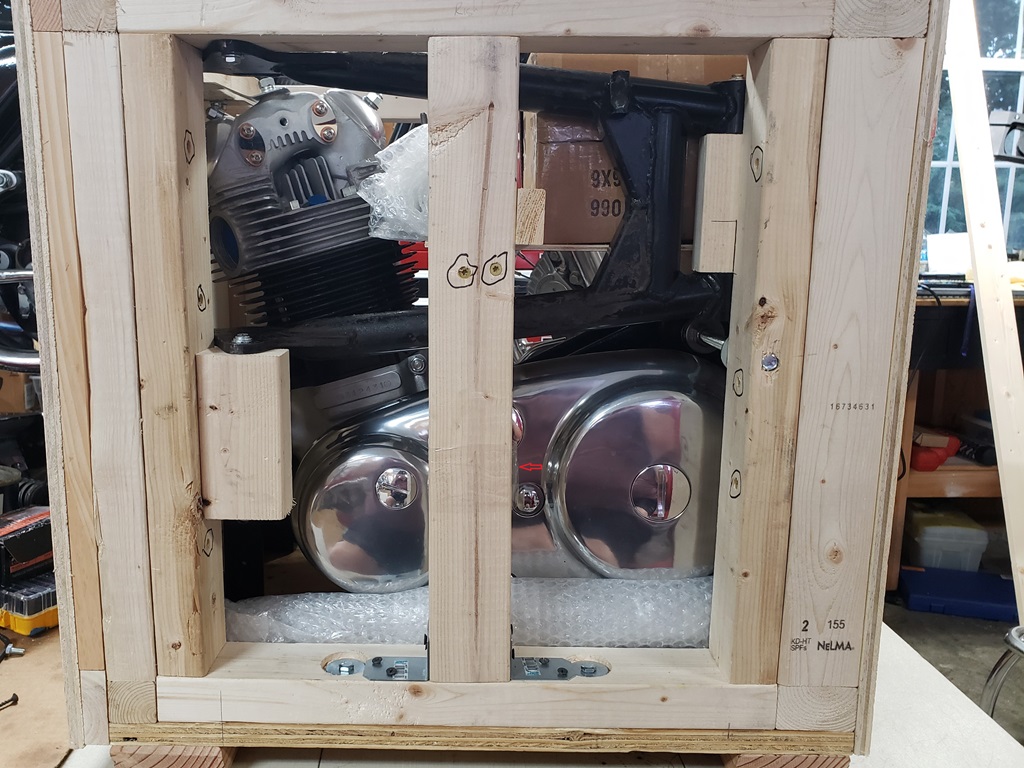
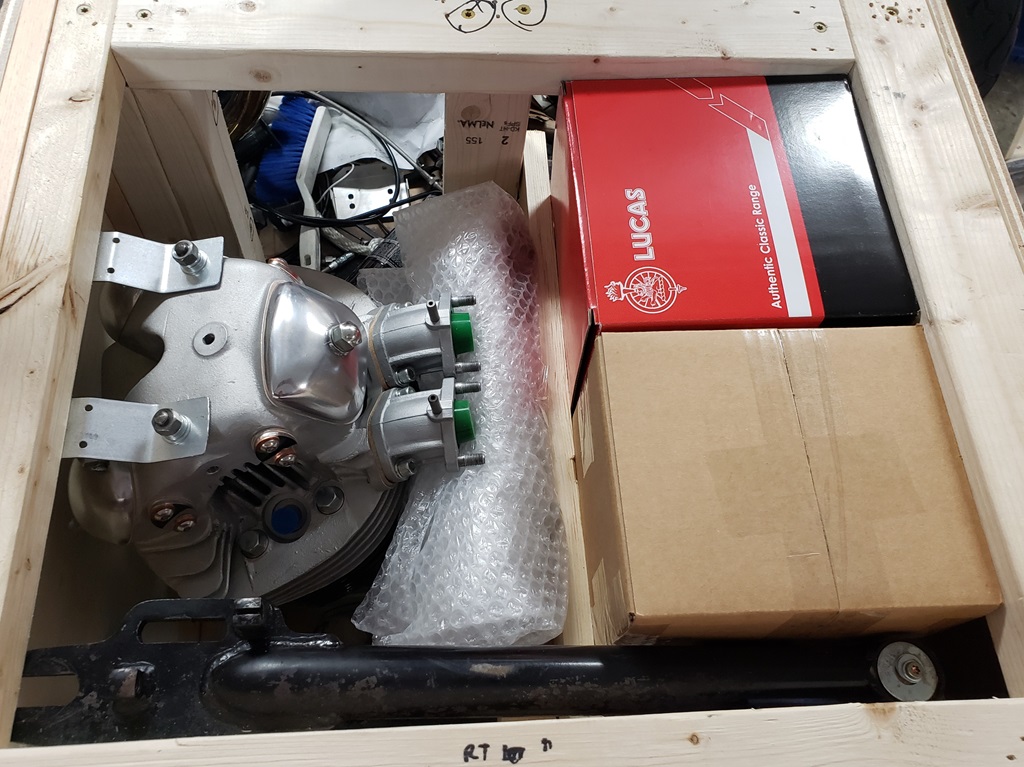
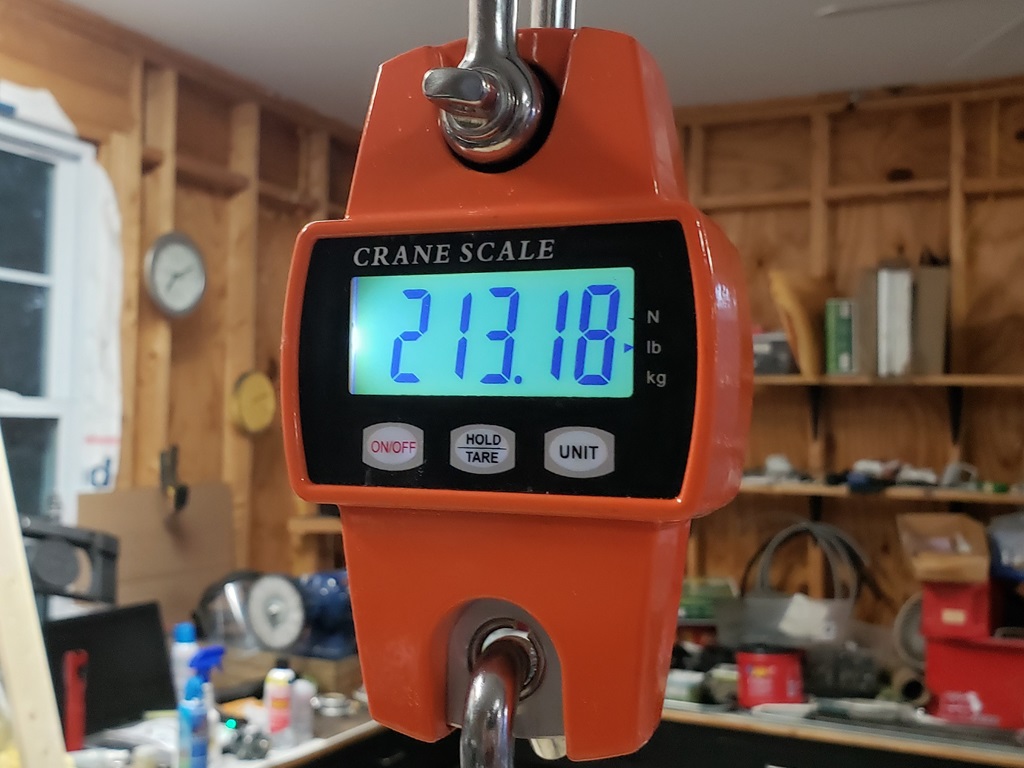
March 16, 2024 Basically done! The top only has two screws because I need to find out if any paperwork must go inside the crate - different countries have different rules. I rigged it to weight it and then to take down off the bench. The second picture shows the weight. I'll go with 215 pounds. More screws in the top and the shipping paperwork will get it close to 214 and there are big penalties for the weight being wrong so a little padding is good. My shop is so packed that I'll have to move a bunch of stuff to be able move the hoist while it's in the air and set it down - too tired today to do that. Also, have to find some place OT put it until I can get it picked up. One of the bikes waiting for me will go on the bench this is coming off of.
April 19, 2024 Shipped today!
After all the hand wringing trying to figure out the shipping we went with the buyers original company. It was probably a little cheaper and much faster via UPS or DHL, but they were both unresponsive.
UPS was unable on line to accept the proper address and insisted the post code was 100KM from the buyer's address! Everything else was good but many attempted communications never got that resolved.
DHL would not give details on the cost - they would just say the general cost, nothing about brokerage fees, insurance, or anything else so actually getting a price was impossible. When I shipped to France, it was under 150 pounds and I used UPS - simple - never needed to talk to anyone, just set it up on-line, printed the docs and attached to the crate (Door to Door service).
Next time, I'll start with the crate must be under 150 pounds whatever that takes. to France it was just under 150 pounds and separate box that was around 30 pounds. the overall cost was under $1000 and it took 5 days if I remember right.
|